
Melly Sews: Pickup Skirt Tutorial. Hello there!
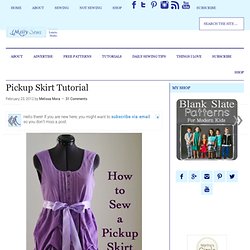
If you are new here, you might want to subscribe via email so you don't miss a post. Today I’m going to share my pickup skirt tutorial I have been obsessed with pickup skirts lately. From the Mountain Laurel Dress to the skirt with the His & Hers Henleys to the Fairytale Seersucker Dress, to pins from my Women’s Clothing Fashion Inspiration board on Pinterest, I’m all about the pickup skirt. My apologies that you’re going to see photos from both the His & Hers Henley Skirt and the Mountain Laurel dress. First, you need both your skirt and your lining. I know the lining looks kind of like a straight skirt in the pic above, but it was actually flared. Next, sew a gathering stitch around the bottom of the skirt. Sew around the bottom. For a poufier skirt, like the Henley Skirt, add some netting between the layers.
Now gather the top edge of the skirt to match the top edge of the lining. Creating, cutting and printing your own woodblock. Here's the basic process for buying tools, cutting a woodblock, inking and then printing with it.

I've actually been trying to find a way into printing for a while, but don't have any access locally to equipment or classes. I finally came across Louise Woods' awesome book entitled " Practical Printmaking" and realized I should just get on with something, rather than waiting for the perfect opportunity to show itself.
She describes pretty much all the printing processes, with equipment lists and great photos. I'd definitely recommend that book if you're looking for a proper, practical explanation of general printing techniques. I picked woodblock as the technique I wanted to learn since it requires very few tools and the piece of wood itself is typically small, so there's very little mess and the whole thing is easy to do on the kitchen table. As background, it's worth knowing that there are basically two ways of doing relief printing with bits of wood, woodcut and woodblock. Craft Ideas and Homemade Gifts / Origami Bows. Needlepoint Lace Tutorial « textile dreams – fibery wake up. This tutorial will show you how to create a small piece of needlepoint lace.
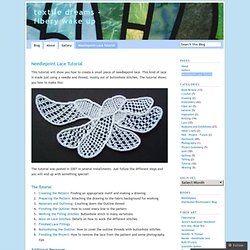
This kind of lace is made just using a needle and thread, mostly out of buttonhole stitches. The tutorial shows you how to make this: The tutorial was posted in 2007 in several installments. Just follow the different steps and you will end up with something special! Macaron Coin Purse. Just can’t help for not sewing these sweet little macaron coin purses when one of Craft Passion’s Facebook fans showed them to me.
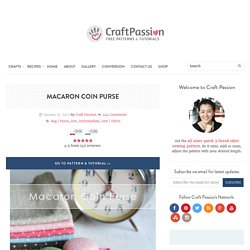
Thanks to XYZZhandmade for her inspiring handmade and some tutorial links in Japanese, this, this, this and this. No, I can’t read Japanese but I can guess from the pictures on how to sew it. Here is the English version of tutorial on how to sew this macaron coin purse where I have added more details in the sewing. The space inside the coin purse is quite limited but good enough to place some small jewelries like ear rings, rings; may be to keep some small coins, folded money; a place to keep small piece of note that wrote your shopping list and reminder etc. Or, simply use it as a key chain or hanging ornament. I have tried both nylon and metal zipper, each gave different feel and effect on the macaron coin purse. Furoshiki Gift Wrapping. Black Apple Doll. Hand-Embroidered Type Designs by Maricor/Maricar. Wired Needlelace Elements for Stumpwork. Whilst I was working the stumpwork poppy recently, I took some photos of the technique for one of the petals, which I thought may be of interest to anyone who wants to know how to create a wired element for a stumpwork piece using needlelace.

(I'll do a fabric based one later on.) The first step is to create a wire outline for your selected shape. In this case, I had the printed guide in the kit to help me, but you could also be working from something in a magazine, book or even your own drawing. Naturally, it needs to be the exact size and you simply bend the wire to fit. It doesn't have to be too exact a fit at this stage. The next stage is to couch the wire shape to a needlelace pad. Fasten on a length of thread by simply taking the needle under the couching stitches along one side of the shape.
Continue until the first row is done and, oh, don't pull these stitches too tight or work them too close together. Clay Figures on the Behance Network. Worth Pinning: Make your own paper boxes. When I was my daughter's age, my mom used to make these pretty little paper boxes out of wrapping paper.
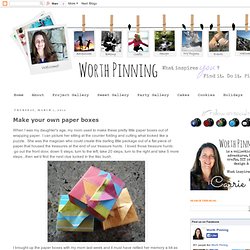
I can picture her sitting at the counter folding and cutting what looked like a puzzle. Little Livingstone: How to Make a Leather Leaves Necklace. What you need: Soft leather piecesAwl (or something sharp and pointy =)PliersScissorsGluePre cut chain2 0 ringsleaf template first, cut a simple leaf template from card. mine is 2 inches long by about an inch wide. use your template & cut out 4 leaves from your leather take your first leaf and turn it on its side, next, you need to fold the leaf in half& pinch it together over on the right side.

Martin Urmston : Handwood Furniture. Pintuck practice. I am making a blessing dress for baby Ruby (which may or may not actually be her name. We started calling her that a while ago, and I think it will stick, but don't hold me to it). Normally when I start a new project, I just wing it, but a blessing dress is special. It should have french seams and pretty details and not look like mom made it all willy nilly. I decided this was going to require some research and practice. Step one, the research (borrowed from my mother-in-law): There is a newer version available, but I am digging the retro 1979 copy. Step two, the practice (diamond pintucks): Burnishing, Blending and Layering Techniques. Crochet, sewing, knitting, etc. / crochet.