
Free Maya Tutorials. The Hobbit Guy: Dave K's Poly Head Modeling Tutorial. Joint_Tutorial_v2.0. Creating Easily Animatable Tank Treads. Program(s): Maya Creating easily animatable tank treads After modeling most of my Marder III model I came across the problem of creating the treads.
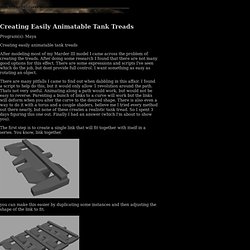
After doing some research I found that there are not many good options for this effect. There are some expressions and scripts I've seen which do the job, but dont provide full control. I want something as easy as rotating an object. There are many pitfalls I came to find out when dabbling in this affair. The first step is to create a single link that will fit together with itself in a series. You can make this easier by duplicating some instances and then adjusting the shape of the link to fit.
Ok now that you have a good link you can delete those instances. Now what we are going to do is duplicate this setup for each link needed, I calculated that I will be needing 93 links to go the full way round for my tank. Presentation. Image converted using ifftoany. Randomly Shuffled Texture Tiles. This image was created with 3 randomly shuffled tiles.
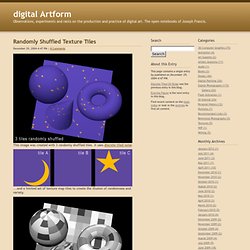
It uses discrete tiled noise ...and a limited set of texture map tiles to create the illusion of randomness and variety. Let's begin. Set up some discrete tiled noise as described here. Or simply download the Maya 6 scene file discreteNoise.mb from here. Breath Vapor Simulation in Maya. More and more, cold weather scenes are being shot in mild climates, or in enclosed studios for budgetary, temporal and comfort reasons.
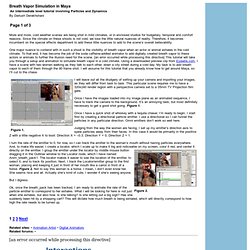
Since the climate on these shoots is not cold, we lose the little natural nuances of reality. Therefore, it becomes incumbent on the special effects department to add these little nuances to add to the scene’s overall believability. One major nuance to contend with in such a shoot is the visibility of breath vapor when an actor or animal exhales in the cold climate. To that end, it has become the job of the soda caffeine-addled animator to add digitally created breath vapor to these actors or animals to further the illusion need for the scene. [an error occurred while processing this directive] This tutorial will take you through a setup and animation to simulate breath vapor in a cold climate. I will leave out all the drudgery of setting up your camera and importing your images, as they will differ from task to task. 3d Tutorial. Maya Tutorials.
Human skin shading. This could be the single biggest hurdle in realistic cg since Gouraud shading... :) ...as for me, I've been wrestling with this since -95.
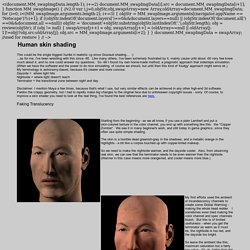
Like many others, I've been extremely frustrated by it, mainly cause until about -00 very few knew much about it, and no one could answer my questions. So -99 I found my own home-made method, a pragmatic approach that sidesteps simulation. (When we have the software and the power to do nice simulating, of course we should, but until then this kind of 'kludgy' approach might serve ok.) My terminology is astronomy-based, because it's clearer and more concise: Dayside = where light hits Nightside = where light doesn't reach Terminator = the transitional zone between night and day Disclaimer: I mention Maya a few times, because that's what I use, but very similar effects can be achieved in any other high-end 3d software.
Faking Translucency So we need to make the nightside warmer, and the dayside cooler. Worldofmaya.com. About The following tutorial shows how to use lens shaders with mental ray for maya.
You'll need the mental ray for maya plugin and you have to activate the custom mental ray nodes. You can do this by activating the environment variable "MAYA_MRFM_SHOW_CUSTOM_SHADER" with an value of of 1. If you're using Windows, go to System Control / System / Advanced / Environment Variable and create a new variable called "MAYA_MRFM_SHOW_CUSTOM_SHADER" and set the value to 1. go up Stage 1 First create a line of objects and a camera so you can test the depth of field (DOF) effect. Jittered Tiles. Continuous noise in red and green, when applied to the offsetU and offsetV attributes of a tiled UV map, can create the impression of "digital ripple glass.

" Download continuousNoise.mb Maya 6 scene file Discrete noise, when similarly applied, can shake a repeating array of UV-mapped textures seemingly "out of its grid," adding variety to your 3D CG work. Download discreetNoiseUV_8.mb Maya 6 scene file The idea is to cause discrete noise to become tiled at the same rate as a texture map is tiled. If the noise is red and green, and if red and green are connected to the offsetU and offsetV attributes of a place2dTexture node, then the tiles can be "jittered" out of place. Some Caveats You don't have to use a ramp as your tile texture. If you "turn up the dimmer" too high, you will knock the textures into the borders between "cells" and destroy the illusion.