
Coffee Filter Rose Tutorial - Emmalee Elizabeth Design. I’ve had some requests to do a tutorial on the coffee filter roses I made for my wedding.

So here it is. Like I said they really are easy once you get the hang of them. A bit of practice and you’ll have beautiful roses in no time. The supply list is simple. You will need: floral wire 22–24 gauge white cone shaped coffee filters floral tape scissors pen Petal template (Martha Stewart and Cassie Mae Chappell have a great one, click here to download it) Trace the petal patterns onto the coffee filters and cut them out. Tip: Make sure that you keep the different petals separated. So this is where the explanation gets tricky, so bear with me as I try to explain it the best I can.
Tip: Make sure that you wrap each petal with enough tape to secure it tightly. Rip open petal #2 at the seam, leaving one side still connected. Pedals #5 and #6 require two steps so that they stick securely to the stem. DIY Idea: High-Impact, Low-Cost Wall Art! When I first spotted this image on Flickr, I fell in love with the idea immediately.
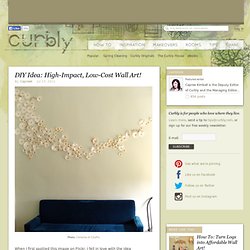
What a beautiful installation this would make in a guest room, living room, or even the master bedroom! It's soft and whimsical, crafty and nostalgic all at the same time. Can you guess what it's made of? Christine of CityPix snapped this image in a local cafe, inspired by the simplicity and beauty of the wall installation. Adapting this concept into your own home decor would be a piece of cake! So, what do you guys think of this idea? Everyday Mom Ideas: Scrap Paper Tree Centerpiece Tutorial (Featured guest blogger)
Hi there! I'm Sharon from Two Girls Being Crafty, and I am so delighted to be today's guest blogger on Everyday Mom Ideas! Thank you so much, Julia, for having us. My co-blogger, Tristin, and I create fun and inexpensive crafts that anyone could do. Our goal is to inspire. So come check us out! Today I would like to share with you all our newest craft. This simple project uses scrapbook paper leaves to create a bright and cheery Spring ambiance for your home. First, drag out your unseemly healthy assortment of scrapbook paper scraps.
Cut out a template of your leaf from the cardboard (you can also use chipboard or card-stock). Take your floral wire and cut strips anywhere from 5"-8" long. Lay down some newspaper next to your workspace. Now for the fun part! ...or make them funky. And you're done! Thanks again, Julia, for having us here today! Paper Flowers – Anyone Can Do That. Japanese Kusudama, this tutorial is featured on Craftuts Anyone can do that, I assure you.

The proof: I can, just take a quick look at my result below. And, believe me, I am neither meticulous nor particularly patient. Pictures. Beautiful boquet. Hanging. How to peony. Roses. Book paper rose. Pics. The perfect line: 8 DIY Gifts You Can Make Under $5. Gifts are an expression of love and care for friends, family and people we care about.

Gifts are best when time and effort have been made in selecting them according to the likes and dislikes of the recipient. Self made gifts are coming back into trend. More and more people like to make gifts themselves for people they care about. It's a very sweet way of showing love and concern. How to make a personalized gift for someone as well as keeping it all in a strict budget? Paper Flower Bouquet DIY Flowers light up an otherwise dim and dull corner. Glitter Bottles These are perfect decoration items for a party.
No Sew 5-Minute Lace Bow I've always wanted one of these to go with every color. Printed Candles DIY I find candles very romantic. Braided Bead Bracelet You can never get enough of bracelets, that's for sure! Handwritten Printed Plate DIY. Paper Carnations" Paper carnations are a perfect introduction to paper flower crafts.
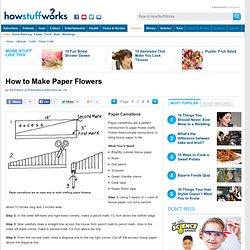
Follow these simple instructions to bring tissue paper to life. What You'll Need: Brightly colored tissue paperRulerDull pencilScissorsGreen chenille stemsClear tapeGreen florist tape Step 1: Using 3 layers of 1 color of tissue paper, cut out a section about 12 inches long and 3 inches wide. Step 2: In the lower left-hand and right-hand corners, make a pencil mark 1/2 inch above the bottom edge. Step 3: Now carefully draw a straight line across the tissue from pencil mark to pencil mark. Step 4: From the second mark, draw a diagonal line to the top right corner.
Step 5: All the way across the tissue paper, make narrow cuts from the top diagonal edge down to the straight line across the bottom. Step 6: Place the top part of the chenille stem in the corner of the short end, and tape it down. Step 7: Roll the pipe cleaner toward the long end. Step 8: When done, tape the bottom edge of the tissue paper down.