
Explore more. Web pages, photos, and videos. Trash to Couture original DIY tutorials Click on the links below the pictures to see the page.

Explore more. Web pages, photos, and videos. Immediately after removing the paper, place it in a pan, and pour water over it.
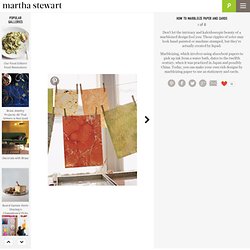
Hang paper to dry, marbleized side up. Do not touch the paper until it is dry (typically within 2 hours, depending on humidity levels). Decide whether to keep or discard your solution (it can be used several times). To change paint colors, lay strips of newsprint across the solution's surface, then remove; repeat with clean strips until the solution is clear.
You can store the solution in an airtight jar for about a week. Make something monday. The ombré trend has stolen my heart this year as it has with so many of you I am sure.

I can't resist the subtleness of it, so bohemian and soft. I bought some Rit dye earlier in the summer and had fun experimenting with a few projects and came away with this easy infinity scarf using only dye and an XL white t-shirt. It's really the perfect early fall piece to add into your wardrobe as the weather starts to change and this thing is a snap to make. Here is what I did: Supplies: Rit dye - I used liquid rubber gloves XL white t-shirt bowl for dying scissors. Carry on...Carry on...: DIY Lanvin-inspired Pearl and ribbon necklace. Supplies- Satin Ribbon-I used two different sizes but you don't have to.
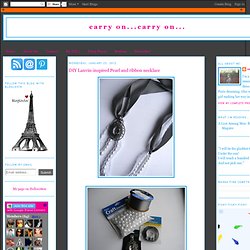
Large rhinestone pendant Assorted sizes of pearl beads Beading thread Thin lace trim First I started by beading the pearls onto the thread. I did a graduated beading to add some interest. I beaded the pearls with the thread still attached to the spool, this way I could make sure I had enough length. Continue beading the large pearls and then begin incorporating the small pearls again working back up to the large pearls. Once your done beading, tie a knot large enough for the beads to not move around on each end. Then I took about a yard of ribbon and laced it through the loop of the pendant. Double Strand Lace Headband. Today’s headband DIY is how to make a Double Strand Headband.
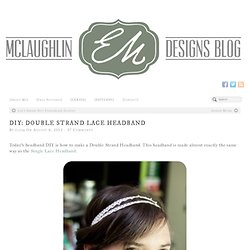
This headband is made almost exactly the same way as the Single Lace Headband. All you need is 36 inches of lace or ribbon 1 inch width or narrower. I used 1/2 inch width lace from Joann’s Fabrics. 3 1/2 inches of braided elastic 3/8 inch width or larger. Cut the lace so that you have two strands that are 18 inches long. Lay the end of one length of lace over the other as the picture shows. After you have the ends lined up lay the elastic over the top so they overlap by 3/4 of an inch or so. Then with a sewing machine or by hand stitch across the two layers of lace and the elastic. After you have sewn one side do the same to the other side. Watermark Tee by Sweet Verbana. Hello U-Create readers!

I am so excited to be guest posting here today. It just so happens to be my first guest post and I'm still a little shocked that it's here at Ucreate, one of my favorite blogs! A little bit about me.. I'm from a little town called Keller, Texas. I'm a junior at Texas A&M University (whoop!). I'm working on my education degree and expect to be an elementary school teacher in just two short years. When I'm not busy studying for classes, I love to sew. I just started blogging in May and have already met all kinds of wonderful women, I hope you'll stop by and say hi too! Watermark Tee Tutorial. Single Loop Lace Infinity Scarf Tutorial. Materials: 1/ 2 yd Lace 1/2 yd Backing Fabric Matching thread (ignore the elastic thread shown in the pic) Tutorial: My original intention for this project was a shirred waist skirt.
Begin by cutting your lace and backing fabric into 18" x 45" rectangles. Sew along each 45" side Turn inside out and you'll have something like this: Bring the two ends together and pin the lace fabric right sides together. Sew with a 1/2 inseam. Turn the scarf inside out so that the seams are exposed and pin your backing fabric right sides together. Sew as shown below (with a 1/2" inseam), leaving about a 4 inch gap opening. Turn scarf right side out through your gap and secret stitch the opening. And done! Maybe not as cute as the skirt I had envisioned, but pretty darn close!
*Update* Yoga Pants. *This tutorial was featured for National Sewing Month 2012 at FaveCraftsBlog!
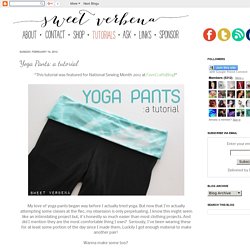
* My love of yoga pants began way before I actually tried yoga. But now that I'm actually attempting some classes at the Rec, my obsession is only perpetuating. I know this might seem like an intimidating project but, it's honestly so much easier than most clothing projects. And did I mention they are the most comfortable thing I own? Wanna make some too? *Note* A serger is recommended but certainly not required for this project. Assume 1/4" seam allowances. Materials: A pair of well-fitting yoga pants (to copy a pattern from)