
Inspired by Yulia Brodskaya. I can't get over how amazing these are.
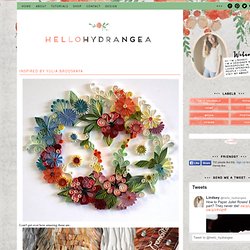
I wouldn't be surprised if Yulia invented quilling. She is a 28 year old artist from Moscow who creates beautiful designs from vertical pieces of thin paper and her website is full of inspiration in color, line, shadow and technique. You don't have to be a fellow quiller to wish you were like this great lady. Even though her pieces would be amazing if they were drawn, it was the fact that they are 3d that caught my attention.
I imagine one of her expert pieces would take hours, which I do not have... When my husband and I were engaged, I bought wooden letters to spell out 'save the date' and covered them with different patterned paper. The BEST Play-Dough Recipe. Have you ever made play dough and it just fell apart??

Well… not this time. This recipe will make play dough that is seriously the closest thing to store-bought you’ll ever make. No falling apart or drying out (as long as stored in a sealed container). It will last up to 6 months.The secret to this recipe?? Two things: First, Cream of Tarter… it’s what helps the dough stay together. and Second, not a lot of salt… all that salt dries out your dough! Ready to make it? Ingredients: 1 C Flour 1 C Water 1/4 C Salt 1 TBSP Vegetable Oil 2 tsp Cream of Tarter Food Coloring (actual coloring or a kool-aid packet will do) Sparkles (If you wanna be a fun mom!) Pour in all ingredients.
Stir until everything is mixed well. Once the mixture is (mostly) clump free. Stir. Stir, Stir Stir.Just keep stirring until the Play Dough is formed. Remove from heat, and knead by hand. Holder for Charging Cell Phone (made from lotion bottle) IMG_1349 – Make It and Love It. Light&Spoon - StumbleUpon. EDIT 11/5/2012: We are no longer selling custom crayon pieces in our Etsy shop.
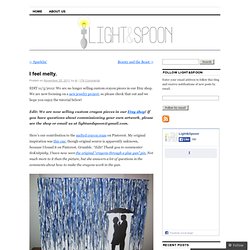
We are now focusing on a new jewelry project, so please check that out and we hope you enjoy the tutorial below! Edit: We are now selling custom crayon pieces in our Etsy shop! If you have questions about commissioning your own artwork, please see the shop or email us at lightandspoon@gmail.com. Here’s our contribution to the melted crayon craze on Pinterest. My original inspiration was this one, though original source is apparently unknown, because I found it on Pinterest. Anyway! He filled in in with marker, and then we taped some saran wrap around a piece of cardstock to make a run-off barrier for the top of the umbrella. We pulled out all the blues and greys from three boxes we got on sale for $2.50 each at A.C.
Then it was just a matter of putting the crayons through the gun–the pretty-but-stupid impulse-buy glue gun that barely works, so I didn’t ruin my good one. V and Co how to: jersey knit bracelet - StumbleUpon. I don't know what it is about this time of year that makes me just want to have my bare feet in the sand, be watching the sun setting into the ocean, and breathing in the warm salty air of the beach...as i get older, more and more i find myself missing that place i used to go to almost every.single.day. as a teen.
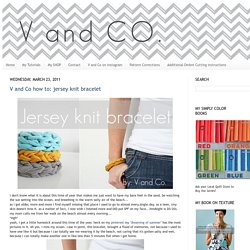
(my skin doesn't miss it. as a matter of fact, i now wish i listened more and DID put SPF on my face...hindsight is 20/20). my mom calls me from her walk on the beach almost every morning... *sigh*yeah, i get a little homesick around this time of the year. heck on my pinterest my "dreaming of summer" has the most pictures in it. ah yes. i miss my ocean. case in point. this bracelet, brought a flood of memories, not because i used to have one like it but because i can totally see me wearing it by the beach, not caring that it's gotten salty and wet, because i can totally make another one in like less than 5 minutes flat when i get home.
*sigh* okay... *cut off excess tails! Perfect Summer Bangle - StumbleUpon. Here's a fun tutorial on how to make a message bangle that's one-of-a-kind, done in the sun, waterproof and weatherproof.

Even after several trips to the beach, it won't fade or wash off! Essentially, it's the Perfect Summer Bangle. Used in this tutorial: Inkodye Red Prepare. All you'll need for this project is a raw wooden bangle (we got ours from DIYBangles.com), a black paint marker, plastic wrap, and some Inkodye! Stencil with freezer paper (harry potter tee)... - StumbleUpon. Yes, I am a nerd.

I came up with a brilliant idea for a Harry Potter t-shirt and I couldn't resist. "Expecto Patronum! " However, you can make whatever kind of design you want with a freezer paper stencil. Crayon Hearts - Martha Stewart Crafts - StumbleUpon.