
Molded Papier-Mâché Form. David Coffin Photo: David Coffin by David Coffinfrom Threads #75, p.40 The best thing about the poured-foam form that you make from a surgical-plaster cast or mold is that the mold makes a very accurate copy of your body contours, complete with distinct collarbones and shoulder blades.
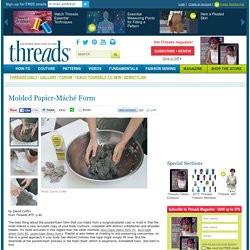
It's more accurate in this regard than the other methods (duct-tape dress form #1, duct-tape dress form #2, paper-tape dress form). Account Suspended. A couple months ago I came upon a tutorial on The Artful Parent for Kool-Aid Dyed Playsilks.
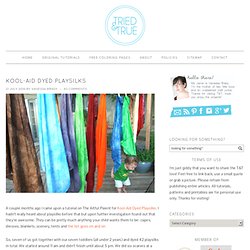
I hadn’t really heard about playsilks before that but upon further investigation found out that they’re awesome. They can be pretty much anything your child wants them to be: capes, dresses, blankets, scenery, tents and the list goes on and on. So, seven of us got together with our seven toddlers (all under 2 years) and dyed 42 playsilks in total.
We started around 11 am and didn’t finish until about 5 pm. We did six scarves at a time, with the other mothers pitching in to watch the child of whoever was working on their playsilks. After we did the first batch of Kool-Aid packets, some of the mothers decided to get a bit creative with color combination and as a result we ended up with 14 different color at the end of the day. Edit: Here are a few answers to some of the more popular questions posted in the comments. Easy as 1 2 3. So you guys know that I'm a big dork right?
Yeah like it's a big secret or something... this chick here (pointing at myself)... she's a DORK!! I was talking with Jeanne the other day.... ok by talking I mean emailing... Kimono pjs tutorial. Assembling it here to put on Craftster.
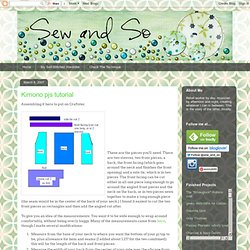
These are the pieces you'll need. There are two sleeves, two front pieces, a back, the front facing (which goes around the neck and finishes the front opening) and a side tie, which is in two pieces. The front facing can be cut either in all one piece long enough to go around the angled front pieces and the neck on the back, or in two pieces sewn together to make a long enough piece (the seam would be in the center of the back of your neck.) I found it easiest to cut the two front pieces as rectangles and then add the angled cut after. 70CM Cosplay Straight Wigs. Gakupo Kamui Cosplay Wig Version 03. 1. All character wigs come fully styled. 2. All wigs are one-size-fits-all, and are adjustable. 3. Depending on your computer's color resolution, some of our product's colors may appear different from the actual product. Dresses :. #5331 Asian dress.
Difficulty: ** You will need: silk, satin or brocade fabric; fusible interfacing; invisible zipper (refer to your pattern for zipper length); bias tape; 3 rayon braid frog closures.
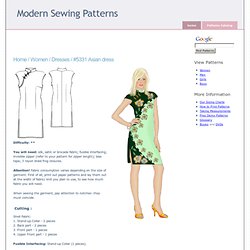
Attention! Fabric consumption varies depending on the size of garment. First of all, print out paper patterns and lay them out at the width of fabric/ knit you plan to use, to see how much fabric you will need. When sewing the garment, pay attention to notches- they must coincide. The Convertible "Infinity" Dress: How it almost defeated me, and ... I made this thing.

It’s pretty cool. It’s a convertible dress that’s basically a circle and two straps, so it’s really easy, inexpensive, and crazy versatile. It’s been around forever and everyone seems to love it (in fact, part of the reason I’m posting this is to answer some questions for people I’ve run into), and I can hardly believe how close I came to not making it at all. I first found the instructions at a blog called rostitchery, and then I came across a second set at Cut Out + Keep. It sounded so easy. So I bought some material, spread it out in the living room, cut out my pieces, and… …stopped. I didn’t understand the next step. Turn the skirt inside out? How to Make A Dress from Tshirt - Video - StumbleUpon. Tutorial: how to sew a simple maxi dress & Bored and Crafty. The Plan.
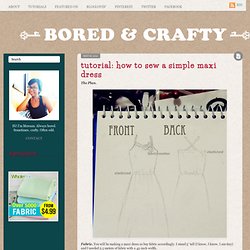
Fabric. You will be making a maxi dress so buy fabric accordingly. I stand 5′ tall (I know, I know, I am tiny) and I needed 2.5 meters of fabric with a 45-inch width. Preparation and Cutting. Sewing. Don’t forget the banana. Makeup Mon...errr Tuesday: Green Eyes. First, I know it's Tuesday and I'm predictably late with Makeup Monday.

I hope the lack of alliteration doesn't detract from the post; I promise that I have lots of great excuses for not putting this up yesterday. Or, I fell asleep. One of my first forays into the wonderful world of bright eyeshadow was with a beautiful shade of green from Milani (whose older shadows were amazing), and I was forever hooked. Green has since become the most popular color in my rather large makeup collection, though I can't remember the last time I gave them a proper spotlight.
That was rectified immediately, upon my recent purchase of the Urban Decay Black Palette, which has a beautiful dark emerald that was surprisingly missing from my arsenal. Quickie, How-to make a Camisole, Threadbanger. Want to make an exact replica of your body for custom work? Yesterday we set out determined to make our own dress forms for the Etsy Labs and thought we'd share the love with you guys if you want to make one of your own or just laugh at our own trails with the duct tape!
Materials: A large T-shirt that fits below the bum that will be cut up and destroyed in the processAnother small piece of discard able cloth (a paper towel will do)At least two 45 gram rolls of duct tapeA pair of sharp scissorsCardboard, and cardboard tubingSomething to stuff the form with (peanuts, foam, polyfil, old clothes, be creative)A helperHere's what ya gotta do:Step 1Put on large T-shirt and have your helper begin to wrap the roll of duct tape around your body.
Make sure the tape is somewhat smooth and that there are no gaps in between wraps. Stop wrapping once the bust is reached. Step 2Cut several strips of tape from the roll and apply them it a vertical pattern along the curves of the bust for most natural looking shape fit. How to Hem Pants. How to Dye Your Clothes. Majesticfulness. How to Sew a Dress Part 1: Cutting the Pieces. Pillowcase Sundress : Daily source of DIY craft projects and...
By Nikol Lohr Sundresses made of cute vintage pillow cases aren’t just for little girls.
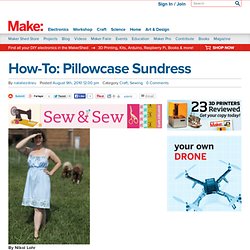
If you have a pair of pillowcases, you can make a dress that fits up to a size XL. Look for pillowcases in solid colors or that aren’t too worn out. Thin white cases mean you’ll either need to line them (just cut out some washed white cotton in the same shape as your skirt pieces and sew double layers), or relegate the resulting see-through dress to nightie status. Materials 2 pillowcases, preferably with fancy cuffs, pressed standard/queen for a short dress; king for a longer dress Sewing machine Scissors Straight pins Safety pin Thread Iron Note: I used a serger to finish edges and to sew the simple seams, but it’s not really necessary.
Directions Step 1: Turn pillowcases inside-out and trim short seamed sides. Step 2: Measure 4″ in from corner near other seamed edge on first pillowcase. Step 4: With right sides facing, fold one of those pieces in half lengthwise. Step 18: Snip off two 3″ pieces.