
How To Mix Chalkboard Paint in Any Color. We love using chalkboards as backdrops for displays and parties (like this one here!).

So we were super excited to learn that you can create your own custom colors-and it's really easy! We first learned how from Martha Stewart whose tutorial you can read here. She recommends that you use latex paint, but we tried it out with acrylic paints with much success. Here's how you too can create your own chalkboard paint... Supplies: 1/2 cup acrylic paint (choose any color you like, or mix colors together to make the perfect shade!) 1. 2. Once your chalkboard has fully dried be sure to slate the surface before using it for the first time. Have fun creating any color combination you like!! How-To-Paper-Rosette.pdf (application/pdf Object) Perfect Summer Bangle. Here's a fun tutorial on how to make a message bangle that's one-of-a-kind, done in the sun, waterproof and weatherproof.

Even after several trips to the beach, it won't fade or wash off! Essentially, it's the Perfect Summer Bangle. Used in this tutorial: Inkodye Red Prepare. All you'll need for this project is a raw wooden bangle (we got ours from DIYBangles.com), a black paint marker, plastic wrap, and some Inkodye! How to Make Clothing Buttons from Shrink Plastic… This tutorial is an old one of mine that’s too good not to share again.

Since posting the first time, I’ve had lots of questions about these buttons which will hopefully be answered in this revised post. Equipment Some handy notes: 1. The buttons. Single hole, hole punch (like this one here). 2. 3. Okay.. lets get started! Tracing tips: You can use either coloured pencils or permanent pens. Words must be writted backwards in order to be readable. Shrinking the buttons: To shrink the buttons, you can use an oven or a heat gun (the kind used for embellishing). After the buttons have twisted and twirled, and are LYING FLAT, it’s time to take them out. Note: If the skrinking is taking too long, you may need to turn your oven up. Here’s a short little stop-motion to make sure you’ve got the gist of how easy this is! Bubble Printing Fun!!! This weekend we were doing bubble activities galore: playing and printing with bubbles.
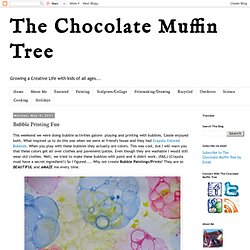
Cassie enjoyed both. What inspired us to do this was when we were at friend's house and they had Crayola Colored Bubbles. When you play with these bubbles they actually are colors. This was cool, but I will warn you that these colors get all over clothes and pavement/patios. Even though they are washable I would still wear old clothes. First you need some water, tempera paint, and dish soap. We mixed about a 1/2 cup of water, 2 Tablespoons of paint, and a few squirts of dish soap in each container. Then add a straw to each container and make sure you blow into the mixture.
Once you have a huge bubble foam on the top of the container you are ready to lay a paper on top to print the bubbles. Here is our best bubble print.... we made lots and lots. I made the bubble prints into cards. Now back to blowing bubbles and trying to catch them. Have FUN Exploring Bubbles What is your favorite bubble activity?