
Wednes-diy. UPDATE: This post originally ran on March 23 2011, but with summer winding down we wanted to bring it back up for some late summer inspiration!
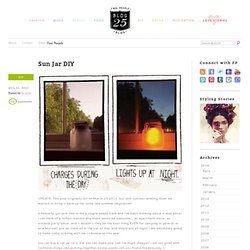
A fellow fp girl sent this to me a couple weeks back and i’ve been thinking about it ever since! I can think of a million reasons why these would be awesome… as apartment décor, as outdoor party décor, and – wouldn’t they be the best thing EVER for camping in general or at a festival? Just let them sit in the sun all day, and they’ll last all night! I am absolutely going to make some to bring with me to bonnaroo this year. you can buy a sun jar here, but you can make your own for much cheaper! What you need: a mason jar with a clear glass lid like this one from ikea, a solar garden light like the ones pictured above, which i found here, adhesive and glass frosting spray. start by spraying the inside of the jar with the frosting spray – this will help diffuse the light and give it a warm glow. don’t spray the lid though!
Last image. Magical Mason Jars - Style Lush. Mercury! FIND ME AT MY NEW HOME - LAVISHYOU.COM Maybe it is just me, but I have noticed that mercury glass is everywhere this season!

I think mercury glass is timelessly beautiful, even if it is a cheaper substitute for silver. And while looking through the West Elm catalog, I saw some mercury glass vases and thought to myself...I can make that! So, this is my West Elm knockoff mercury glass vase how-to. Here is my inspiration picture: What you will need: silver leaf, adhesive, umber glaze (I didn't have this and used antiquing glaze), a sponge brush, and a glass vase that you can stick your hand into. Let's get started! Step 1 - Adhesive. I added the antiquing glaze to the adhesive for the plain glass and created a major fail. Step 2 - Dry time. Step 3 - Silver leaf. It was hard to hold the camera in one hand and silver leaf with the other.
Step 4 - Brush it off. Step 5 - Glaze. My original plan was to leave the ridged vase plain, no antique glaze. Project cost breakdown: Make a Lunch Box from a Milk Jug. Inspired Entertaining: DIY Chalkboard Wine Glasses. Last month I got an email from one of those "deal of the day" websites featuring a very cute set of wine glasses with chalkboard stems from a company called Chalkboard China.
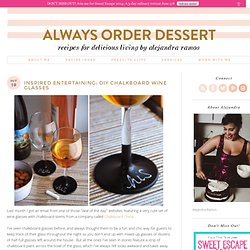
I've seen chalkboard glasses before, and always thought them to be a fun and chic way for guests to keep track of their glass throughout the night so you don't end up with mixed-up glasses or dozens of half-full glasses left around the house. But all the ones I've seen in stores feature a strip of chalkboard paint across the bowl of the glass, which I've always felt looks awkward and takes away from the beauty of the wine or beverage in the glass. What I like about this version is that the writing part is at the bottom on the stem and foot of the glass, so it doesn't compete with the beverage. I also like that the simple black foot on the glass is in itself an elegant design element, and would work just as well with no writing on it.
So I figured, "I can totally make that myself! " Materials 1. 2. 3. Method Step 1. Glass Etching. Have you ever done any glass etching?
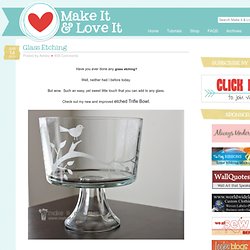
Well, neither had I before today. But wow. Such an easy, yet sweet little touch that you can add to any glass. Check out my new and improved etched Trifle Bowl. The perfect bowl for desserts of all kinds…..and even a great place for fresh fruit on the counter. Glass etching is also a great way to stamp your name on your pyrex dishes, to make sure they come back to you. And how about adding a little extra detail, just because…… (Edited to Add: The font used here is called Smiley Monster and I downloaded the font for free here.) Sweet in every way. Are you wanting to make your own? (This technique permanently etches your glass. Cutting glass.