
Intermedia-Advanced Face Rigging. Intermediate-Advanced Face Rigging for 3ds max by Athey Moravetz Written 11-01-07 Overview This tutorial will cover creating custom facial rigs using morph targets, controller shapes, and the Reaction Manager. This tutorial makes the assumption that you already know how to use 3dsmax to some extent. Start with a head model, ideally one with an internal mouth box and the teeth already created. The better your edge loops are setup, the easier the morphs will be to create and the better they'll look. First I'm gonna go through the bone rig nessecary for the head. The bone you need to add is a jaw bone. This next step is mostly a precautionary step. Go to the create tab, and Dummies and chose Point. Right-click on the snap button and it will open the Snap Settings window. Now you should see a blue-gizmo around your bone when your cursor gets near the end.
Now, with the point still selected, click the Align button and the dialog should come up. So why do all this? This just avoids trouble. Next! Modeling a foot - CGWiki. I won't explain every detail in the beginning, you can get to the state in the next image several different ways.
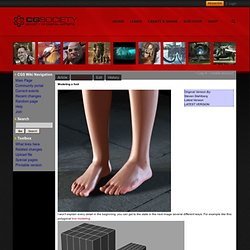
For example like this: polygonal box modeling. This is the model I started with for this session - a simple model several years old that I'd previously used as the 0-level of a hierarchical SubD surface. But I wanted to rebuild it without the hierarchy. The smoothed or Subdivided version: Say we're going for realism. The best reference is without a doubt the actual human body, and I did use my own foot to some extent, but good photographs do have certain advantages over the living body (like for instance, my foot is really ugly).
The most important preparation you can do is sketching. From here I started adding and deleting edges to the old model. A view showing some points being pulled to the left: More edge-insertions and deletion steps: At this stage I felt dissatisfied with the SubD version of the foot - it was still too smooth, and lacked detail. With those knobs added: Créer un oeil réaliste. Kikou à tous et à toutes Aujourd'hui je vais vous apprendre a faire un œil ma foi assez réaliste en partant de rien Pour commencer prenez un nouveau document de 800/800 Et faites "filtre >> rendu >> nuages" Ensuite faites "filtre >> rendu >> nuages par différence" Et répétez cette dernière opération 3 fois supplémentaires (4 au total) Vous obtiendrez ceci: Maintenant faites une transformation manuelle (ctrl+t) Dans les options en haut de l'interface de photosho, entrez les paramêtres suivants.

Vous obtiendrez ceci Maintenant dupliquez 2 fois votre travail et mettez-les de part et d'autre du calque pour qu'ils prennent toute la place sur votre travail Maintenant, faites "image >> transformation >> symétrie horizontale" sur les calques qui se trouvent à l'extérieur du premier Une fois fait, fusionnez les calques entre-eux Maintenant faites "filtre >> déformation >> coordonnée polaire" Vous aurez ceci Dupliquez le calque du rond (ctrl+j) Maintenant que vous avez ces 2 ronds.
Speed Model: The Human Nose. Modeling human head in 3DS MAX. Second Picture is devoted to original tutorials about 3D graphics, Photoshop, Photography and Web Design.
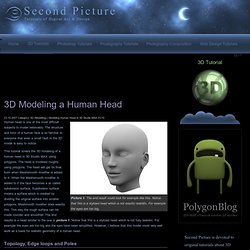
Character Modeling Tutorials 23.10.2007 Category: 3D (Modeling) | Modeling Human Head in 3D Studio MAX 01/10 Picture 1. The end result could look for example like this. Notice that this is a stylized head which is not exactly realistic. Human head is one of the most difficult subjects to model believably. This tutorial covers the 3D modeling of a human head in 3D Studio MAX using polygons. Topology, Edge loops and Poles Picture 2. In picture 2 and 3 you can see the topology and edge loops of the model. There are almost only four sided polygons (quads) in this model which is good if the model is going to be animated. 3D Studio MAX Tools Picture 4. Before starting the 3D modeling one should be familiar with the following concepts and 3DS MAX tools: Reference Pictures for the 3D Head Picture 5.
Create reference pictures in 3D Studio MAX according to picture 5.