
Dollar Store Mom - Frugal Fun - Crafts for Kids. Today’s post is a lesson in improvisation.
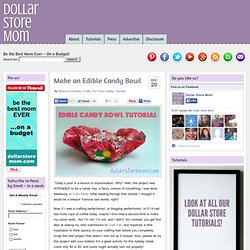
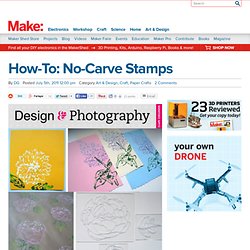
Why? Well, this project was INTENDED to be a candy tray, a fancy version of something I saw done flawlessly at Tutto Bella. After reading through that tutorial, I thought it would be a breeze! Famous last words, right? Now, if I was a crafting perfectionist, or blogging perfectionist, or if I’d had two more cups of coffee today, maybe I’d've tried a second time to make my vision work…but I’m not, I’m not, and I didn’t. Supplies: candy canes- $1 for twelveold fashioned hard candies- $1starlight mints- $1 for a bag, I used just one for this particular project Unwrap the candy canes and starlight mint and arrange on a baking sheet lined with wax paper or parchment paper. Bake at 350 for 8-10 minutes, but watch it closely the whole time!! Then I realized it was still quite hot and pretty pliable, so I quickly grabbed a bowl, turned it upside down and placed the whole thing on top. No-Carve Stamps. By Jeromina Juan Ever wonder about the possibilities of designing your own stamps without having to carve anything?
There is a simple way! You’ll need one ordinary household object – silicone caulking. How to make your own apothecary, make a super simple linen spray, and feel like a wizard. As a little girl I mixed up shampoos and lotions in my laboratory, trying to improve on the toiletries we had.
I never came up with anything worth mentioning, but I did once get scolded for spilling my mom's shampoo all over the bathroom rug. A friend of mine told me about the "laboratory" she'd had at age 12, in which she created, among other things, the cure for AIDs. You probably won't cure any diseases with your apothecary, but you will scratch that youthful itch to create something useful out of ordinary ingredients. narfmore I'll get your mad scientist career started with a list of ingredients to start a home apothecary, with which you'll be able to make herbal teas, salves, syrups, tinctures, eye pillows, and infused oils.
I've also included a recipe for an air freshening spray you can make. Starter herbs and their properties You can find these herbs online or in stores with large bulk herb selections. So, oils. Starter oils AND! Storage Lavender Mint Room Spray & Linen Mist. Better Sterno Alternative. Homemade play dough recipe using Kool-Aid or Jell-O (preschool teacher and kid approved!) : Queen Bee Coupons & Savings. My friend Zene (a preschool teacher) makes the BEST play dough. It smells amazing. It’s the best texture. It’s easy to clean-up. And, it’s very FRUGAL and easy to make. So I had Zene write up a post for you so you could become a homemade play dough pro, too:As a preschool teacher, I make a few batches of play dough each year. Add color, smell or pizzazz to your play dough - Kool aid is the most inexpensive way to color AND add scent to your play dough. Play dough toys, tools - Play dough toys are a must, but they certainly don’t have to be bought.
Clean-up tips - If you are worried about the kitchen table use a plastic table cloth or cutting board, but play dough wipes off very easily. And all of it did come out. Play dough recipe 1 cup flour 1 cup water 2 tablespoons oil (vegetable, canola) 1/2 cup salt 1 teaspoon Cream of Tartar Food coloring, Kool Aid, Jell-O or other colorful mix (prefer two packages of Kool-Aid for best color) 1 quart-sized Ziploc bag for storage p.s. Light Switch Time Capsule. Paint Moss Graffiti - Step-by-Step Guides for Offbeat DIY Projects. Tutorials. Hola there!
Here you can find an organized list of all my tutorials, projects and printables. I want to point out that I am no sewing expert and have no formal education in either sewing or English (Spanish is my native language) So I might not always use the correct terminology or best technique, I am always learning too! It might not always be perfect, but it’s sure a lot of fun! All of my tutorials and printables for personal use only, if you want to sell items made with these tutorials please purchase a Limited Production License.
If you blog them, please do not share the complete post and share a link crediting back to the post and DO NOT link directly to downloads, please read my Site Policy and Contact me if you have questions, hope you all enjoy! Flowers & Jewelry Tutorial: Anthropologie Inspired Necklace Link: Go to Tutorial Difficulty: Easy Tutorial: Duct Tape Joyful Flower Link: Go to Tutorial Difficulty: Easy Clothes and Upcycled Projects Maternity and Baby Nursery Other Projects.