
» How to drop a dress size in 20 minutes The Beauty Gypsy. Craft DIY Projects, Patterns, How-tos, Fashion, Recipes @ Craftzine.com - Felting, Sewing, Knitting, Crocheting, Home & More. Paper Mache Animal Heads. Felting Project: A Rug! This is the most beautiful felt project we’ve seen.

Strips of felt are wrapped around each other with hot glue to create this amazing swirled effect. What a great project for a snowed-in weekend and a movie marathon with the family. The kids could even help cut strips and decide on color combination while you operate the hot glue gun. Would you attempt something like this? Keep reading to see more pictures and find out where to find more details about this beautiful felt project! You can see all the instructions and details here on The Crafts Dept blog A few other fun pictures of the process: Images: Martha’s Crafts Department Blog Other post of mine you might like: The Best Thing to Happen to Your Baby’s Feet This Winter! Zara Kids Winter Collection Snow Bricks! Lace lamp – DIY. We are at our little cottage in Dalarna and we are fixing it up.

So we are able to use it even in the winter. (Dalarna is in th middle/north of Sweden. To me and Jenny it’s north but Sweden is a very tall country so I guess we are not even in the middle). Papier-mache easter eggs. For Easter I made papier-mache polka dotted eggs.
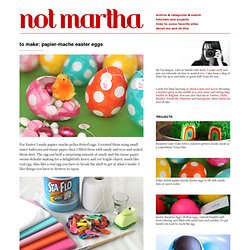
I created them using small water balloons and tissue paper then I filled them with candy and toys and sealed them shut. The egg can hold a surprising amount of candy and the tissue paper seems delicate making for a delightfully heavy and yet fragile object, much like real egg. Also like a real egg you have to break the shell to get at what’s inside. I like things you have to destroy to open. You’ll need: water balloons (they make the egg-iest shape)white tissue paper (one sheet will make about three eggs)colorful tissue paper (one sheet will make many eggs, so you don’t need much)a 3/4 inch hole puncha paint brush you don’t care much aboutliquid laundry starcha sturdy shot glass to hold your egg while you’re working with ita way to hang the balloons to dryenough time to let these dry overnight, and a few hours to let them dry after filling and sealing them (you’ve been warned) Note: I tried a few variations on the starch.
Why the loop? Repurposed Hardcover Book to Notebook Tutorial. I’ve told you before I’m a bit obsessed with books.
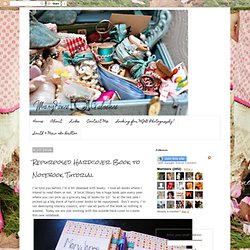
I love all books where I intend to read them or not. A local library has a huge book sale every year where you can pick up a grocery bag of books for $3! So at the last sale I picked up a big stack of hard cover books to be repurposed. Don’t worry, I’m not destroying literary classics, and I use all parts of the book so nothing is wasted. Today we are just working with the outside hard cover to create this new notebook. What you need-Hardcover bookPaperDecorative paperSmall bit of ribbonPaper cutterWhite glueHot gluePadding compound (optional)Clamps or bulldog clipsFirst you need to cut the pages out of your book so your just left with the cover.
Slather on a nice layer of white glue to the inside of your cover. Apply your decorative paper. Also cut a piece of thin recycled cardboard the size of your notepad and a piece of decorative paper about 3 inches by the width of your notepad (this will be used to wrap the top edge of the pad). Giant Paper Rose Flower.
If you loved the beautiful DIY wedding this morning and Nata’s gorgeous paper flower bouquets, you are in luck as Nata is sharing how she crafted them with us!

She was inspired by a template created by Morgan Levine on Martha Stewart (as was I in the flowers I created for this styled shoot). I just love that this basic idea has inspired different brides to create their own version of giant paper flowers – you might remember these equally awesome giant paper flowers from this wedding I shared last year. :) Thanks so much Nata for sharing how you created your giant pink paper rose + special thanks to Studio Castillero for the photos of the DIY + her wedding! Materials (to make one giant rose) Step 1: Cut the petals Cut 5-6 teardrop petals and 15-6 heart-shaped petals from the petal colored crepe paper. IMPORTANT: Crepe paper is directional so it matters which way you’re cutting the paper. A Tutorial: Fabulous Ric Rac Flowers » Matilda Jane Clothing Rocks.
Let me start out with a warning or sorry of some sort.

The warning is because I have never done a Tutorial before, so I hope this is helpful and easy to follow. The sorry is for how horrible my nails look. I promise I did them after looking through these pics. WOW! I thought I would start off with a Flower, I too, just learned how to make.