
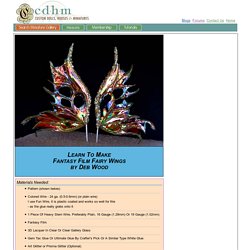
Fantasy Film will bring brilliant light and luminescence at Art Institute Glitter. How to make fantasy film fairy wings, by Artisan Deb Wood. Close-up images of materials needed.Enlarge Picture of supplies need. 1.
Enlarge pattern image (its going to appear large, you'll need to scroll to close the image). Copy to your computer, right click, save image; then print out in any size you need. Enlarge Picture to enlarge pattern. TIP The wings pattern are intended for a fairy about 6" tall, you can rescale the pattern to any size. 2. 3. 4. TIP This wire comes in many colors. I also like to use a bright color, say pink, if the fairy's garments are also bright. 5. 6. 7. TIP I only apply glue to the side of the wire that will be in contact with the film. 8. 9. 10. 11. 12. 13. Fantasy Film will shrink and strengthen with heat. TIP Shut the windows so you don't have any breeze on the candle flame. 14. 15. 16. 17. 18. 19. 20. 21. 22. TIP Clean your brush immediately in soapy water. 23. TIP Before proceeding to the next step please read. 24. TIP On these wings I didn't add an overall glitter, but you can do that now. Making Pose-able Cellophane Insect Wings in Patterns & Tutorials Forum.
So after much procrastination and some nudging from Allen, I'm finally posting a write-up about how I made my Wasp wings.
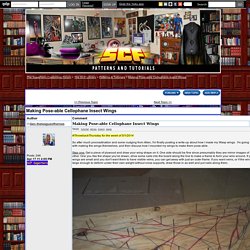
I'm going to start with making the wings themselves, and then discuss how I mounted my wings to make them pose-able. Step one: Get a piece of plywood and draw your wing shape on it. One side should be fine since presumably they are mirror images of each other. One you like the shape you've drawn, drive some nails into the board along the line to make a frame to form your wire around. If your wings are small and you don't want them to have visible veins, you can get away with just an outer frame. Step two: Take some 14 gauge steel wire and wrap it tightly around the outer nail frame you made.
Step three: Bust out your trusty soldering iron and reinforce all the joins in the wire frame. Step four: Cellophane each of the wings individually. Cut a piece of cellophane roughly 3 inches larger than the wing in all directions. Hope that helps! Icy Earrings From... Bubble Wrap?! I've been experimenting with fused bubble wrap this past week, something I've wanted to try ever since I spotted this awesome bubble wrap pendant over on Craft:.

Here's what I came up with: Snowflakes! In June! There are lots of fused plastic and bubble wrap tutorials out there you can Google, but fortunately the process is really simple: just sandwich your plastic between two sheets of parchment paper and iron the bejeepers out of 'em. (Do this in a well ventilated area, since the fumes can be toxic.) The resulting fused plastic is relatively smooth, but has a nifty crackly look to it, almost like frosted ice. Maybe in small quantities it's more pearl-ish. Anyway, after brainstorming a while I decided to take advantage of the icy look with snowflake earrings. They're pretty shiny when the light catches them, which adds to the ice illusion.
You can see the texture a bit better here, plus the slight translucency: End Pieces & End Caps. MacCulloch & Wallis - Decorative Fasteners. Kits / Rockeresque Beauty Company. Jessica B.'s (JessieBlush) Photo. How to Make Quick-Drying Clay. Eyes. Nosescrews & nosebones.