
Thermistance NTC boitier Goutte Radial 100 kΩ sortie fil de cuivre émaillé 1 pc(s) TTS1A104F4363RY - Vente Thermistance NTC boitier Goutte Radial 100 kΩ sortie fil de cuivre émaillé 1 pc(s) TTS1A104F4363RY sur conrad.fr. Sensor tutorials. An analog temperature sensor is pretty easy to explain, its a chip that tells you what the ambient temperature is!

These sensors use a solid-state technique to determine the temperature. That is to say, they dont use mercury (like old thermometers), bimetalic strips (like in some home thermometers or stoves), nor do they use thermistors (temperature sensitive resistors). Instead, they use the fact as temperature increases, the votage across a diode increases at a known rate. (Technically, this is actually the voltage drop between the base and emitter - the Vbe - of a transistor. By precisely amplifying the voltage change, it is easy to genereate an analog signal that is directly proportional to temperature. Because these sensors have no moving parts, they are precise, never wear out, don't need calibration, work under many environmental conditions, and are consistant between sensors and readings.
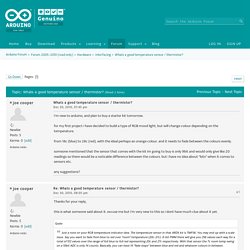
To convert the voltage to temperature, simply use the basic formula: breadboarded to-92. Whats a good temperature sensor / thermistor? First of all, a TMP36 sensor is an analog output device.
Its output is volts, not bits. The ADC on the Arduino has ten bits, so I don't know where the "9 bit" stuff comes from. I think I can guess where the "20 values" comes from, and I'll show my guess in a minute. But, first of all: How many different "fade values" do you really need? Maybe you can experiment with a sketch that doesn't read temperature, but applies different values over some range for certain amounts of time and observe the visual effects of varying the output that many fade steps. LED Cube 4x4x4. LED Cube 8x8x8. A wireframe box is a good geometric shape to show in a monochrome 8x8x8 LED cube.
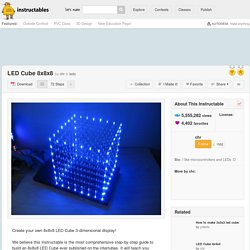
It gives a very nice 3d effect. We made two box animation functions for the LED cube. Effect_box_shrink_grow() draws a wireframe box filling the entire cube, then shrinks it down to one voxel in one of 8 corners. We call this function one time for each of the 8 corners to create a nice effect. Effect_box_woopwoop() draws a box that starts as a 8x8x8 wireframe box filling the entire cube. Here is how effect_box_shrink_grow() works. It takes four arguments, number of iterations, rotation, flip and delay. To make the function as simple as possible, it just draws a box from 0,0,0 to any point along the diagonal between 0,0,0 and 7,7,7 then uses axis mirror functions from draw.c to rotate it. 1) Enter main iteration loop. 2) Enter a for() loop going from 0 to 15. 3) Set xyz to 7-i. 4) When i = 7, the box has shrunk to a 1x1x1 box, and we can't shrink it any more. 7) Do the rotations.
Here is how it works: Découverte de l'ESP8266. Présentation L'ESP8266 est un petit module Wifi très bon marché (de l'ordre de 2,80€ port compris au jour de l'écriture de ce billet).
Il permet à l'origine de s'interfacer en serial avec d'autres périphériques et donc de faire de l'UART vers Wifi. Par exemple pour qu'un Arduino puisse se connecter à Internet pour récupérer la météo, ou envoyer la température d'un radiateur. Son faible coût et ses capacités croissantes (firmwares alternatifs, nouvelles versions hardware) ont font un candidat sérieux pour tous les "objets connectés".
Par rapport à un module 433MHz du même ordre de prix, les avantages principaux sont: - Possibilité de se passer d'Arduino etc.. Le seul bémol, c'est que le Wifi est assez consommateur de courant. Hardware Il existe à ce jour 12 versions de ce module. . /! C'est valable pour l'alim et pour les niveaux TX/RX. Software Il faut donc s'interfacer avec le module en sérial. Mon 1er module est arrivé en 9600 bauds. Alim. led. Electronique > Réalisations > Alimentations > Alimentation d'une LED Dernière mise à jour : 06/03/2016 Présentation Les lignes qui suivent décrivent comment utiliser une LED de façon isolée ou en groupe, avec des tensions alternatives ou continues.

Pour plus de renseignements concernant ce composant, merci de vous reporter à la page Théorie - LED. Bases - Alimentation en basse tension continue Une LED, si on l'alimente directement et sans autre forme de procès à une source de tension continue (pile 9 V neuve par exemple) ou à une source de tension alternative (secondaire d'un transformateur 220V / 9V par exemple), a 99% de chances de griller. Sur le schéma qui précède, la valeur de la résistance R1 est donnée à titre indicatif, la tension V n'étant pas spécifiée. BLE Micro - Super Compact BLE Module.