
Play PC games the iPad style - Using a PIC with USB, accelerometer and optional Gyroscope. The iPad is finally out – one feature that might caught your attention is the built-in accelerometer and the ability to control a game by tilting the device.

For more than a year I was working on a similar idea for the PC Notebook market based on my original motion gamepad project that would allow playing a game by tilting the laptop/netbook. Now that iPad is out I hope that the notebook/netbook manufactures will catch up by incorporating MEMS sensor into their devices. Here is the result of my prototype , it is a USB attached device, but ideally I think this should be embedded into the laptop.
Demo: About the project: For the hardware I used the Acc_Gyro sensor and a thumb-size PIC platform UsbThumb built around the inexpensive PIC18F14K50 chip that provides all the necessary USB connectivity and ADC inputs. In the pictures above headers are used to connect the device, so the end result is a little taller than you could get if you'd simply solder the two boards together. //starlino// A Guide To using IMU (Accelerometer and Gyroscope Devices) in Embedded Applications. Introduction There’s now a FRENCH translation of this article in PDF.
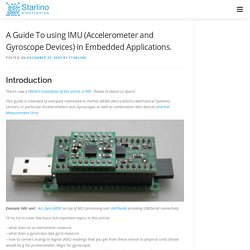
Thanks to Daniel Le Guern! This guide is intended to everyone interested in inertial MEMS (Micro-Electro-Mechanical Systems) sensors, in particular Accelerometers and Gyroscopes as well as combination IMU devices (Inertial Measurement Unit). Example IMU unit: Acc_Gyro_6DOF on top of MCU processing unit UsbThumb providing USB/Serial connectivity I'll try try to cover few basic but important topics in this article: – what does an accelerometer measure – what does a gyroscope (aka gyro) measure – how to convert analog-to-digital (ADC) readings that you get from these sensor to physical units (those would be g for accelerometer, deg/s for gyroscope) – how to combine accelerometer and gyroscope readings in order to obtain accurate information about the inclination of your device relative to the ground plane Throughout the article I will try to keep the math to the minimum.
Part 1. R^2 = Rx^2 + Ry^2 + Rz^2 (Eq. 1) Part 2. How to make a sub-$100 gyro-stabilized camera. [UPDATE: I've found an even better way that costs $25, is simpler and works perfectly.

It's here] Once again I started a weekend with a crazy idea and once again I had it working by Sunday evening. (Needless to say I'm not going to win any parenting award until this particular obsession runs its course). This time it was trying to resolve a problem that cropped up in our Googleplex UAV mission. Many of the photos from that series are from angles, rather than straight down as you'd want for Google Maps imagery, because the airplane was banking quite a lot to keep within the boundaries of the Google campus. The aerial photography pros solve this problem with expensive gyro-stabilized camera platforms.
The secret ingredient is an off-the-shelf "heading hold" gyro made for a R/C helicopter. UPDATE: the test is here. For the tilting camera mount and base, you'll need a sheet of relatively thin aluminum. Here's a video of the whole thing at work, strapped to the bottom of our Predator UAV: