
Flax & twine for easy craft tutorials and diy projects: Day 1: A Strand of Pearls - a diy ribbon and pearl necklace. Yippee–here it is–Day number 1.
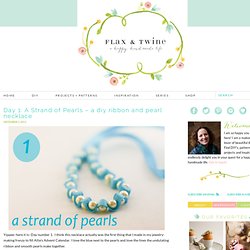
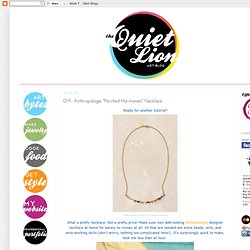
I think this necklace actually was the first thing that I made in my jewelry-making frenzy to fill Allie’s Advent Calendar. I love the blue next to the pearls and love the lines the undulating ribbon and smooth pearls make together. This ribbon strand ties in a bow in the back to whatever length your little girl desires. DIY- Anthropologie "Perched Harmonies" Necklace. Ready for another tutorial?
What a pretty necklace. DIY Leather Wrapped Rings. DIY Tutorial: Wrapped Ring. Double Strand Lace Headband. Today’s headband DIY is how to make a Double Strand Headband.
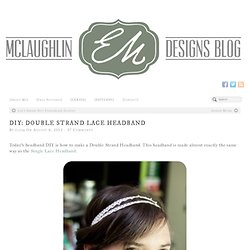
This headband is made almost exactly the same way as the Single Lace Headband. All you need is 36 inches of lace or ribbon 1 inch width or narrower. I used 1/2 inch width lace from Joann’s Fabrics. 3 1/2 inches of braided elastic 3/8 inch width or larger. Cut the lace so that you have two strands that are 18 inches long.
Lay the end of one length of lace over the other as the picture shows. After you have the ends lined up lay the elastic over the top so they overlap by 3/4 of an inch or so. Then with a sewing machine or by hand stitch across the two layers of lace and the elastic. Flax & twine for easy craft tutorials and diy projects. DIY Pumpkin and Candy Corn Earrings. Well you can find these Halloween and Fall inspired earrings in my shop HERE for $1.49 or you can make your own.
Here is what you will need: Buttons in yellow, orange, and white Beads in yellow, orange, white, and green Small clear beads Earring Findings You can probably figure out how they are made from the pictures but if you have any questions just let me know. Happy Halloween Fashion! Be sure to check out our DIY page for more Halloween and Fall Craft ideas. DIY hex nut earrings. Hello everyone!!!
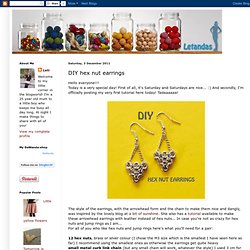
Today is a very special day! First of all, it's Saturday and Saturdays are nice... :) And secondly, I'm officially posting my very first tutorial here today! Tadaaaaaa! The style of the earrings, with the arrowhead form and the chain to make them nice and dangly, was inspired by the lovely blog at a bit of sunshine. She also has a tutorial available to make these arrowhead earrings with leather instead of hex nuts... 12 hex nuts, brass or silver colour (I chose the M3 size which is the smallest I have seen here so far) I recommend using the smallest ones as otherwise the earrings get quite heavysmall metal curb link chain (but any small chain will work, whatever the style) I used 3 cm for each earring22 4mm jump rings earwiresflat nose pliers (prefereably the ones which are smooth so the jump rings won't be dented)round nose pliers (but any pliers with which you can grip the other end of the jump ring will work) Your fingers are sore?
And you are DONE!!!! PS. Ribbon Flower Pin Tutorial. I thought with pretty good certainty that the last corsage I would ever pin on was at Senior Prom in High School.

But I was wrong. A few weeks ago I visited the Quilting Cottage in American Fork, Utah. I love the Quilting Cottage, which is not only a quaint little store, but they have a wonderful selection of fabrics. While there, I spoke with Wendy, one of the women who works there… She was making ribbon flower pins for an upcoming wedding. Wendy was kind enough to teach me how to make these fabulous fabric flower pins. 2-4 yards of wire ribbon (depending on how large and tight you want your flower) (I used one and 1/2 inch wide ribbon.)quilting thread or other strong threadsmall amount of felthair clip or pin (or both) 1. 2. 3. 4. 5.
{macramé: half knot spiral} washer & wingnut bracelet. By Kate on October 25, 2011 Hello there!

I finally got around to posting after a hectic few weeks. I’ve been working on a big project which is all done and dusted now so I will be making more frequent updates between now and Christmas…phew! I sincerely wish there were more hours in the day! I’m hoping to post another Halloween craft in the next day or so. It’s comprised of a’half knot spiral’ (and is even easier than the square knot bracelet I showed you previously). A few people left comments about the last bracelet saying it looked like it may take too long to make. By the way thanks to all you lovely people who ‘liked’ my facebook page. How to Make Wrap Bracelets - AuntiesBeads.com. DIY Wrap Bracelet - Honestly WTF - StumbleUpon. You should all know by now that we are all about stacking bracelets on our wrists.

The more, the better. In fact . . . the most, the best! With that being said, we’ll show you how to master a version of the ever so popular wrap bracelet. It’s so simple and addicting, you’ll soon be churning out these wristlets with your eyes closed. Clearly this arm party train isn’t stopping and it’s about time you get on board! You’ll need (for a double wrapped bracelet) :* Lengths will vary depending on the size of your wrist (see comments for suggestions). Fold the length of leather cording in half to form a loop.