
How-To: Quilled Hearts Jewelriy - Craft Test Dummies. It’s that time of year again- when we all wear our hearts on our sleeve…or ears….or hands…. or lapel!
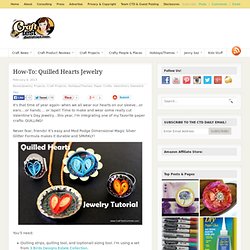
Time to make and wear some really cut Valentine’s Day jewelry…this year, I’m integrating one of my favorite paper crafts: QUILLING! Never fear, friends! It’s easy and Mod Podge Dimensional Magic Silver Glitter Formula makes it durable and SPARKLY! You’ll need: Quilling strips, quilling tool, and (optional) sizing tool. To make the hearts, you’ll need 2 different color of quilling strips. Rip your quilling strips to the approximate size you need, then use a dab of glue to join them as shown below. Next, use your quilling tool and make a spiral starting with the light-colored end. Use a dab of white glue to secure the ends of the spiral. Join the two teardrops together to make a heart, using another dab of white glue. Next, get your bottlecaps ready by using a drop of MPDM in the bottom of the bottle cap.
Add some more MPDM on top and spread it around with a toothpick. Rings! DIY Friendship Bracelet. For several months now, we’ve been receiving emails requesting a friendship bracelet DIY.
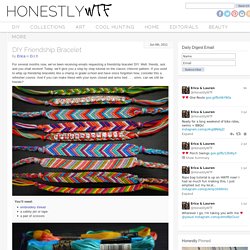
Well, friends, ask and you shall receive! Today, we’ll give you a step by step tutorial on the classic chevron pattern. If you used to whip up friendship bracelets like a champ in grade school and have since forgotten how, consider this a refresher course. And if you can make these with your eyes closed and arms tied . . . umm, can we still be friends? You’ll need:embroidery threada safety pin or tapea pair of scissors Start by cutting several strands of embroidery thread at about 24 inches each. Start on the left side with the outermost color (shown here in red) and make a forward knot by creating a 4-shape over the 2nd color, loop it under and back through the opening. Pull up and to the right to tighten. Now pick up the outermost color on the right side (show here in red) and make a backward knot, creating a reverse 4-shape over the 2nd color, loop it under and back through the opening.
Make a Hemp Necklace or Jewelry. Diy {bird nest necklace} I have been seeing a lot of bird nest jewelry around lately.
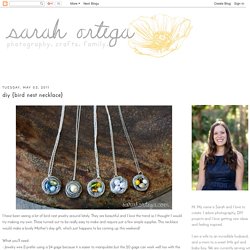
They are beautiful and I love the trend so I thought I would try making my own. These turned out to be really easy to make and require just a few simple supplies. This necklace would make a lovely Mother's day gift, which just happens to be coming up this weekend! What you'll need: - Jewelry wire (I prefer using a 24 gage because it is easier to manipulate but the 20 gage can work well too with the help of some round nose pliers) - pearls or glass beads - necklace chain - jump ring and a clasp Select the beads you want, string them onto your wire and arrange them as you'd like. then simply wrap the wire around the beads wrap some wire in the space between each bead (I like the look of three loops but you could just do one or two if you prefer) this is what the back looked like.
Now attach a jump ring and a clasp to the end of a necklace chain and this is what you end up with :) I love how each one is so different. How to make Jewelry for Everyone.