
Building a CNC router. How_to_build_a_multimachine. Mini Desktop CNC Machine Build! A bit about myself, I am 16 years old and for my senior project for high school, I plan on building a small CNC router.
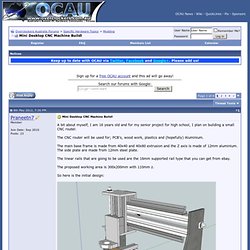
The CNC router will be used for; PCB's, wood work, plastics and (hopefully) Aluminium. The main base frame is made from 40x40 and 40x80 extrusion and the Z axis is made of 12mm aluminium. The side plate are made from 12mm steel plate. The linear rails that are going to be used are the 16mm supported rail type that you can get from ebay. The proposed working area is 300x200mm with 110mm z. So here is the initial design: Build Thread Ryan's g0704... - Page 16. MTM Snap. F-Engrave. Adam Iseman's CNC machine. Micro-Laser Cutter Project - LVL1.
From a Challenge, the Project is Born When LVL1 was discussing the purchase of a Laser Cutter, one of its members said "I could build one before you get around to buying one.

" And so the race began. Then on 7/13/2011, the Micro-Laser Cutter was demonstrated. On 7/14/2011, the purchased laser cutter arrived. So, the member built a laser cutter faster than the space could buy one. The mechanical core of the project is the axis movement. The threadeds rod is mounted in small bearings for smooth movement. Although the device only moves in two axes, three drive axis are employed.
The two Y-Axis assemblies hold a platform for the item to be laser cut. Here are images of the assembled unit. The functional breakdown of the unit is displayed below. Hardware Modding & Tuning Gallery. The plans and Solidworks files are available for free @ Thingiverse!
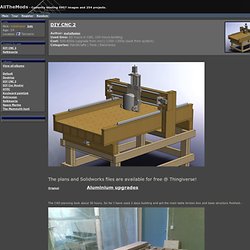
Original Aluminium upgrades The CAD planning took about 30 hours. So far I have used 2 days building and got the main table torsion box and base structure finished. CNC. Easy to Build Desk Top 3 Axis CNC Milling Machine. Mini CNC router, complete plans and instructions. Pocket laser engraver. For the Arduino I started out writing my own software.
But while searching for a good way to control movement from the serial port I stumbled upon something called "Grbl ". This is a g-code interpreter with lots of nifty functions. As I already had everything connected to the Arduino I had to ether change my connections or change the software. Luckily it is easy to change control pins in the software. I did however have to download Winavr and then the code from github.com . I have however changed the pin-out since then and here in the instructable I use the default pin-out of Grbl.
Important: The current version of Grbl (0.6b) has a bug in the queue system. Any way you choose to do it you will end up with a .hex file that you must get into the Arduino. The Arduino needs to be set up for the job. Start – Open Desktop CNC mill. Le projet ODCNC est une aide à la conception de fraiseuse numérique pour les particuliers.
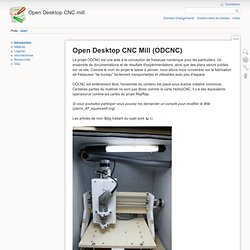
Un ensemble de documentations et de résultats d'expérimentations, ainsi que des plans seront publiés sur ce site. Comme le nom du projet le laisse à penser, nous allons nous concentrer sur la fabrication de fraiseuses “de bureau” facilement transportables et utilisables avec peu d'espace. ODCNC est entièrement libre, l'ensemble du contenu est placé sous licence créative commons. Wiki Home - Make Your Bot! Start – Open Desktop CNC mill. Machines - Make Your Bot! PCB Milling with the MakerBot CupCake (Almost) « Keith's Electronics Blog. Online » Arduino GRBL. We’ve written about Grbl before, the G-code interpreter, that can be flashed onto Atmega328-based Arduinos.
Our new project contributor, Riley Porter, has a project that he’s just shared with us. It’s an Arduino Shield that plugs into an Arduino and turns it into a 3-axis CNC controller. This is very exciting hardware. For $70, you can turn your Arduino into a three-motor motion control system. Here’s what Riley has to say about the grblShield. Simen Svale Skogsrud is the programmer responsible for the Grbl, the G-code interpreter to be used with the Arduino development board. Grbl is a G-code interpreter that implements a subset of the RS-274/NGC standard and is tested with the output of a number of CAM-tools with no issues.
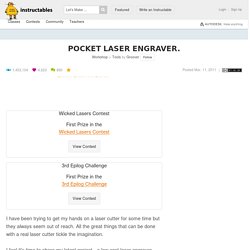
Before now, acquiring the needed stepper drivers and wiring up an Arduino to work with them was something of a messy process. Features of the grblShield: Inkjet/Toner Hybrid PCB Printing. After a fair amount of trial and error I’ve got a reasonable method for printing a PCB with a silkscreen using a modified inkjet printer.
This isn’t a new idea but I haven’t really seen the inkjet/toner hybrid method detailed so I thought I’d share my experience and tips. The great thing about the hybrid method is that it stands up to Cupric Chloride etchant which is helpful when you don’t have access to Ferric Chloride. The videos are a bit long but I wanted to share some of the detail, I hope it’s helpful. This method comes with 2 warnings (The later you should take seriously) Hacking A Printer To Directly Print PCB's. Mini CNC. My CNC Engraver (Part 1) The goal of this project is to design and build a CNC wood router/engraver.This turned out to be a much larger project than I had anticipated.

Bigger both in terms of dollars and hours I spent on it. It took me about 50 hours to build the mechanical portion of my CNC machine and I still have to do the electrical and software work. This posting will focus on the parts list and the mechanical systems. Welcome to CamBam. PRO Chopper Driver Board Kit. Control 3 or 4 Stepper Motors From Your Computers Printer Port!

Ideal For Desktop Machining and Robots! Control Routers, Lathes, Mills, PCB Drillers, and Engravers! Just About Anything! Specifications: RoHS Compliant3 or 4 Axis Unipolar Chopper control.Individual OR simultaneous control of 2/4 Phase Stepper Motors.Accepts 5, 6, or 8 wire stepper motors only. 4 wire types are not usable.42VDC maximum input voltage, 12VDC minimum input voltage. 24VDC Minimum Recommended Voltage.3.0 Amps Maximum per Phase, 500ma (.5A) minimum. Kits requires PCB soldering skills. Table de Nicolas Morel. La mécanique Dossier complet au format Pdf Dossier complet au format Sw.
Cncfil. 5XProject. La p'tit page de Papy Kilowatt. Chariot. De quoi se compose une table ? Les tables présentées ont été réalisées Exclusivement avec des matériaux de récupération (sauf les moteurs) les axes des Y sont des axes d’imprimantes pas de jeu et ils sont déjà quasi finis, mais on peut utiliser le système rustica Les chariots, un gauche et un droit. CNC : La fraiseuse numérique... La carte HobbyCNC est "idéalement" alimentée en tension continue entre 24 et 40 Volts. L'alimentation est réalisée de façon classique avec un transformateur, un pont de diodes et un gros condensateur chimique selon le schéma suivant : Prenez un transformateur capable de tenir 10A si vous voulez pouvoir utiliser cette alimentation pour alimenter une CNC de puissance (moteurs de 3A) Si vraiment vous voulez limiter le budget et ne pensez pas utiliser votre carte avec d'autres moteurs alors vous pouvez vous contenter d'un transformateur moins puissant.
La règle à appliquer est d'avoir une intensité moitié de l'intensité totale maximale du nombre de phases à alimenter. Grünblau Design Studio. DIYLILCNC. How to wire an arduino-based 3-axis CNC machine. Rstep.