Wax Paper Chandelier. I love wax paper for packing lunches; i wrap sandwiches in a piece of wax paper and tie it like a present with a little cotton string. it’s so much better looking than a plastic bag. wax paper comes in handy for more things than i realized, like rolling it up to use for a funnel, or how about rubbing a piece of wax paper on the top of your shower curtain rod to cut down on that terrible screeching in the morning…problem solved. but who knew that if you iron layers of wax paper together it looks remarkably similar to a capiz shell?
This discovery brought me to today’s project: the faux capiz chandelier. hung over your dining table, or outside at an outdoor dinner party, it is an easy solution to a dramatic light fixture and will look phenomenal in either setting. i hope you enjoy making your own as much i did! -brenna CLICK HERE for the full how-to after the jump! Materials: Instructions: 1. spray paint your planter basket. let dry. 8. once you cover the hanging basket you are done! Crayon Hearts. Make A Bow With A Fork. I made this fork bow tutorial for you. It's very easy and makes cute little bows that can be tied to favors, small earring boxes, homemade Christmas ornaments and more! I used an old, big serving fork to demonstrate, but you can use a regular size fork or dowels glued on a wooden base. Picture 1 Below: All you need is some kind of 4 pronged fork, ribbon and a pair of scissors. Picture 2 Below: First off, start by weaving the ribbon in and out of the fork.
Leave a little extra ribbon on the left and just let it lie there. The ribbon you will be weaving with is pictured on the right. Picture 3 Below: Take the ribbon on the right hand side over the top of the fork and weave the ribbon in and out. Picture 4 Below: Then, do the same thing again on the left hand side of the fork, weaving the ribbon in and out, coming the opposite direction. Picture 5 Below: Now, finish weaving in and out until you almost reach the top of the fork.
Picture 7 Below: Now, tie it tight! Curling Ribbon Coasters. Years ago when I was a college student, I had a part time job in a card store. One day on the job, I was fiddling with the curling ribbon we used for balloons. As I twisted and curled it in my fingers, I found myself rolling it into a tight spiral. As it grew and I added more colors, I soon realized I had a really cool design forming, and without too much effort I would have a spiral of color large enough to use as a coaster.
I bought some rolls of ribbon and that weekend I sat down and made several fun coasters by carefully coiling the ribbon around itself. Ever since then, whenever I get balloons or gifts that are tied with curling ribbon, I save the ribbon in a special box in my craft room. Selecting the ribbon You probably haven’t been saving up used curling ribbon from balloons and packages (not yet, anyway), so you might need to buy some new ribbon to start on this project.
Winding the ribbon Now for the fun part. You can see a lot of potential fun here with patterns and colors. Perfect Summer Bangle. Here's a fun tutorial on how to make a message bangle that's one-of-a-kind, done in the sun, waterproof and weatherproof. Even after several trips to the beach, it won't fade or wash off! Essentially, it's the Perfect Summer Bangle. Used in this tutorial: Inkodye Red Prepare. All you'll need for this project is a raw wooden bangle (we got ours from DIYBangles.com), a black paint marker, plastic wrap, and some Inkodye! Transcribe. Perfect. Pour. Brush. Wipe. Wrap. Tape. Expose. Develop. Cut. Reveal. Wash. Enjoy. Packaging Templates. I’m not sure how I discovered this awesome collection of packaging templates but I’m glad I did!
Some professor or student at a japanese univeresity was nice enough to share all their packaging templates with the world! These are a few of my favorites and you can see all of them on their website. Every situation is covered! You sell Bon Bons? P.S. Stumbleupon. Fabric Gift Boxes. Money Gift Box. Gift Box This box made from two bills. The bills/box can be the gift itself, but it is also just about the right size for a ring box. (Perhaps a dollar-bill ring?) Get yourself two fairly new, crisp bills. Older "soggier" bills are much harder to work with. For this design to work, the folds should be very precise, and perpendicular to the edges of the bill if the resulting is to be retangular. Lay the bill on a flat surface, face up. Fold the note top-to-bottom just to the right of the portrait, then unfold. Starting at the top left corner (as illustrated), close the top third fold to about 90 degrees. Inside this corner will be a remaining portion that you will crease along the natural 45 degree line to complete the corner.
Complete the previous step for the other three corners. For each tab, pull it inside the box, folding so that the natural edge of the box is pulled slightly over inside the fold. Do this evenly for both tabs. You should now have an open box. Back. Gift Wrapping Ideas. Paper Bows. DIY: Chiffon and Tulle&Flowers. Shabby Flower Pillow. Sometimes, ideas in my head don’t always turn out as planned. And sometimes, they turn out better…. After running across Sweet Jessie’s Scalloped Garland tutorial a few months ago, I wanted to take the same technique and use it to make a shabby, fun, linen pillow.
Here’s how I did it: Supplies Needed:fabric (I used linen)sewing machinezipper (if desired) Step 1: Create your “petals”. I’ll explain the technique briefly, you can refer to the tutorial linked above if you need additional help. Step 2: Take sew petals and turn inside out. Step 3: Stitch petals down to fabric. Step 4: Continue creating petals and attaching them to pillow front. Step 5: Almost there! Step 6: Glue or stitch your flower’s center onto your pillow fabric. You Might Also Like: 6 Fabulous DIY Origami Crafts. Create your own galaxy of origami stars! You can find complete instructions for each star in this fantastic post by Bloomize. Here’s a lovely little origami heart page marker, perfect for your kids as they head back to school. Get the tutorial here. These origami paper diamonds are totally amazing. Get the complete tutorial at Mini-eco. Explore mathematics with these fantastic origami cubes and polyhedra by Mini-eco.
Download the templates here. Make your own origami gift bows from magazine pages! Your little one will love these miniature origami dresses. Related. Under the Sea ~ KIDS ~ Crafts. School Crafts: Flowerpot Pencils. Paper Flower Tutorials & Templates. Rolled Paper Roses. Welcome to flower week – five days of simple and delightful flower projects. I could probably do three weeks of flowers because there are so many different ways to create them, but I’ve limited it to five of my current favorites. Before we get started, let me make a few disclaimers: 1. I find inspiration for projects all over the place {online, in shops, in magazines}, then figure out how to re-create them on my own.
Each of these projects are my adaptation of something I’ve seen elsewhere. 2. 3. Okay, so let’s begin. Here’s what you’ll need: :: paper {either cover or text weight} :: florist wire :: scissors, pencil, glue gun STEP ONE: cut irregular circle This circle is approximately 8 inches, but you can do any size you wish. STEP TWO: cut spiral Start at the outside edge and cut in a spiral fashion to the center. I like a sort of bumpy shape so that the petals end up a bit irregular If you aren’t so sure about your cutting skills, feel free to draw your spiral before cutting.
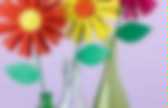
Wire & Paper. Paper Roses. Paper Flowers. Why not brighten up your gloomy winter day, by making your own paper flowers. This super simple project takes only about 5 mins and is sure to brighten any room. Add them to twigs or branches for an instant bouquet or simply throw them in a bowl.
Originally created by Martha Stewart, Wendy from DoziDesign has whipped up a quick tutorial. Head on over there and start making flowers to your heart’s content. Pictures from Dozi & Jen Elisebeth. related posts. Pop up flower Video. Paper Flower Key Holder. Maple Leaf Roses. Gift Ideas For Poor Souls.
You know how it goes, a friend calls you and invites you to dinner at the last minute. OMG! What gift can you take?! You scrabble around the cupboards trying to find a box of chocolates or a bottle of wine but find that most of the chocolates have been eaten and the wine has gone. I thought this was a wonderful idea. Supplies: Patterned paper-one 12 x 12" sheet. These directions will give you one flower. 1. 4. 5. Tip: For single sided paper. 6. Note: Florist tape is stretchy, just play with it and pull gently but firmly as you move down the stem. 7. Note, you will have to play around with the height of the petals, and where on the petal you start your tape. 8. 9. 10. 11. 12. For tutorials on how to market yourself online, go here. Milk Jug Decorative Window Crafts. Jun30 by Lindsey Boardman We’re always looking for cheap or– better yet– free materials to craft with here, so we’ve played around with crafting all sorts of things out of those big plastic gallon milk jugs over the last couple of years.
The type of plastic they are made from is pretty versatile as far as crafting goes. You can cut it easily with scissors, use hole punches on it, stick it with hot glue and best of all you can draw on it with permanent markers with great results due to it being semi-opaque and mildly textured on one side. We have two crafts here to show you. Before the kids got to doing these two crafts I had to prepare the plastic for them.
All that was involved was washing out a couple of empty milk jugs like these: Milk Jug Window Art Then I used a sturdy pair of scissors to cut out any flat side panels from the milk jug plastic. We hung them in the window for the light to shine through like little stained glass decorations using teeny suction cups from the Dollar Tree. Crafts. This site is owned and maintained by Diane Geister. If any material offends you; please click the upper right hand corner box marked with an "x". Problem solved. :) Don't forget to tell them you found their ad on BookaRep.com! Easiest and best website building company ever! Unlimited everything, easy as Word to use, lots of fun features built in, and less than a lunch out for a month of web site.
Build your business today instead of just thinking about it! Dianne Holden- Trinkets and Rare Gems - Trinketladydi@Yahoo.com - Brush Prairie, WA The National Direct Sales and Home Business Directory Search This Site. String Tree. Thread LED Tealight Cover. I was messing around with different materials trying to dress up a little LED tealight, and this is one of the versions I ended up liking (plus it’s dirt cheap since it’s just thread!).
I love me some textures. This may be useful for those with wedding venues that don’t allow real flames. Finding these* at the dollar store is what started this mess… 1) Get your hands on some thin cardboard that you’ll be recycling anyway. I used the back of a pasta box. 2) Find some wrapping plastic (try to use something you’ll toss anyway!) 3. 4. 5. 6. 7. 8. 9. 10. 13. You can make different sizes and shapes. . … and configure it however you want! * Batteries were included, and they lasted for many hours. Happy crafting! Mrs. Location: Sacramento Occupation: Tea Analyst Wedding Date: August 23, 2008 Venue: Vineyard on the Delta. Doily Lamp. How To: Cherry Blossom Lights.
String Lanterns. Jessica of Wednesday Inc shows us how to make those gorgeous twine chandeliers from the inspiration shoot she shared with us this morning. Using balloons, glue and twine, you can also make these lanterns for your wedding – and then bring it home and use it as your very own mid century lampshade. What you will need are: balloons, glue, yarn, tray for glue, corn starch 1/2 cup of Corn starch, 1/4 cup of Warm water, clear fast drying spray paint, hanging lamp cord or fishing line (depending on your desired final product), and a lighting kit if you’re looking for a fully functional lantern. Jessica recommends using a sharpie to mark on the inflated balloon how much room you need to leave for the lighting cord. She also recommends coating the balloon with vaseline prior to wrapping the yarn coated with glue so it doesn’t stick on the balloon once it’s dry.
Are you getting excited to try to do this at home as much I am? Instructions: 1. Origami For Everyone. Origami Flower. Craft Gawker. Diy and Crafts. Seed Paper. Hair Flower. Easy Cd Case ....NO Glue. How To Make A Hollow Book.