
Dyed Buttons. Dyeing buttons and beads is fun and easy to do, enabling you to get the exact color you want whether using the buttons and beads on a coat, a pillow cover or in a necklace.

They also look beautiful in a vase as part of a flower arrangement, helping the flowers to stand tall. Most buttons and beads are made out of nylon and Rit is one of the few dyes that will color these materials (it also dyes wood buttons!). That means you can transform plain buttons and beads into colorful accents that match or coordinate with whatever you are making. Prep, dye and rinse time: 30 minutes You’ll Need White nylon-based plastic buttons or beadsRit Dye, liquid or powderMeasuring cupMeasuring spoonsPlastic containersSpoonRubber glovesPlastic table coverPaper towels Step by Step Cover work surface with a plastic table cover.
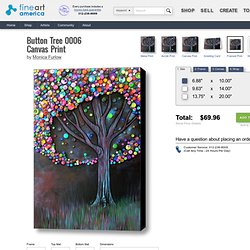
Button Tree 0006 Stretched Canvas Print / Canvas Art By Monica Furlow. Our return policy is very simple: If you're not happy with a purchase that you made on FineArtAmerica.com, for any reason, you can return it to us within 30 days of the order date.
As soon as it arrives, we'll issue a full refund for the entire purchase price. Please note - Fine Art America does not reimburse the outgoing or return shipping charges unless the return is due to a defect in quality. Fine Art America sells thousands of pieces of artwork each month - all with a 100% money-back guarantee. If you've hesitated to purchase artwork online in the past, why not give us a try? We take great pride in the fact that 238,108 artists have chosen Fine Art America to fulfill their orders, and we look forward to helping you select your next piece!
View Shopping Cart. Mango and Passion Fruit: Art with buttons! This is a quick post, but I couldn't help it.
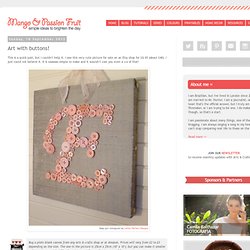
I saw this very cute picture for sale on an Etsy shop for U$ 65 (about £40). I just could not believe it. It is soooooo simple to make and it wouldn't cost you even a 1/4 of that! Buy a plain blank canvas from any arts & crafts shop or at Amazon. Prices will vary from £2 to £3 depending on the size. Choose the buttons you want to use. For the fabric, this one uses grey silk. The rest is pretty straight forward, isn't it? With the fabric still placec over your canvas, play around with the buttons to design your letter. Once you're done with the sewing, time to stick your fabric to the canvas. To finish, use some fabric/textile glue to stick the fabric inwards covering both the wood and the taped pin edges.
I can't see anyone spending more than £15 to make it. Oh my, this was meant to be a quick post and it is now 2am! How to Make Clothing Buttons from Shrink Plastic… This tutorial is an old one of mine that’s too good not to share again.

Since posting the first time, I’ve had lots of questions about these buttons which will hopefully be answered in this revised post. Equipment Some handy notes: 1. The buttons. Single hole, hole punch (like this one here). 2. 3. Okay.. lets get started! Tracing tips: You can use either coloured pencils or permanent pens. Words must be writted backwards in order to be readable. Shrinking the buttons: To shrink the buttons, you can use an oven or a heat gun (the kind used for embellishing). After the buttons have twisted and twirled, and are LYING FLAT, it’s time to take them out. Note: If the skrinking is taking too long, you may need to turn your oven up.
Here’s a short little stop-motion to make sure you’ve got the gist of how easy this is! Shrink Paper {here} Circle Punch {here} Hole punch {here} Pens {here} Update: I’ve made a video to show how to shrink the buttons using a craft embellishment heat gun. Kimanh.