
DIY- Anthropologie "Perched Harmonies" Necklace. Ready for another tutorial?
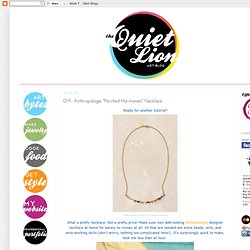
What a pretty necklace. Not a pretty price! Make your own $68-looking Anthropologie designer necklace at home for barely no money at all. All that are needed are some beads, wire, and wire-working skills (don't worry, nothing too complicated here!). It's surprisingly quick to make, took me less than an hour. Get out your pliers; let's make some jewelry! Step 1: Gather materials. I used just plain glass rounds, as the Anthropologie necklace uses faceted gemstone beads. Step 2: Make the wire pendant. Time to hammer. When it looks slightly flatter, hammer the ends extra hard to sort of "push" the wire outwards, flattening it a lot. Step 3: Make the holes. Step 4: Add your beads to the pendant. Little Red Infinity Dress Tutorial. February 14, 2011.
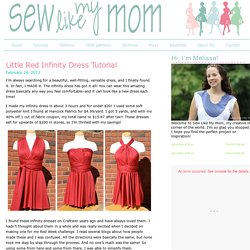
DIY projects made from everyday objects. I was inspired to make this DIY tote bag after I took a trip to the farmer's market and realized I needed a comfortable and lightweight bag to carry all my goodies.
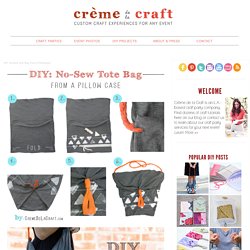
I love the way this DIY project turned out and, more importantly, there was no sewing involved! A pillowcase already has all the stitching you need to create this easy and stylish tote bag. The cross-body shoulder strap also makes it super comfortable to carry around all day. Just grab a pillowcase from your dresser, stamp it, give it a couple snips and you've got a custom carry-all tote for your next trip to the market! Follow the steps below to make your very own. Materials: • King Size Pillowcase (you could also use a standard size, but the bag will be smaller. . • Acrylic Paint and a Dish Sponge (if you wish to add a pattern to the bag) • Long Fabric Strip (for the strap) • Scissors • Lay the pillowcase flat with the open end facing towards you. Embellished Tee with Fabric Strips. I have been on a thrifty hunt to add to my maternity wardrobe.
Remember how it all began with the flower embellished tee, found here? Well, more simple tees were purchased and and more simple embellished tees have been making an appearance on this ‘ol pregnant self of mine. Yay for simple comfy knits. This next shirt, is embellished with fabric strips. That’s it. Many little strips of fabric, sewn right next to the other, with turned up knit edges. Nice and basic but more fun to look at than a plain tee. Note:Whenever I embellish with knits and leave the edges raw, I always hang dry the clothing. Would you like to make your own? Note: You will not need a ton of extra fabric to create the strips of the front, so you could just purchase one long-sleeved shirt and turn it into a half-sleeve shirt and use the extra fabric from the sleeves for the strips on the front…………….OR, you can save the major pieces of the shirt for a future project.
Then I pinned each strip in place, at the top and bottom. DIY 20 Minute Beach Cover Up. ** NO SEW VERSION CLICK HERE!

****HIGH-BACK VERSION/STREET WEAR- CLICK HERE****HALTER VERSION- CLICK HERE****MAXI WITH THICK STRAPS HERE** Need more help? Click HEREProbably my favorite 'la vie' project... ever. I was browsing through a swimwear catalog and saw an adorable beach cover up. The Blog: Delicate DIY Bird's Nest Necklace. J'adore delicate gold jewelry (and j'adore ma mama) so I decided that I would make this for my mom's birthday!
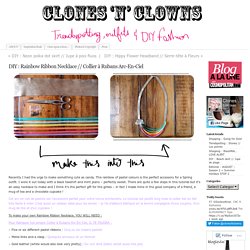
See the steps below by clicking "Read More" I snatched the idea from the inventive Sarah Ortega's post. Sarah used silver wiring and experimented with both 20 and 24 gauge wire for her cute little nests. I settled on 24 gauge gold wire and whimsical soft pink frosted pearl beads for the eggs. The proud mama bird has has four daughters so I thought it would be cute to use 4 of the smaller pearls to symbolize her four children. 1) Arrange the beads on the wire however you like. 2) Start wrapping the wire around the beads to create the nest. DIY : Rainbow Ribbon Necklace // Collier à Rubans Arc-En-Ciel. Recently I had the urge to make something cute as candy.
This rainbow of pastel colours is the perfect accessory for a Spring outfit. I wore it out today with a black teeshirt and mint jeans – perfectly sweet. There are quite a few steps in this tutorial but it’s an easy necklace to make and I think it’s the perfect gift for the girlies – in fact I made mine in the good company of a friend, a mug of tea and a chocolate cupcake !
Cet arc-en-ciel de pastels est l’accessoire parfait pour votre tenue printanière. Le tutorial est plutôt long mais le collier est en fait très facile à créer. How-to make the Infinity Convertible or Wrap/Twist Dress. **disclaimer: I am not a professional designer or tailor by any means.
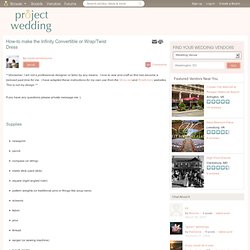
I love to sew and craft so this has become a beloved past time for me. I have adapted these instructions for my own use from the Shira.net and Rostitchery websites. This is not my design.** If you have any questions please private message me :) Supplies newsprintpencilcompass (or string)metre stick (yard stick)square (right angled ruler)pattern weights (or traditional pins or things like soup cans)scissorsfabricpinsthreadserger (or sewing machine)1 inch elasticbodkin (or safety pin)large open space (floor or table) Wrap Cardigan is Womens Wardrobe Must-have.