
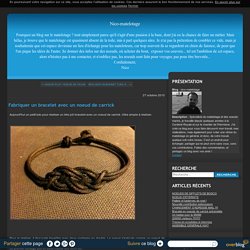
Bracelet tressé en laiton par brasslady. Fabriquer un bracelet avec un noeud de carrick. 27 octobre 2010 3 27 /10 /octobre /2010 22:13.
DIY Bracelet Tutorials. DIY Gold Tube Bracelets. I have very vivid memories of walking into a bead store for the first time, almost 15 years ago, and being overwhelmed by the million and ten ideas that filled my mind.
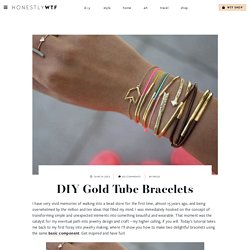
I was immediately hooked on the concept of transforming simple and unexpected elements into something beautiful and wearable. That moment was the catalyst for my eventual path into jewelry design and craft – my higher calling, if you will. Today’s tutorial takes me back to my first foray into jewelry making, where I’ll show you how to make two delightful bracelets using the same basic component. Get inspired and have fun! For single, adjustable gold tube bracelets, you’ll need: Start by cutting the knotting cord into 2 12 inch pieces. And now, all that’s left is the sliding closure! . . . and bring the top cord under both the bottom and middle overlapping strands through the loop, into a knot. Repeat the same step on the right side. Continue to make 5-6 more knots. Trim away any excess cord. Delicate Chain Bracelets. All though it could be said that I’m the queen of “more is more,” lately, I have been obsessed with dainty little baubles… especially in the form of delicate chain bracelets.

I’ve bought a few here or there, but then it dawned on me – why not make a few, repurposing some old chain necklaces that I no longer wear. They’re incredibly easy to make… I made three – one with a safety pin, another with a gold tube bead, and one with a little star charm. I’m wearing the homemade versions on the right side. On the left side, my bracelets are Cartier, Gorjana, and Derng. Materials / Where to Buy: Old necklace or delicate fine chain // charm // safety pin (I used a tiny brass one that came in this set.) // 3mm jump rings // 6mm jump rings // needle-nose pliers // tube bead //wire nippers (not pictured) To make the tube bead bracelet: 1.
To make the safety pin bracelet: 1. To make the star bracelet: 1. D.I.Y: bracelet tressé avec des perles et un noeud ajustable - Trop Top Tendance - Astuces et tendances mode, beauté, déco, et plus! Ce qui fait la différence entre un ensemble ordinaire et un ensemble qui a du punch, ce sont souvent les accessoires!

Quand j’ai l’impression que ce que je porte est trop simple et que j’ai envie d’être créative, j’aime agencer plusieurs bracelets ensemble pour donner un peu plus de personnalité à mon style. Mais, parfois, il est difficile de trouver LE bracelet qui irait si bien avec nos autres bijoux… alors pourquoi ne pas le fabriquer soi-même? Aujourd’hui, je vous montre donc comment réaliser ces jolis bracelets faits à partir de fils et de perles, qui sont idéals pour être «mixer» avec d’autres, et qui, en plus, sont ajustables. Comme d’habitude, vous comprendrez que vous pouvez choisir les couleurs de fils et de billes qui vous plaisent, ainsi que la grosseur des billes, ce qui peut totalement changer l’aspect du bracelet.
Laissez aller votre imagination! Commençons par le matériel nécessaire: Et voici les étapes pour réaliser le bracelet: DIY Macrame Bracelet. Growing up by the beach in Southern California, the ability to knot a macrame bracelet was practically a right of passage.

Although those days are long behind us, we’ve never forgotten the ever-so-simple square knot technique. This time, however, we’re replacing hemp and wooden beads for more updated elements like colorful nylon cord and glossy metal charms. Happy knotting! You’ll need: Start by cutting the knotting cord into two 30 inch, two 20 inch and one 10 inch lengths. Center the 30 inch cord under the two middle strands. Pull tightly and slide the knot up to the top. Finish the 2nd half of the square knot by folding the left cord over the middle strands and under the right cord. Pull tightly and repeat the steps – left, right, left, right . . . To finish the knots, thread one of the cords onto a needle and sew up the center of 3-4 knots along the backside. DIY Braided Bead Bracelet. It’s been awhile since our last bracelet DIY.

I don’t know about you, but our wrists have been begging for another colorful addition for months now. So after playing with some materials that were already on hand, we’ve created a tutorial for a braided bead bracelet, which is a not so distant cousin of the hex nut and wrap bracelet. Because honestly, you can never have too many . . .
DIY Braided Hex Nut Bracelet. We’re nuts for nuts.

Is there a more versatile and inexpensive DIY component than a hex nut from the hardware store? You can imagine our excitement when we first discovered Philip Crangi’s Giles & Brother Hex Collection. Honestly, nuts braided into jewelry is WTF genius! With a few items that we always seem to have lying around, we tackled the technique and made our own spine-like braided hex nut wrap bracelet. You’ll need:3 strands of cotton butcher’s twine cut into one yard pieces18 small brass hex nutsa bit of dexterity! Gather the 3 strands of twine and tie a knot at the top, leaving about 2 inches of slack. Keep your thumb at the base of the braid, holding the nut in its place. Repeat the steps, by threading the rest of the nuts to the outer pieces of twine before they are crossed over.