How to: home made anti acne masks. Acne is an annoying problem that causes inconvenience not only to teenagers, but also to adults. Anyone that have or had this problem knows that there is no ‘cure’ that will magically clear the skin once and for all. To get the maximum effect and control the acne, it is necessary to combine different treatments. Homemade anti acne face masks should be part of the skin care routine for skin prone to acne. The only problem is that every treatment doesn’t have the same effect in all people, so you need to experiment and find the solution that works the best for you.
These homemade anti-acne face masks are completely natural, they will clean the pores, make the skin firmer and reduce the redness. Homemade anti acne face mask with apples and honey: You may be tempted to cut the apple, drizzle some honey on it and eat it as a snack, but resist the temptation and make a homemade anti acne face mask so you can feel the benefits of apple and honey to your skin. Salt can naturally clean the skin. Nails: Nail Polish Tips, Prevent chips, base coat, top coat all about nail polish! Apply polish remover before doing your nails even if don't need to remove any old polish, it prepares the nails by removing any oil so that your polish will last longer and adhere better.
When cleaning the house and doing the dishes, be sure to wear gloves; prolonged exposure to water can cause nail damage because it will dry out your skin and nails. Store your nail polish in the refrigerator. It will last longer and be easier to apply. Try it on before you buy! Sally Hansen - Beauty that Works has a great online tool that allows you to match polish to your skin tone. You can actually try it on and create the perfect look! Nail Polish Tips & Tricks: Longer lasting chip free nail polish <A HREF=" Have you ever had a manicure at a professional salon? You need to properly prepare your nail bed for the polish to adhere to it correctly. Priming Priming is a crucial step during any polish change.
Nail polish Base Coat What does a nail base coat do? Nail polish Top Coat. How to: 8 different home facials. Facials are a great way to keep your skin glowing, but they can be pricey. We asked Louisa Macan-Graves, author of Hollywood Beauty Secrets: Remedies to the Rescue, and Elda Argenti, owner of the Plantogen skincare line, for their favorite make-at-home face masks crafted from common household ingredients. For All Skin Types Brighten: Cut a slice of ripe papaya and remove the seeds and pulp (save the pulp for a snack later—it’s great for digestion). Rub the inside of the papaya peel on your cleansed face, focusing on lines around the mouth and eyes, crow’s feet, thinning temples, neck and hands. Exfoliate: Combine 1 tsp honey and 1 tsp olive oil. Cleanse: “Believe it or not, I love to cleanse with oil,” says Argenti. For Oil- and Blemish-Prone Skin Lift & Tighten: Combine 2 Tbsp plain yogurt with 1 Tbsp fresh lemon juice (the juice of one lemon) and apply to your cleansed face and neck.
For Dry Skin Soothe: Combine 2 Tbsp honey with 1 Tbsp apple cider vinegar or lemon juice. Makeup Mon...errr Tuesday: Green Eyes. First, I know it's Tuesday and I'm predictably late with Makeup Monday. I hope the lack of alliteration doesn't detract from the post; I promise that I have lots of great excuses for not putting this up yesterday. Or, I fell asleep. One of my first forays into the wonderful world of bright eyeshadow was with a beautiful shade of green from Milani (whose older shadows were amazing), and I was forever hooked. Green has since become the most popular color in my rather large makeup collection, though I can't remember the last time I gave them a proper spotlight. That was rectified immediately, upon my recent purchase of the Urban Decay Black Palette, which has a beautiful dark emerald that was surprisingly missing from my arsenal.
This collection is hands down my favorite shadow palette to date: each color is highly pigmented and though they are all darkdarkdark, the duochrome is prominent enough to be unique. This will make the colors pop and keep them from creasing. DIY - MAKE YOUR OWN WAX FOR HAIR REMOVAL - Fashion + Beauty on Shine. I was chatting with someone on my flight back from my vacation. She lived in another country where salons are hard to come by or if they are around, they aren't very good.
So, sometimes a girl has got to depend on herself. You can make one on your own so easily. So when I described it to her, she loved it and she said I just have to put it up online. Wax recipe Ingredients 2 cups sugar ¼ cup water ¼ cup lemon juice Method Pour the sugar, water and lemon juice in a saucepan, and heat it over a low flame. How do you know it is done? Take a glass of water and put a drop of wax into it. Benefits of making your own WAX: 1. Waxing strips: We used to do this in college all the time. NOTE: The inner facing fabric of the jeans should be the one touching your skin otherwise if you use the opposite side, your skin will probably get blue with the denim color. Waxing technique Test the temperature before applying the wax to your skin. Benefits of Waxing 1.
Makeup Tutorial: How To Create A Simple Smoky Eye | Makeup For Life – Beauty Advice, Product Reviews, Makeup Tutorials, Celebrity Makeup. Since you guys wanted to see more step-by-step tutorials, I will be doing a series of makeup tutorials starting with one of my favorite looks, smoky eyes. One thing I LOVE about the smoky look is how versatile it is. You can use pretty much any color and you can go from a soft smoky to a really dramatic one. My favorite colors to use on my brown eyes are purples, blues, greens, bronzes and charcoals. In my tutorial below, I used golds and browns but feel free to substitute them with other colors. Step 1. What I Used: NARS Pro Prime Smudge Proof Eyeshadow Base Step 2. What I Used: MAC Chilled On Ice Paint Pot Step 3. What I Used: NARS Eyeshadow Duo in Cordura Step 4. What I Used: NARS Eyeshadow Duo in Cordura Step 5.
Step 6. What I Used: MAC Fluidline in Blacktrack Step 7. What I Used: MAC Eyeshadow in Pollen Step 8. What I Used: Rimmel London Lash Accelerator in Extreme Black; Makeup For Life Lashes in #Hugs ‘n Kisses Step 9. What I Used: Rimmel London Lash Accelerator in Extreme Black. A Twist on the Ombre or Gradation Manicure | All Lacquered Up. Tips:*Have your nails prepped with base coat applied before beginning.
*Apply the polish as soon as it is mixed. Exposure to air will cause it to thicken quickly and dry shortly after. *Mix the lightest color first and apply immediately before moving on. *Clean your brush with remover between colors to avoid streaks from previously mixed polishes. *Regarding my formulas below, I remove the brush from the bottle without wiping it against the sides and the amount that drips off equals one drop. Note: Because this is a demo I only mixed colors for my middle and ring fingers and left my thumb out. Ring finger mix: Start with 7 drops of Milf and add 1 drop of Orbis Non Suficit.
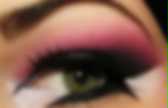
Middle finger mix: Use an equal amount of both lacquers. 4 drops each of Milf and Orbis Non Suficit. The Finished Result! What I love about this look is that it’s much softer than the “Skittles Nails” I’ve worn in the past. So what do you think of this look? Quick Makeup Tutorials: Arabic Pink Purple Makeup Tutorial | Makeup Ideas.