
Master a perfect inline wire splice everytime. In this instructable i will teach you how to make a perfect inline wire splice, every time What is an inline splice?
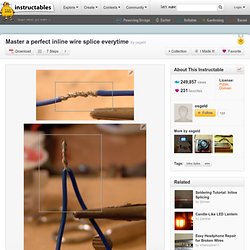
Well, if you work with any type of electrical wiring, and need to join 2 pieces of wire you have 2 choices, pigtail or inline Pigtail splices are when you hold the 2 pieces of wire, one end going up, the other going down, and twist their stripped ends together. Forum. Contrôleur de moteur pas à pas. Ce circuit Open Source "EasyDriver", compatible Arduino permet de commander les moteurs pas à pas bipolaire jusqu'à 30V et 750mA par phase.
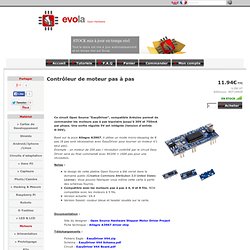
Une sortie régulée 5V est intégrée (tension d'entrée 6-30V). Basé sur la puce Allegro A3967, il utilise un mode micro-stepping de 8 pas (8 pas sont nécessaires avec EasyDriver pour tourner un moteur d'1 seul pas). Exemple : un moteur de 200 pas / révolution contrôlé par le circuit Easy Driver sera au final commandé avec 8X200 = 1600 pas pour une révolution. Sending Multibyte Numbers from ActionScript to Arduino at Mike Chambers.
If you follow me on twitter, then you have probably noticed that I have been learning about Flash, physical computing and electronics lately. I started out working with Phidgets, and have recently begun working with the Arduino (Ill write up Flash / Arduino getting started tutorial shortly). I am currently working on a project where I need to send data from Flash to the Arduino, and quickly discovered that it is not as easy as I thought it would be. In this post, I will show an example of how to send multibyte Numbers from ActionScript to Arduino. <! --more--> When you send data to Arduino over the Serial port, Arduino reads that data byte by byte. And then read the same number in Arduino by reading the byte: value = Serial.read();Serial.println(value, DEC); //will send 127 However, if you need to send a number larger than 127, then things get a bit tricky.
LCD4884 Shield For Arduino (SKU:DFR0092) The DFRobot LCD4884 LCD Shield. Learn how to use the DFRobot LCD4884 Arduino LCD shield. Updated 19/03/2013 This needs to be updated for use with Arduino IDE v1.0.1 and greater… however we no longer have a shield to test it. Stay tuned via twitter to find out when this is updated. This article is my response to a request on how to use the LCD4884 LCD shield from DFRobot in China. It is a simple way of displaying text and the odd graphic, as well as another way to accept user input. From a hardware perspective the LCD has a resolution of 84 by 48 pixels, with a blue back light. Along the bottom-left of the shield are solder pads for some other I/O options, however I couldn’t find any documentation on how these are used.
Controlling the backlight is very easy, just use: digitalWrite(7, HIGH/LOW) to turn it on and off. PinMode(7, OUTPUT) in void setup();. Arduino. Piloter une CNC par une Arduino avec Grbl : multiplateforme et USB ! Edit: Un billet sur une version plus récente de GRBL est disponible : Introduction: la CNC sur arduino Arduino est une petite carte électronique open hardware, avec son environnement de développement open source, qui permet très simplement de développer en C et de tester en envoyant par un lien USB sur la plateforme.
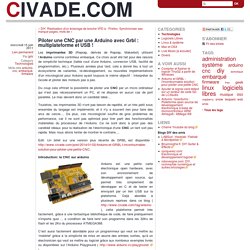
Déjà abordée à plusieurs reprises dans ce blog ( ), cette plateforme permet très facilement, grâce à une fantastique bibliothèque de code, de faire pratiquement n'importe quoi ... a condition de faire tenir son programme dans les 32Ko de flash et les 2Ko du processeur ATMEGA368. » Arduino music from a midi file jarv.org. Recently I wrote an Arduino / AVR lib and python script so that I could take three parts from a midi file and playing them simultaneously using the three Arduino timers. There are already plenty of other ways to generating tones using an Arduino.
You can play music from a midi input there is a library for playing PCM audio and similar projects for playing music using all three Arduino timers simultaneously. I’ve also played around with AVR sound generation before in previous posts. What you need to get started How music is generated using an Arduino On the Arduino and in general on the atmega168 and 328 there are 3 timers that operate independently of each other in hardware.
Here are the match values that correspond to different pre-scalers and their corresponding piano notes at 16MHz. Let’s start making music.. Copy playtune.cpp and playtune.h to a “PlayTune” directory in the libraries folder of your Arduino install. So that was fun (but boring).. SMB theme in Musescore. CapSense Arduino Library with Teensy, for Capacitive Touch and Promimity Sensing. Digital camera control using Arduino USB Host Shield. Part 1 – basics. Arduino taking picture of itself I’m starting new series of articles describing exciting field of digital camera control.
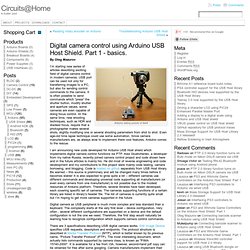
In modern cameras, USB port can be used not only for transferring images to a PC, but also for sending control commands to the camera. It is often possible to send commands which “press” the shutter button, modify shutter and aperture values, some cameras are even capable of doing focus control. At the same time, new shooting techniques, such as HDR and stacked focus, require that a photographer makes several shots, slightly modifying one or several shooting parameters from shot to shot.
Even age-old time lapse technique could use some automation. I am announcing new code developed for Arduino USB Host shield which implements digital camera control functions via PTP. Digital camera as USB peripheral is much more complex and less standard than a keyboard. There are 3 specifications describing USB digital camera works. Let’s talk briefly about PTP protocol.
Oleg. SammyIAm/Moppy - GitHub.