
» ATtiny45/85 Servo Library Cunning Turtle. Charliecube - Asher Glick. Pixy (CMUcam5): a fast, easy-to-use vision sensor by Charmed Labs and Carnegie Mellon. "This is the single most important robotics product since the Arduino.

" Ted Macy, Contributing Editor, Robot Magazine. The Shrimp. Moving Servos with a SSC-32 and an Arduino - Robotics. Next, you have to connect a jumper from RX on the SSC-32 to TX on the Arduino.
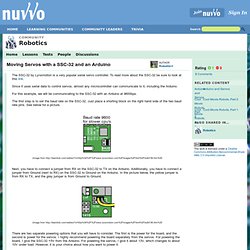
Additionally, you have to connect a jumper from Ground (next to RX) on the SSC-32 to Ground on the Arduino. In the picture below, the yellow jumper is from RX to TX, and the grey jumper is from Ground to Ground. (Image from There are two separate powering options that you will have to consider. The first is the power for the board, and the second is power for the servos. Install the Arduino IDE in Ubuntu 12.04. Installing the Arduino IDE in Ubuntu only takes a few minutes.
As usual, it’s a better idea to install the Arduino straight from the source, instead of relying on the version in Ubuntu’s repository. While it wasn’t hard to install the Arduino IDE, I noticed that the Arduino GUI was really slow and laggy. This is because the startup script tells Java to use Ubuntu’s GTK look and feel, which makes everything run slowly. It’s easily fixed by changing a single line in the startup script. Update: In the Arduino 1.0.1 update, “Serial Port” is greyed out. Install the Arduino IDE in Ubuntu. Getting Arduino UNO to work in Linux. As of now (early July, 2011), the UNO is broken in Linux.
The board is shipped with a firmware that makes it practically impossible to use in Linux. The symptoms are : {*style:<ul style="padding-left:20px;"><li> Arduino IDE unable to detect serial port, or loosing it randomly, making it very difficult to upload a sketch or to open serial monitor. Inability to detect the board from within Pd in a predictable fashion.
Arduino + WiiChuck steered laser pointer - Maxoffsky. MikMo. GoBetwino 0.6 on the way – for real :-) September 18th, 2011 After a very long break from work on GoBewtino, caused by having a baby, moving twice and a generally busy life, i have begun to finish the work on the next version of GoBetwino that i started two years ago. The most important new features in version 0.6 : 5 new command types, including file upload with FTP, and posting Twitter status updates.All code concerning sending and receiving emails have been totally rewritten, so now mail accounts that require SSL (Gmail for instance) can be used.Serial monitor like functionality build in to simplify debugging while using GoBetwino.It’s now possible to test commands without having your Arduino connected. Gobetwino. I can't guarantee that every mail will receive an answer but I will try. Sculpey Polymer Clay - the Mokume Gane Technique. Playground - ArduinoUsers. :: Exhibition :: The place to share and show off projects.
Blog : Hacromatic: Electronics kits and projects worldwide. I couldn’t find much information about how to use the Arduino motor shield (as of late 2012), so I thought I’d show how to set up the connections for both stepper motors (4, 5, 6, and 8 wires) and DC motors, along with some basic sketches to drive them. Stepper Motors Steppers can be broadly classified as 2/4-phase or 5-phase. This breakdown covers the vast majority of stepper motors you’re likely to encounter. 5-phase motors typically provide lower vibration and smaller stepping angles than 2 and 4 phase motors, but they are less common and won’t work with the Arduino motor shield, so I’m not going to talk about those here.
That leaves 2/4 phase motors. FrSKY Telemetry Projects - Flytron Projects. This tiny PCB including only 3 component for measuring the 0-36V over FrSky’s brilliant analog voltage input. Our new FrSky telemetry display supporting this sensor. You can build it your self or buy from our shop. Hi Guys Here is the our new telemetry firmware (v2.6 didn’t released yet) and ground station software. Electronics : Microprocessors : How to make an Arduino-compatible minimal board.
Make your own board Once you have been playing with Arduinos for a while you probably are thinking that you want to deploy one, but without the expense, and physical size, of using a whole new Uno board.
This post describes how to do that. AtMega328P chip We will start off with a "raw" Atmega328P-PU chip, the sort of thing you might buy off the shelf from Digi-Key, Element14, or other suppliers: Note that pin 1 is at the end where there is a notch in the plastic and an extra hole on the top. The chip itself can be purchased for around $US 3. Arduino and 7 Segment LED. 7 Segment LED Click here to like us on Facebook! How many TV shows and movies have you seen with some mysterious electronic device counting down to zero on one of those 7 segment LED displays? If we were in that situation, we would be thinking: "Wow, where did they get that in cool blue? They are usually red. " Operating Two Servos with the Arduino. The Arduino can control two servos with the same ease as one.
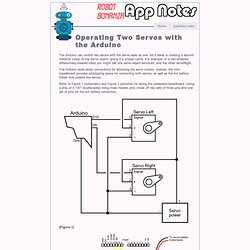
All it takes is creating a second instance (copy) of the Servo object, giving it a unique name. For example, in a two-wheeled differentially-steered robot you might call one servo object servoLeft, and the other servoRight. The Arduino lacks direct connections for attaching the servo motors. Instead, the mini breadboard provides prototyping space for connecting both servos, as well as the AA battery holder that powers the servos. Refer to Figure 1 (schematic) and Figure 2 (pictorial) for wiring the solderless breadboard.
Code, circuits, & construction. A stepper motor is a motor controlled by a series of electromagnetic coils.
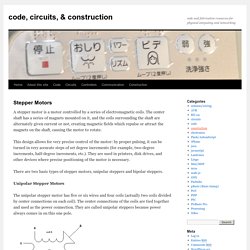
The center shaft has a series of magnets mounted on it, and the coils surrounding the shaft are alternately given current or not, creating magnetic fields which repulse or attract the magnets on the shaft, causing the motor to rotate. This design allows for very precise control of the motor: by proper pulsing, it can be turned in very accurate steps of set degree increments (for example, two-degree increments, half-degree increments, etc.).
They are used in printers, disk drives, and other devices where precise positioning of the motor is necessary. There are two basic types of stepper motors, unipolar steppers and bipolar steppers. Top 40 Arduino Projects of the Web. Burn a bootloader to a blank atmega328/atmega328p with an Arduino UNO. Build your own optiLoader shield!
You cant use your Arduino UNO as programmer unless you modify it, but i didnt want to do that! Some people had luck using a Resistor and Capacitor to disable the auto reset feature but it did not work for me (Using an Arduino UNO R2) So i tried using a parallel port programmer but never got it to work. It seems easy, so if your interested go ahead and try it yourself, but be warned, could lead to frustration :)
It Editor. Arduino-Python 4-Axis Servo Control. Top 10 DIY Arduino Projects and HOW-TO Tutorials! Freeduino. YourDuino. NEW!

Easy Credit Card Payments. AccelStepper: AccelStepper library for Arduino. This is the Arduino AccelStepper library. Editing "Unnamed Circuit" Minimalist Arduino. Arduino: The Documentary (2010) LED Cube Editor. Gleichstrom-Getriebemotor GMPD/404980-1, 12 V- - Motoren - DC-Getriebemotoren - Arduino GCode Interpreter. This page describes something which is no longer the most recent version. Contraptions - Contraptor. Micro Maestro 6-Channel USB Servo Controller (Assembled) The six-channel Micro Maestro raises the performance bar for serial servo controllers with features such as a native USB interface and internal scripting control. Microcontroller circuit with copper tape.
Making a circuit with a microcontroller, battery, and LEDs connected by copper tape. Components (for more, see our electronic components page): Arduino: Dynamic Turning: Servo: Speed Freak Eye: Houston, we have a problem:Wiring Diagram. Spooky Projects – Introduction to Microcontrollers with Arduino. Arduino Serial Servo Control. Physical Etoys « GIRA. Introducción En las últimas décadas, las teorías construccionistas y el progreso tecnológico permitieron que la robótica educativa comience a surgir en algunas escuelas como complemento a diversas materias de la currícula. Sin embargo, cada kit de robótica tiene su manera particular de programarse y no permite la comunicación con otros kits.
Es por esta razón que se decidió crear Physical Etoys, una extensión argentina de Etoys que facilita la interacción con estos dispositivos. Minibloq. Arduino hacks. Playground - Ps2mouse. Mini Volt Meter ID: 460 - $7.95. The World Famous Index of Arduino & Freeduino Knowledge. Modern Device. The Open-Source Photographic Motion-Control Community. Playground - Hall Effect. Navigation History. Main Sheepdog Guides Arduino Page- (ArTut.htm)