
DIY projects made from everyday objects. I've been on the lookout for bright and playful jewelry for the summer and fell in love with Chan Luu's stylish wrap bracelets.
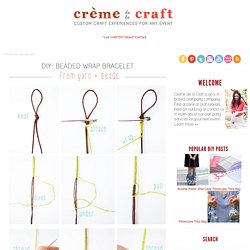
I was instantly inspired to make my own custom arm candy and complete my DIY jewelry collection. Take a trip to the craft store and grab your favorite beads and colored thread to make your own. Mix 'n match to create a one-of-a-kind design. The perfect project for a craft + movie night! Follow the steps below to make your very own. Materials: Makes a triple wrap bracelet. . • 5-6 feet of waxed cotton cord (1mm or 1.5mm thick) • 10 feet of embroidery floss • Beads (I used 30. DIY Macrame Bracelet. Growing up by the beach in Southern California, the ability to knot a macrame bracelet was practically a right of passage.

Although those days are long behind us, we’ve never forgotten the ever-so-simple square knot technique. This time, however, we’re replacing hemp and wooden beads for more updated elements like colorful nylon cord and glossy metal charms. Happy knotting! You’ll need: Start by cutting the knotting cord into two 30 inch, two 20 inch and one 10 inch lengths. Center the 30 inch cord under the two middle strands. DIY BRACELETS. There has been so much chitter chatter on pinterest lately about the stacking bracelet trend (or as some people call it - "an arm party") and I think I am jumping on the bandwagon.
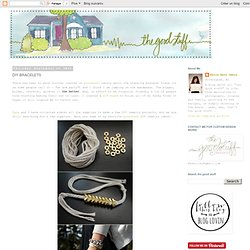
DIY Wrap Bracelet. You should all know by now that we are all about stacking bracelets on our wrists.

The more, the better. In fact . . . the most, the best! With that being said, we’ll show you how to master a version of the ever so popular wrap bracelet. It’s so simple and addicting, you’ll soon be churning out these wristlets with your eyes closed. Clearly this arm party train isn’t stopping and it’s about time you get on board! You’ll need (for a double wrapped bracelet) :* Lengths will vary depending on the size of your wrist (see comments for suggestions). Fold the length of leather cording in half to form a loop. DIY Vinyl Bowls.
How do they do it?

Make bowls out of vinyl records? I’ve tried it and I think it went very well! Button Rings DIY. My supplies of buttons just doesn't seem to get any smaller.
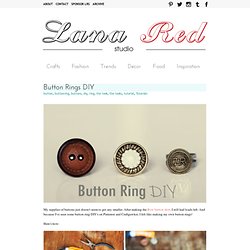
After making the Bow button shirt, I still had loads left. And because I've seen some button ring DIY's on Pinterest and Craftgawker, I felt like making my own button rings! Here's how: 1. Get your supplies: Buttons, adjustable sizes rings, super glue, pliers. Cheap Craft Ideas - Inexpensive Crafts. Adapted from Clare Youngs’s The Perfect Handmade Bag ($19.95; Cico), this cute carryall requires little more than a pair of small wooden spatulas and two tea towels ($15 each; motherlindas.com).
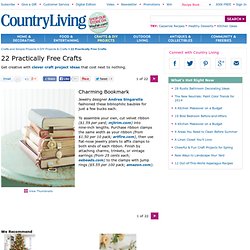
Cut six strips of fabric from one towel. Two, measuring 33⁄4"W x 141⁄4"L each, will serve as the decorative horizontal bands at the top of the tote and should incorporate the towel’s graphics (as shown, left). The other four, measuring 31⁄2"W x 8"L, will form tabs for the bag’s handles. Turn under the long sides of each strip and press a 1⁄4" hem. To make a tab, topstitch one of the long sides of a 31⁄2"W x 8"L strip near the edge. Lay the second towel on a flat surface, right side up. Flip the towel right side down. Fold the towel in half, wrong sides together.
Utility Cord Bangle. Teacher’s Badge Holders. Can you believe it?
School is almost over! I was at the school on Tuesday and I realized that all of the teachers wear their identification badges everyday. I actually wear my house and car keys around my neck also {since it is the only way I can keep track of them} in something like this. picture source And then I thought, how hard would it be to come up with my own key-badge holder? Before I knew it there I was at JoAnns looking for “lanyard”. This is what you’ll need: A small amount of leftover fabric {or you can use some cool ribbon}, the lanyard {a little bit over a yard} you can buy it at your local Fabric Store, glue gun, scissors, a key ring {I used the one from my old holder} and Fray Block {optional}
Quick bread in a bottle. Cool weather puts us in the mood to bake.
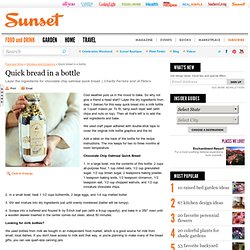
So why not give a friend a head start? Layer the dry ingredients from step 1 (below) for this easy quick bread into a milk bottle or 1-quart mason jar. To fit, tamp each layer well (with chips and nuts on top). Then all that's left is to add the wet ingredients and bake. We used craft paper adhered with double-stick tape to cover the original milk bottle graphics and the lid. Add a label on the back of the bottle for the recipe instructions. Chocolate Chip Oatmeal Quick Bread.