
Using Viewport Canvas - Part 1. 3ds Max/3ds Max 2010 Quick Tips. Well Im no expert really this is for my sake cause I forget things real easy and also a good reference for beginners out there.
These are very beginner tips so if you are an expert and you think I missed some really good tips then send me buzz I'll add it here and I will thank you for teaching me. Here we go: * While doing something and you decide you dont wanna continue press RIGHT CLICK, this is while your about to finish an action. * Use ALT and CTRL then right click or left click to change the number of frames while moving your mouse.
This is when your doing animation. * To change the gizmo location go to the HIERARCHY tab and control the gizmo to affect pivot only. * Use Pivot Point Centre to change orientation of where you transform your object. . * Position an object to a surface use the Normal align under the align icon drop down. . * Use snap for accurate positioning. * When doing an animation of a moving object its nice to see an outline to the direction of that object. Louis marcoux - 3ds Max Tips & Tricks. Kanal uporabnika 3dsMaxHowTos. Kanal uporabnika 3dsMaxHowTos. Vray grass tutorial part 2 « Peter Guthrie.
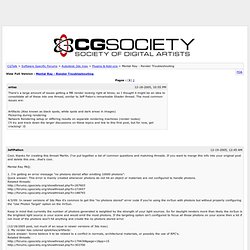
Longer grass - some stats: approx 8000 polys per proxy x 1000 proxies = approx 8 million total polygons. 3dsmax uses about 2 gig memory for this scene and each view rendered pretty quickly considering I had vrayfog and depth of field on.

Note: I use vrayscatter (a commercial plugin but well worth the money) to scatter the proxies. There are lots of tutorials for it here. You can also use scatter by Peter Watje, advanced painter, Forest by Itoosoft, Groundwiz Planter or 3dsmax particles. Material set up: The main material for the grass is a multi-sub object with 3 materials within it. Mental Ray - Render Troubleshooting. Cool, thanks for creating this thread Martin.
I've put together a list of common questions and matching threads. If you want to merge this info into your original post and delete this one...that's cool. Mental Ray FAQ: 1. I'm getting an error message "no photons stored after emitting 10000 photons": Quick answer: This error is mainly created whenever photons do not hit an object or materials are not configured to handle photons. 4/3/09: In newer versions of 3ds Max it's common to get this "no photons stored" error code if you're using the mrSun with photons but without properly configuring the "Use Photon Target" option on the mrSun.
Keep in mind that currently the number of photons generated is weighted by the strength of your light sources. Making Interior Scene. First of all have to create help lines in Adobe Photoshop (using line tool) to set the perspective of the image. These lines should meet in one point. Open 3d Studio Max Now open Views -> Background view (shortcut ALT+B), it will allow You to select Viewport Background. Choose the reference file from hard disk and press ok. Now You have to change render output in rendering menu to match the resolution of reference file (in our case 1025 x 819 ). Now in your selected viewport rightclick in top-left corner and select show safe frame. Next let's create a simple box in scene.
This box will be a modeling base for our room. Create Vray Physical Camera in the left corner of the box. Matching camera isn't easy task. Making of Esherick House, Part 2 - 3D Recreation with 3dsmax & Mental Ray. 111 Flares Facebook 0 Twitter 21 Pin It Share 8 Google+ 80 LinkedIn 2 inShare2 StumbleUpon 0 Reddit 0 111 Flares × Picking up where he left off in Part 1, Ludvík dives into materials setup in great detail in Part 2 of the Esherick House Making Of series.
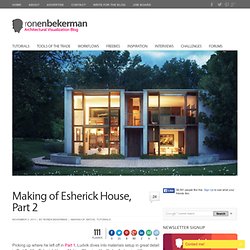
You’ll also find a nice little scene with some materials to play with inside. I initially thought of adding the Lighting section here too but both are too long and stand on their own anyway, so Lighting will be published in Part 3 shortly after. Materials are probably one of the most important aspects of my work (that and the lighting), since everything you see is covered with them. Overall, you should use only these 3 shaders: Arch&Design (mi) (A&D from now on).Car Paint.Up to date Fast SSS Skin + shader by Master Zap, at – Zap’s Mental Ray Tips. Of these 3 shaders, A&D shaders are the ones you’ll use the most.
Every single material in my scene is A&D. A&D is sort of the equivalent of V-Ray Advanced Material. Get the Files! Wood.