
A Quick Guide to Inkscape. This is a guide is for artists or hobbyist who are already familiar with one vector drawing application and are looking to try Inkscape.
Even if this isn't you, you might still find this guide useful. It will hopefully be a good quick reference to help users overcome the hurdle of getting to know a different application, reveal some of the differences with other vector drawing applications, and highlight just a few of Inkscape's lesser known or more attractive features. Many simplistic and obvious features aren't described at all in this guide. For a thorough guide to all of Inkscape's features, visit In most cases I only list keyboard shortcuts for functions, but many of these functions are also found easily in the menus or on palettes and toolbars. Contents The Inkscape Window Note that the Tool Control Bar will display icons specific to the tool you have selected. Generate from Path. This group of extensions creates new objects from one or more existing paths.
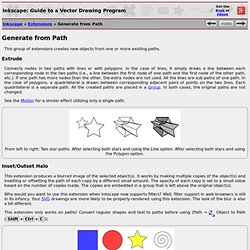
Connects nodes in two paths with lines or with polygons. In the case of lines, it simply draws a line between each corresponding node in the two paths (i.e., a line between the first node of one path and the first node of the other path, etc.). If one path has more nodes than the other, the extra nodes are not used. All the lines are sub-paths of one path. In the case of polygons, a quadrilateral is drawn between corresponding adjacent pairs of points on the two lines. See the Motion for a similar effect utilizing only a single path. This extension produces a blurred image of the selected object(s). Tutorial: Tracing. Home One of the features in Inkscape is a tool for tracing a bitmap image into a <path> element for your SVG drawing.
These short notes should help you become acquainted with how it works. Currently Inkscape employs the Potrace bitmap tracing engine (potrace.sourceforge.net) by Peter Selinger. In the future we expect to allow alternate tracing programs; for now, however, this fine tool is more than sufficient for our needs. Keep in mind that the Tracer's purpose is not to reproduce an exact duplicate of the original image; nor is it intended to produce a final product.
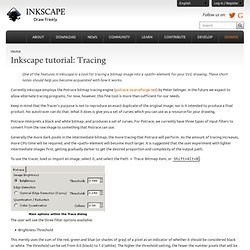
Potrace interprets a black and white bitmap, and produces a set of curves. Generally the more dark pixels in the intermediate bitmap, the more tracing that Potrace will perform. To use the tracer, load or import an image, select it, and select the Path > Trace Bitmap item, or Shift+Alt+B. Tutorial: Interpolate. Home Ryan Lerch, ryanlerch at gmail dot com This document explains how to use Inkscape's Interpolate extension Introduction Interpolate does a linear interpolation between two or more selected paths.
It basically means that it “fills in the gaps” between the paths and transforms them according to the number of steps given. To use the Interpolate effect, select the paths that you wish to transform, and choose Effects > Generate From Path > Interpolate from the menu. Creating tileable patterns with GIMP, Inkscape and Blender « BenSimonds.com. Trying to isolate a tileable pattern from a photo or sketch to use in your 2D and 3D projects can be a pain, and often involves tedious tracing of patterns by hand.
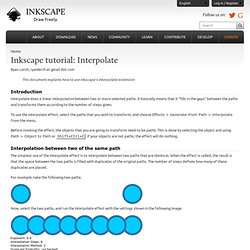
I’ve come up with a method for generating tileable raster/vector/3D curve based patterns from photos that automates some of the tedious parts and gives good results, using the free and open source softwares GIMP, Inkscape, and Blender. For this tutorial I’ll be using one of the free textures from CGTextures.com: Stage 1: GIMP Our aim in the GIMP is to simplify the image as much as possible, so that later the automatic extraction of the pattern can be achieved with minimal input from us.
This involves identifying the repeating unit of the texture and isolating it, followed by increasing the contrast between the different elements as much as possible. Step 1. Step 2. The selective Gaussian blur dialogue. Step 3. Left: Selection by colour. Step 4. Tutorial: Tips and Tricks. Home This tutorial will demonstrate various tips and tricks that users have learned through the use of Inkscape and some “hidden” features that can help you speed up production tasks.
Radial placement with Tile Clones It's easy to see how to use the Tile Clones dialog for rectangular grids and patterns. But what if you need radial placement, where objects share a common center of rotation? It's possible too! If your radial pattern need only have 3, 4, 6, 8, or 12 elements, then you can try the P3, P31M, P3M1, P4, P4M, P6, or P6M symmetries. Choose the P1 symmetry (simple translation) and then compensate for that translation by going to the Shift tab and setting Per row/Shift Y and Per column/Shift X both to -100%.
Creating Patterns in Inkscape. Background patterns are a great tool for web designers.
A current trend on the web is to use a pin stripe pattern that repeats and is set at a 45 degree angle for a background image. A Vine Design—A Tiling Example. Inkscape Tutorial: Seamless Patterns. First of all: working with patterns in Inkscape is not without challenges.
Inkscape provides awesome tools to create seamless patterns, but there are quite a few things to take into account upon using them. I hope that some day in the near future I can update parts of this tutorial where things got fixed or work more user friendly. Although this tutorial is not specifically aimed at beginners, I will tell which buttons, shortcuts and menu options are used to maximize usability for users of all levels. I do assume that you know how to create objects, set fill colours, strokes and adjust opacity.