
40+ Adobe After Effects Best of Tutorials & Resources. Feb 18 2009 For months, we have been bookmarking interesting, useful and creative Adobe After Effects tutorials and Resources, so you can now rest assured that you will have the necessary tools to get the job done.

Whether you want to learn how to create vibrant motion graphics, breathtaking special effects or cinematic footage, today we got it all. In this post, we want to showcase some of the best After Effects tutorials around to make your message stand out. You will find After Effects tricks and techniques that should appeal to all users from beginners all the way to the most seasoned and advanced users of After Effects. - Create a MoGraph Urban Jungle This is a 2 part tutorial. After Effects Tutorials. Change InDesign’s UI Language with Free App. Wow.

Do you have an English version of InDesign but you wish the menus were in Italian? Do you have a Swedish version but you wish the dialog boxes were in English? I just found a free application on the Web that will change the UI (user interface) to any one of a dozen or so languages. [Editor's note: This script no longer works in later versions of Mac OS. And it doesn't work in CS6 or CC. Unfortunately, this app appears to be Mac OS only, but the fact that it works would imply that Adobe actually puts all those languages into the program.
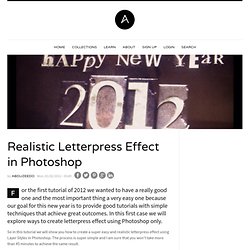
The app works like this: You double-click the app and it asks you to find your copy of InDesign. When you click OK, it quits. Look, I have no idea if this causes any other weirdness with InDesign. Not all the interface elements work perfectly. But in general, all the languages I tried seem to work okay. Workspaces and Shortcuts When I tested this in CS3, the panels and shortcuts all worked without a hiccup. How Good is the Translation? Realistic Letterpress Effect in Photoshop. For the first tutorial of 2012 we wanted to have a really good one and the most important thing a very easy one because our goal for this new year is to provide good tutorials with simple techniques that achieve great outcomes.
Easy Wax Seal in Illustrator and Photoshop. A few weeks ago I was having my Maker's Mark and decided it was time to do the wax effect they have on their brand using Photoshop.
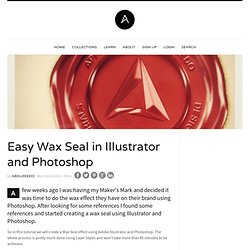
After looking for some references I found some references and started creating a wax seal using Illustrator and Photoshop. So in this tutorial we will create a Wax Seal effect using Adobe Illustrator and Photoshop. The whole process is pretty much done using Layer Styles and won't take more than 45 minutes to be achieved. Step 1 Open Illustrator and with the Ellipse Tool (L) create 3 circles. Step 2 Using the Type on Path tool to use one of the circles to add a text following it. Step 3 Select the outer and the bigger inner circle and then using Pathfinder you subtract the center area to have just the melted wax area. Step 4 Go to Layer>Layer Styles>Ineer Shadow.
Step 5 Select Inner Glow. Maya Tutorial Videos by zeth willie. Production Shaders in MR. 3D Studio Max Mental Ray Tutorials - Using the Production Shaders - Chrome Ball I Introduction : The new set of Mental Ray Production Shaders in 3DS Max enables a whole set of features to help with compositing 3D models into images/environments.

An example of these shaders in action (created by Zap Andersson) can be found on YouTube: Zap's Production Video This set of tutorials will show how to incorporate your models into photographic locations - using a mirror ball approach and a 360 degree HDRI environment and applying this all to incorporate a 3D car into an environment. Setup of textures for a simple scene using CHROME Ball & Matte/Shadow/Reflection shader In this first example we will use the Environment/Background Switcher, Environment/Background Camera Map, Environment/Probe Chrome Ball and Matte/Shadow/Reflection shaders to create the image below. In Max 2008 some of the shaders are "hidden" by default. In this simple scene we will use the following shaders: Initial Setting up Units. After Effects 32-bit Workflow In-Depth. In this week’s podcast, we speak with AE power user Stu Maschwitz of The Orphanage about the recent release of After Effects 7.

With the new 32-bit workflow in the software, its potential for use in high end compositing has been expanded greatly. Our online story has highlighted information from the interview and we’ve added new tips in our After Effects tips section about using a 32-bit linear workflow. The Professional edition of After Effects now supports 32-bit processing in compositions, in addition to 16-bit color support. You can import and export 32-bit OpenEXR, TIFF, and Photoshop files to work with in compositions, as well as import camera RAW files. This greatly opens up the potential of using After Effects for compositing operations for feature films and other high end output. Work from a recent Ruby Tuesday spot completed by The Orphanage, mentioned in the fxpodcast. Even if you’re not working on feature films, the addition of 32-bit support is truly welcomed. 1. 2. 3. 4.