
Paper Models by Cut 'n' Paste. Scale Model Forums. From 1983 to 1985 This is the first of a series of VLS nostalgia, beginning way back in December, 1983. The first volume is from 1983 to 1985. As I find and process them, I will be adding to all the volumes taking a pictorial history from 1983 to December, 2006, when it was sold to MMD/Squadron. I will add a section on Mastercon to document it’s history pictorially from 1991 to 2006 and beyond! Stay tuned! These are the fronts of the two original locations of VLS #14 was production (Click on photos to enlarge) #17 was sales, Wes Bradley and Don Wardlaw plan strategies!
Back then, we sold a lot of vacu-form kits. In those days, Don Wardlaw was in charge of our art dept. Then we expanded into #25 Cross Keys, about triple the space. Modellours Workshop. 5 Step Guide To Weathering Model Railway Buildings. Adding weathering to the buildings on your model railway layout is one of the quickest and cheapest ways to add realism to your layout.
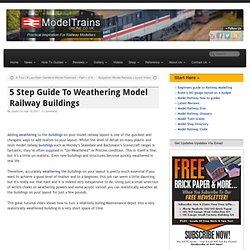
Whilst the level of detail on many plastic and resin model railway buildings such as Hornby’s Skaledale and Bachmann’s Scenecraft ranges is fantastic, they’re often supplied in “Un-Weathered” or Pristine condition. This in itself is fine, but it’s a little un-realistic. Even new buildings and structures become quickly weathered in real life. Model Scenery: How to build a work camp tent.
Build your own Camp Tents for Model Railroads, Civil War Battlegrounds or Role-Playing Games!
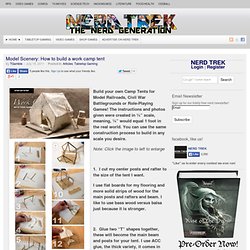
The instructions and photos given were created in ¼” scale, meaning, ¼” would equal 1 foot in the real world. You can use the same construction process to build in any scale you desire. Note: Click the image to left to enlarge 1. Route 66. I bought these toy soldiers-all 350 of them fro just 130pesos and they are in 1:60ish in scale. they have lots of poses although all of them are malebut that can be arranged later-just add dried elmers gluefor skirts and handbags anyways, i tried 3 of them this morning in preparationfor the diorama.
1:18 Artisan – 1/18 diorama – Model Maker – Woodwork – Shelves – Dioramas diorama accessories – Miniature and crafts – Terracotta tealight holders and cabinet making. Modeling in 1/87. View forum - Rusty knocked out and/or abandoned Vehicles. Covered Bridge Tutorial Traces Scratch Building project. It is hard to believe it is 55 years ago when this bridge (the prototype) first came to my attention out in a field near Route 15 just outside Wolcott, VT.
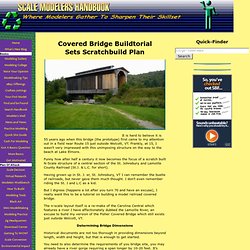
Frankly, at 15, I wasn’t very impressed with this unimposing structure on the way to the beach at Lake Elmore. Funny how after half a century it now becomes the focus of a scratch built N-Scale structure of a central section of the St. Johnsbury and Lamoille County Railroad (St.J. & L.C. for short). Having grown up in St.
J. er, St. But I digress (happens a lot after you turn 70 and have an excuse), I really want this to be a tutorial on building a model railroad covered bridge. The n-scale layout itself is a re-make of the Carolina Central which features a river I have affectionately dubbed the Lamoille River, an excuse to build my version of the Fisher Covered Bridge which still exists just outside Wolcott, VT. Determining Bridge Dimensions You need to provide at least 20 feet (often 22 feet) for overhead clearance (deck to headboard). Tabletop Terrain - War Gaming and Modeling for Pulp, Warhammer, Mordheim and Flames of War » FOW: 15mm Zeltbahn Tent Variants.
Game Terrain Info. Features. WIP - hedgerows. Again the terrainpieces have to be heavy because I want them to sink to the ground when I use them on my fur mat.
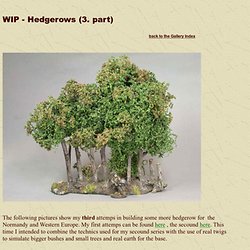
So I used again plaster to do the bases. I also added some of my stone walls for three of the pieces. I mixed up the plaster with less water and put the wet material on a sheet of polysteren. I pressed some real small stones into the wet plaster and let the pieces dry. First I tried to sprinkle sand on the the surface, but the plaster dries to soon and the sand didn't adhere enough. In my last summer vacation in the Netherlands I collected some dead and dried twigs from some bushes near the coast. Before the glue became cold and hard I tried to form some kind of roots with the glue by the use of a toothstick. Because I didn't used the usual black plaster I had to basecoat the bases with a darkbrown color.
In the next step I drybrushed the stones and the roots of the trees with an off white (very light ochre) color. The earth: The flock: Pardulon - Resin Models & Terrain. Two Part Silicone Putty Molds for Miniatures - Miniature Projects Made in a Silicone Mold. Learn to use two part silicone mold putty to make simple flexible molds to cast parts for dollhouse and model scale miniatures.
Two part silicone putty allows casting of a variety of materials, from polymer clay, gesso and plaster to resin and metals. Silicone putty molds withstand reasonable heat. There are food safe forms available if you want to turn your miniature fido into special chocolates using silicone molds! 1. How to Use Two Part Silicon Mold Putty Photo copyright 2009 Lesley Shepherd, Licensed to About.com Inc. Two part silicone mold putty is the fastest way to make detailed casting molds of miniature parts. The only downside of two part silicone mold putty is that it works best for simple press molds. 2. Mold details for furniture and accessories for dolls houses, railways or gaming terrains using gesso, resin, plaster, or polymer clay and simple molds made from two part silicon mold putty. 3. 4. 5. Photo copyright 2008 Lesley Shepherd, Licensed to About.com Inc.
Make Simple Model Stone Walls and Buildings From Styrofoam or Insulation Foam. Lots of scale scenes could use a simple stone wall, or a stone finish on a simple building.

These instructions show you how to use various supports and model all kinds and colors of stone walls from dense insulation foams, florist's foam or styrofoam beadboard, and various protective and paintible coatings. The durability of the piece will depend on the coating you protect the foam with, as well as how much handling the piece must endure.
Although foam can easily be made into stone for walls, model horse jumps or buildings, or left to free fall down mountain terrains in railroad scenes, you may prefer more structured modelled stones from plaster, clay or paper clay. Vintage Ad Browser. Restoration - Model Cars Magazine Forum. Thanks all, here is a tip to do the brick job. Garage Dio - Model Cars Magazine Forum. 1/2" Model Citizens. Panther weathering. Old Gas Station Collectibles - Primarily Petroliana.