
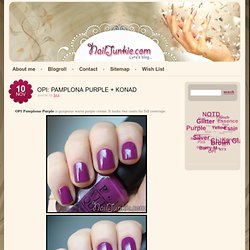
Follow the Trend With Colorblocked Nails! Why not try it out on your nails instead?

You can keep it simple within the same color family or go bold and crazy—whatever suits your mood! Step 1: Get Your Supplies Together To start, make sure you have all of your supplies handy. For this manicure, you will need three different nail polishes (make sure that at least two of them are thick enough that they can cover the base color), Scotch tape, and a fast-dry topcoat like Seche Vite. For this manicure, I used two colors from the new Minnie Mouse Collection by OPI, If You Moust You Moust and The Color of Minnie, along with my favorite silver nail polish, Stardust by Deborah Lippmann.
Step 2: Paint a Base Color Start with your favorite basecoat and paint your nails the base color. Step 3: Start Taping Next, pull off a small piece of Scotch tape (you won’t need more than an inch at a time) and put it against your hand and pull it off several times until most of the stickiness is gone. Step 4: Apply the Second Color Step 6: Marvel at Your Work. Bio Sculpture Gel. Enjoy Stamping Nail art with KONAD. How to Apply Water Marbling Nail Art. Nail Junkie. Yaaaay!
I got the polishes from the Essence Metallics collection! OMG, OMG!! Why are they so special? Four of them are magnetic! The only thing I have to criticize is the Essence magnet :/ It’s sucks! I’ve done all the swaches of the magnetic polishes with Alessandro magnet Copper Rulez! Iron Goddess: here you can see the difference between Alessandro and the Essence magnet. Metal Battle: this is the only polish in the collection that is not magnetic.
Nothing Else Metals: is some kind of washed out golden olive color with silver highlights when you apply the magnet pattern. Steel Me: this polish is a lot thicker than the others in the collection. My boyfriend had a suggestion to try with these polishes – the Buckyballs (little magnets). The PolishAholic: Couple more splatter manis! Good Morning guys!

Today I have for you guys a couple more splatter mani's! These are the 2 that were under a couple of the fractured polishes from Color Club in yesterday's post! I'm kind of obsessed with doing these, I have so many color combinations running around in my head that I want to try! The first one that was under the black crack, Smash Hit, was a pastel splatter mani. Hey, Nice Nails! Water Marble Tutorial.

Supplies: orange stick or toothpick, shot glass or cup (the smaller the circumference, the less polish you end up wasting), room temp. water, nail polish, tape (optional, but it helps with the clean up) I like to begin by prepping my nails with base coat and one coat of polish. Here I used China Glaze Innocence for a nice neutral base. Steps: Makeup Savvy: Dazzle Dust Nail Tutorial. I've been wanting to try out paint splattered nails for ages now, however it seems like alot of hard work and also kind of messy!
So me being supposedly 'savvy' and all I came up with a probably just as messy idea...but slightly more fun and prettier. Also it looks alot more delicate than having a paint splattered effect and alot less nail arty and more wearable. Now like I say... it is kind of messy so you will need at least one face wipe/baby wipe and something to do it on like the back of a magazine. Also your nail polish of choice and a pigment or dazzle dust! Its because I think too much: Galactic Manicure. I loved how my glittery gradient mani turned out so much that I decided to do a variation on it, using the night sky as my inspiration!

Here's how I did it: 1. Prep I grabbed deep navy, silver glitter, and gold glitter polish along with my favorite top coat. I also grabbed an orange stick and some nail art rhinestones. 2. 3. 4. 5. 6. 7.