
DIY projects made from everyday objects. I was inspired to make this DIY tote bag after I took a trip to the farmer's market and realized I needed a comfortable and lightweight bag to carry all my goodies.
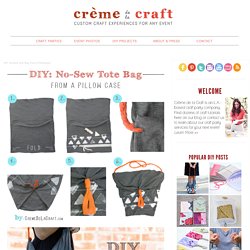
I love the way this DIY project turned out and, more importantly, there was no sewing involved! A pillowcase already has all the stitching you need to create this easy and stylish tote bag. The cross-body shoulder strap also makes it super comfortable to carry around all day. Just grab a pillowcase from your dresser, stamp it, give it a couple snips and you've got a custom carry-all tote for your next trip to the market!
Follow the steps below to make your very own. Materials: • King Size Pillowcase (you could also use a standard size, but the bag will be smaller. . • Acrylic Paint and a Dish Sponge (if you wish to add a pattern to the bag) • Long Fabric Strip (for the strap) • Scissors • Lay the pillowcase flat with the open end facing towards you. "We need to learn to make these shorts!" tutorial. You know the shorts I'm talking about.

I've seen them in every April magazine issue I've received recently--InStyle, Lucky, People StyleWatch, Cosmo (ick), and Glamour. Here's a page from my InStyle with quite a few choices to get the look, prices ranging from $25-$167. I've seen them at Target even., not too expensive, but it's much more eco-friendly to make some out of jeans from your closet! I like that they're cute and trendy but not short-shorts, not too snug, and not the kind that you have to keep tugging down your inner thighs. How To Make An Easy and Cheap Shirt From Silk Scarves. Wanna learn how to make a super cute and breezy summer top?

What if I told you it only cost me about 3.50? And what if I told you it took me about 5 minutes?! I thought so. Guys, this shirt is a dream. I've been wanting to wear it everyday... but since that isn't socially acceptable, I have not. It's super light weight and breezy. Here is how it works... You need: 2 silk scarves matching in size and color. My studio was way too messy for any good pictures of the process, so I used photoshop. So, here is a representation of my two scarves. I got home and washed them on delicate, then hung them to dry.
You then layer the scarves on top of each other, right sides facing in. Basically, sew where you see the dotted lines. (But probably a bit more even..) Leave a big enough space for your head, the shirt is meant to be a bit "boat necked. " Also, make sure you leave enough room for your arms, so it's loose and breezy. The shirt will naturally fall over your shoulders like sleeves.
Lover Serpent Lace Dress. How To Tie Dye Your LEGS. I am about to show you how to tie dye your legs... or leggs really.

Yeah, they're just stockings, but the result is still the same. Lace sunglasses. Denim Capri Re-style with Vintage Trim. Happy Friday friends!
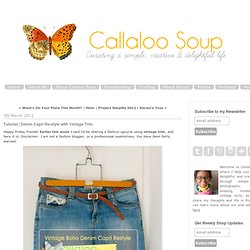
Earlier this week I said I'd be sharing a fashion upcycle using vintage trim, and here it is! Disclaimer: I am not a fashion blogger, or a professional seamstress. You have been fairly warned. So a couple summers ago I got these denim capris that were like my uniform, I pretty much wore them everywhere. But I couldn't really stand the length, they just seemed to hit at an odd spot. Color-Blocked Pockets. Skill level: easy Time: 15 minutes + drying time Supplies: Any bottom garment with pockets: jeans, pants, shorts, skirt...
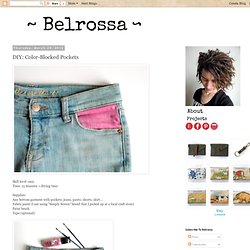
Fabric paint (I am using "Simply Screen" brand that I picked up at a local craft store) Paint brush Tape (optional) Lift pocket open an simply take your fabric paint and carefully paint the area you want colored. Scared Stitchless: Colour Block Top. DIY Braided Bead Bracelet.
It’s been awhile since our last bracelet DIY.

I don’t know about you, but our wrists have been begging for another colorful addition for months now. So after playing with some materials that were already on hand, we’ve created a tutorial for a braided bead bracelet, which is a not so distant cousin of the hex nut and wrap bracelet. Because honestly, you can never have too many . . . You’ll need: Cut the waxed linen cord into a 26″ and 19″ piece. Tie a knot about half an inch down from the loops.
Start braiding the strands. Push the bead against the base of the braid, and cross the left strand over the middle. Keep a finger at the base of the braid, holding the beads in their place and keeping the braid tight. Finish the bracelet with another inch of braided cord, measuring it against the wrist.