
Purpose Visa Prepaid Card.
Jewelry. Crafty Crap. New stuff. Wire Pendant. Head warmer knitted. Friendship Bracelets. Macraméd friendship bracelets were all the rage when I was growing up in the eighties.
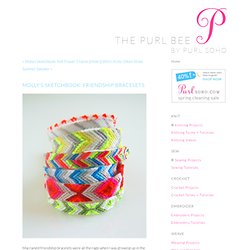
All the girls at my school would obsessively make them for one another in a dizzying variety of colors, widths, and patterns. It's amazing, thinking back, that such young girls could make such beautifully intricate accessories. I, of course, tried my hand at making them as well. I would ride my bike down to the five-and-dime store and pick out the most sophisticated color combinations of embroidery floss I could find, but when it came to the actual macramé I never got beyond plain stripes. There was nothing wrong with plain stripes, except that the other girls seemed so much more advanced with their diamonds and chevrons. Fast forward 20 years: Purl Soho started carrying DMC Cotton Embroidery Floss in every conceivable color (including fluorescents! Making friendship bracelets is a surprisingly easy craft, and best of all, in the end you'll have a bunch of cute summer bracelets to give to your pals. DIY Friendship Necklace.
As soon as Lauren and I saw this editorial in Flare Magazine, we knew we had to recreate these awesome, friendship bracelet-like necklaces.

We promise they are super easy to make and the perfect way to pass the time during those long summer roadtrips. To make a 2-tone necklace, cut a long piece of rope and wrap two different colors of embroidery thread around its own bobbin. Tie a starter knot along with the two colored threads you are using, leaving at least 3 inches of slack, Tape down the slack to a flat surface or safety pin it something that will help keep it in place (feeling nostalgic yet?). Lay the color that isn’t being used (shown here in purple) in your left hand, along with the rope, and hold them taut. Take the active color (shown here in red) in your right hand, pass it over the rope, loop it under and back through the opening.
To alternate colors, simply put the inactive color (red) in your left hand and the new active color (purple) in your right. DIY Beaded Spiders. Great Tutorial on how to make these ... MaryM's Original Daisy Bullion Edging, tatting with crochet hook, crochet tatting, cro-tat, Cro-Tat, cro tat, edging, trim, tutorial. If you like the reocities.com project you can donate bitcoins to: 1E8rQq9cmv95CrdrLmqaoD6TErUFKok3bF MaryM's Original Daisy Bullion Edging©2001 - tatting with crochet hook, crochet tatting, cro-tat, tutorial, how to - Copyrighted.

Please copy, reproduce, collect or redistribute with permission only. Finding little to not-much on the internet for tatting with crochet hook, I dreamed up this little design. (Of course, Crochet Tatting is quite an old art, recently come into vogue again - It is described and pictured in "The Godey's Lady's Book" in the 1850's!) I used No. 10 cotton, and a cro-tat hook for that size thread. For the "crochet" functions, you will use the hook.
Begin with a normal first crochet loop. Begin the Ring (R) on the shaft of the hook: A tatting stitch is a two-part double hitch stitch (ds). Tutorial for Kumihimo Spiral Braid using Satin Cord / Rattail (Rat tail) Cord. Wire Wrapped Agate Cuff Bracelet. I love jewelry projects.

Seriously love them. Crocheted Wire Bracelet. My pal Kelly called me and told me about this jewelry class she took that she promised would change my life.

Kelly often makes these promises, but she did come across a pretty cool method for jewelry making fun. Little Wishes - Beyond Beyond. Well, we are dusting off our obligatory black armband over in Beyond Beyond land for one of our most favourite shops ever – Early Bright (mega sad face) they have been the purveyors of some delicious and inspirational bling that is more art than jewellery. And we just want to share one of the most beautiful pieces every a wish in a jar. We used to shake dandelion bushes when we were little in the vain belief that we would get a Barbie dream house, Michael Jackson tickets, the ability to breakdance overnight (although we never progressed beyond being able to do backspins), millionaire moolah, or our favourite wish was that we had been dropped off at the wrong house (sorry parental units) and we were really the offspring of some family with the financial clout of Daddy Warbucks and the Rothschild’s combined.
About the author I'm the big kahuna with the whole shebang. Amma = Idiot + Savant. Crystal Bracelet #14. Tutorial : Crystal Bracelet #14Level : Beginner Another easy bracelet.
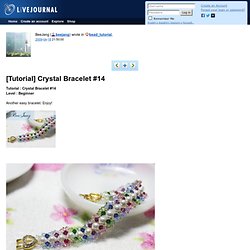
Enjoy! The design is from Thai Crystal Magazine. Equipment :- Swarovski Bicone Crystal 4 mm.- Swarovski Pearl 6 mm. or Swarovski Round Crystal 6 mm.- Seed Bead- Nylon Thread- Clasp Here I used watch clasp. Cut nylon thread around 150 - 170 cm. Learn Beading · Princess Wire-wrapped Ring. This ring is just too pretty to be so fast and easy!
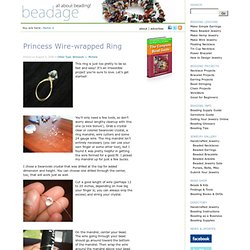
It’s an irresistible project you’re sure to love. Macrame. Crystals on RAW. Tutorial : Crystals on RAWLevel : Beginner Materials- Crystal bicone 4mm.
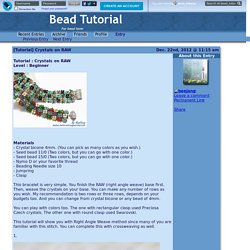
(You can pick as many colors as you wish.)- Seed bead 11/0 (Two colors, but you can go with one color.)- Seed bead 15/0 (Two colors, but you can go with one color.)- Nymo D or your favorite thread- Beading Needle size 10- Jumpring- Clasp This bracelet is very simple. You finish the RAW (right angle weave) base first. Then, weave the crystals on your base. You can play with colors too. The Knot So Hard Flip Flip Flop Diy. Oh I am so excited about this project!
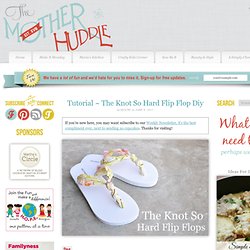
Any DIY that takes less than 30 minutes is worth getting excited about, no? These flip flops are so easy, and so so comfortable. The best part? They only cost me $1.oo. Starburst Wrapper Bracelet Tutorial « « Fluffyland Craft & Sewing BlogFluffyland Craft & Sewing Blog. Bleach.