
Sweet Verbena: Charmed Pencil Pouch Tutorial and an Etsy Shop! Originally posted here for Fancy Little Thing's Back to School Month This is probably my favorite kind of sewing.
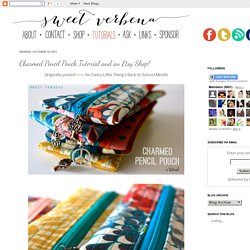
Sewing clothes is great but, usually much more difficult and large scale. Sewing accessories like these pouches gives you the opportunity to really get creative with colors. And the added charm is just that; added charm. These make great gifts for virtually anyone. Let's get started, shall we? Materials: Scrap Fabric Zipper (10" or longer) One sheet of Felt (9" x 12") Charms (Found in the beading section of Hobby Lobby) Tutorial: Cut your fabric into to two 9.5" x 3.5" rectangles. Cut your sheet of felt in half and lay a section of fabric on each. Now for some quilting fun! Now for the zipper. Lay one section of fabric down right side up. Sew with about a 1/4" inseam. Flip the zipper over and sew a quick top stitch if you like. Lay this piece right side up and then lay down the other section of fabric face down and pin as shown: Pin the fabric right sides together.
Neat 'n' Tidy Zippered Pouches - Dog Under My Desk. Thank my friend Erin for the cute name.

No-raw-edge-pouch was just too dreadful. She also told me to go to bed, so of course this is what I did instead. I get 3 hours of sleep but but you all get a new tutorial. Yay? Please speak up if it makes no sense… :) Also this is kind of a thank you for the amazing response to the new wristlet pattern. You all know how much I hate raw edges in bags when they aren’t necessary, however if you’re just making quick makeup bags or coin pouches, I still say you can’t go wrong with how quickly the Easy Zippy Pouches go together. Enough chatting. Figuring out what size to cut for this one is simple. The square pouch is 4″ square finished and I cut the pieces to 4.75″ square (charm pack anyone?) (OK so how cute are those monkeys?
This is a quick and dirty tutorial. Cut two squares from both your main fabric and lining. Fuse interfacing to the wrong side of the main fabric. Then flip the main fabric piece over and align the same edge. Teeny Tiny Mini Zipper Pouch Keyring. I’m taking the Craftsy Class, Design your Own Handbag, so I’m all about bags this month, and we’ll go from this Teeny Tiny Mini bag for your key ring, through the handy ‘Make It Yours’ clutch bag pattern and all the way up to the Carry All Bag to be released later this month.

Sometimes you don’t need a big bag. Just something small enough to take a lip balm and a few notes and coins. I made this tiny bag to keep on my key ring and thought you might like one too. Uses just a tiny amount of fabric, so its a great scrap buster project. Features: Finished size – about 3.5 long, 1.25 inches tall and 2.25 inches wideEasy to scale pattern if you want a larger sizeSuper cute! Firstly, I apologise. Download the full PDF for the pattern and instructions. [Need help downloading the pattern? Want to learn how to design and sew lots of different bags and purses? Want more free sewing patterns? Dotty Pouches TUTORIAL - may chappell. Monkey makes three: Tutorial: Keyring Pouch. I have a quick little project to share with you today.
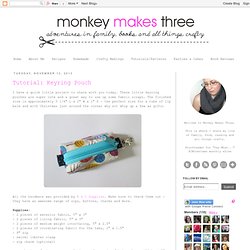
These little keyring pouches are super cute and a great way to use up some fabric scraps. The finished size is approximately 3 1/4" L x 2" W x 1" D - the perfect size for a tube of lip balm and with Christmas just around the corner why not whip up a few as gifts. All the hardware was provided by K & C Supplies. Make sure to check them out - they have an awesome range of zips, buttons, charms and more. Supplies: - 2 pieces of exterior fabric, 5" x 3" - 2 pieces of lining fabric, 5" x 3" Catch-All_Bag.pdf.