
Trinket Projects. Arduino Trinket and RC Servo Testing SoftwareSerial library in the Trinket to drive the 7-Segment Serial Display COM-11441 (Sparkfun) The potentiometer value was maped in the range 900 to 2100 microseconds to generate the servo control pulses.
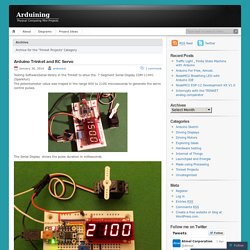
The Serial Display shows the pulse duration in milliseconds. Using bit banging instead of SoftwareSerial saves more than 2K of program memory. The YouTube video: ATtiny85 ISP! Shrink your Arduino projects with ease! by Ben Escobedo. Shipping Details: Shipping is free to the USA (all 50 states) for all reward levels.
For other countries, see description in the reward panel and add the appropriate amount. See project update #2 for full details! Trinket - Mini Microcontroller - 5V Logic ID: 1501 - $7.95. Digispark ATtiny85 LCD I2C DS18S20 DS18B20 Temperature Monitor - electronicramblings.com. Well this has been a great adventure!!!
I wanted to build a simple interior and exterior temperature sensor for my truck. This was a bigger adventure than I expected. I started off by doing research of a the three main components that I wanted to use ( ATtiny85, DS18x20,LCD,). I stumbled upon the Digispark project on Kickstarter and what they have done. Searching more I found a article published in a magazine called the “The Shed” that used the Digispark to accomplish the reading of the DS18x20 temperature chip, but could not do negative number very well.
As I was still searching for code snippets that would work for me, I decided to build up the circuit that matched the DigiSpark on my trusty bread board minus the relay control. Nokia 5110 LCD Displays on the ATtiny. To test the software SPI implementation in my ATtiny85 template project I wanted to use a component that I have had experience with before, was fairly simple to use and would be useful.
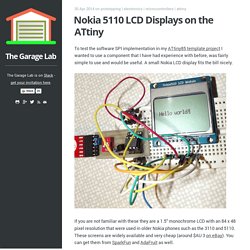
A small Nokia LCD display fits the bill nicely. If you are not familiar with these they are a 1.5" monochrome LCD with an 84 x 48 pixel resolution that were used in older Nokia phones such as the 3110 and 5110. These screens are widely available and very cheap (around $AU 3 on eBay). You can get them from SparkFun and AdaFruit as well.
My arduino: ATtiny85 and DS18B20 temperature sensors. #include <OneWire.h>#include <LCD5110_Basic.h> LCD5110 myGLCD(0,1,2,3,6); //D6 don't exist!!!
Conected to GND! Extern uint8_t MediumNumbers[]; //font that we use OneWire ds(4); // 1-wire bus D4 byte addr1[8]={0x28, 0xEC, 0xAF, 0x5B, 0x05, 0x00, 0x00, 0x6F}; //loose sensor #1byte addr2[8]={0x28, 0x6D, 0xF0, 0x3B, 0x05, 0x00, 0x00, 0xD8}; //loose sensor #2byte addr3[8]={0x28, 0x27, 0xA0, 0x5B, 0x05, 0x00, 0x00, 0x67}; //sensor soldered to RTC (#3) float temp; void setup(void) { myGLCD.InitLCD(); // (xx)contrast value 70 default} void loop(void) { myGLCD.setFont(MediumNumbers); byte i; byte present = 0; byte data[12]; myGLCD.print("1.
ATTINY low power. Changing the Tiny Arduino clock between 1MHz and 8MHz. This article shows how to make a simplest & cheapest Arduino.
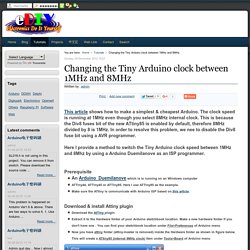
The clock speed is running at 1MHz even though you select 8MHz internal clock. This is because the Div8 fuses bit of the new ATtiny85 is enabled by default, therefore 8MHz divided by 8 is 1MHz. In order to resolve this problem, we nee to disable the Div8 fuse bit using a AVR programmer. Here I provide a method to switch the Tiny Arduino clock speed between 1MHz and 8Mhz by using a Arduino Duemilanove as an ISP programmer. Prerequisite An Arduino Duemilanove which is is running on an Windows computerATTiny44, ATTiny45 or ATTiny85. Download & install Attiny plugin Download the AtTiny pluginExtract it to the Hardware folder of your Arduino sketchbook location.
Program the ATtin85 Run the Arduino software, it must be Version 1.0 and above. Select Tools>Programmer>Arduino as ISP from menuSelect Tools>Burn Bootloader from menu to start writing bootloader to ATtiny85. Note: Connecting sensors — A low cost arduino type board. Programming an ATtiny w/ Arduino 1.0. This tutorial shows you how to program an ATtiny45, ATtiny85, ATtiny44 or ATtiny84 microcontroller using the Arduino software.
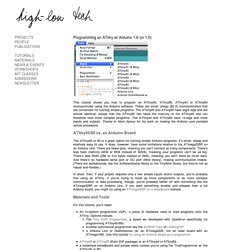
These are small, cheap ($2-3) microcontrollers that are convenient for running simple programs. The ATtiny45 and ATtiny85 have eight legs and are almost identical, except that the ATtiny85 has twice the memory of the ATtiny45 and can therefore hold more complex programs. The ATtiny44 and ATtiny84 have 14-legs and more inputs and outputs. Thanks to Mark Sproul for his work on making the Arduino core portable across processors.
ATtiny45/85 vs. an Arduino Board The ATtiny45 or 85 is a great option for running simple Arduino programs: it’s small, cheap and relatively easy to use. In short, then, if your project requires only a few simple inputs and/or outputs, you’re probably fine using an ATtiny. Materials and Tools. ATtiny85 ISP! Shrink your Arduino projects with ease! by Ben Escobedo.