
Reduce ATtiny power consumption by sleeping with the Watchdog Timer « insideGadgets. Ever wanted to know how to reduce the power consumption of your Atmel microcontroller when it’s not doing anything?
The 2 videos below will step you though how you can reduce the power consumption of your Atmel microcontroller (in this case the ATtiny85) by using the power down sleep mode with the Watchdog timer. The beauty of the watchdog timer is it allows us to not require an external interrupt to wake up the microcontroller, instead it wakes up after a certain amount of time by itself. Sleep Modes on ATTiny85. When using microcontroller in battery-based applications we really need to look at current consumption.
This will affect the power consumption and hence the lifetime of the device. This post shows some tests I performed to try and reduce the current consumption of an ATtiny85 AVR microcontroller using sleep modes and switching off various aspects of the IC when they are not required. The test results and code for th Arudino IDE is shown here.
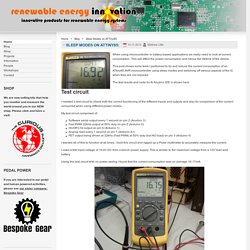
I needed a test circuit to check both the correct functioning of the different inputs and outputs and also for comparison of the current consumed when using different power modes. My test circuit comprised of: Software serial output every 1 second on pin 2 (Arudino 3)Fast PWM 32kHz output at 50% duty on pin 5 (Arduino 0)On/Off 0.5s output on pin 6 (Arduino 1)Analog read every 1 second on pin 7 (Arduino A1)FET output being driven at 32kHz (Fast PWM) at 50% duty (but NO load) on pin 3 (Arduino 4) I wanted all of this to function at all times. SecretVoltmeter - tinkerit - Accessing the secret voltmeter on the Arduino 168 or 328 - Open source releases from TinkerLondon and Tinker.it.
It turns out the Arduino 168 and 328 can measure their own voltage rail.
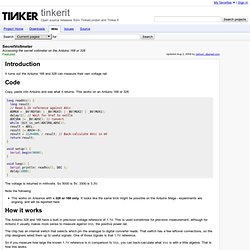
Copy, paste into Arduino and see what it returns. This works on an Arduino 168 or 328. long readVcc() { long result; // Read 1.1V reference against AVcc ADMUX = _BV(REFS0) | _BV(MUX3) | _BV(MUX2) | _BV(MUX1); delay(2); // Wait for Vref to settle ADCSRA |= _BV(ADSC); // Convert while (bit_is_set(ADCSRA,ADSC)); result = ADCL; result |= ADCH<<8; result = 1126400L / result; // Back-calculate AVcc in mV return result;} void setup() { Serial.begin(9600);} void loop() { Serial.println( readVcc(), DEC ); delay(1000);} The voltage is returned in millivolts. Note the following: This works on Arduinos with a 328 or 168 only. The Arduino 328 and 168 have a built in precision voltage reference of 1.1V. The chip has an internal switch that selects which pin the analogue to digital converter reads.
So if you measure how large the known 1.1V reference is in comparison to Vcc, you can back-calculate what Vcc is with a little algebra. AVR: Monitor power supply voltage, for free! While apparently being a very simple task, measuring the voltage of the power supply of your micro-controller can be very important and critical, specially for battery powered applications.
There are many ways to monitor the battery voltage level, many of them propose to add some external components (like a zener diode). The solution we explain in this short tutorial don’t need any external components, for all the AVR micro controllers that have an internal ADC (that like every AVR micro controller that you will find around you!). As an example in this article, we are going to use an ATMEGA48 micro-controller. The code is 100% compatible with ATMEGA88, ATMEGA168 and ATMEGA 328. It is compatible with minor changes to all ADC equipped AVR micro controllers. Pre-requirements In this article, I assume that you already have some basic AVR micro controller skills, and some basic C programming knowledge. H2OhNo/H2OhNo.ino at master · sparkfun/H2OhNo. H2OhNo! Favorited Favorite 1 Tiny Power H2OhNo!
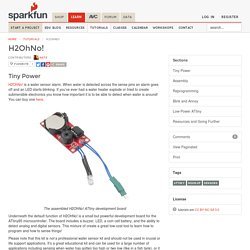
Is a water sensor alarm. When water is detected across the sense pins an alarm goes off and an LED starts blinking. If you’ve ever had a water heater explode or tried to create submersible electronics you know how important it is to be able to detect when water is around! The assembled H2OhNo! Underneath the default function of H2OhNo! Please note that this kit is not a professional water sensor kit and should not be used in crucial or life support applications.
Suggested Reading Before going further with this guide, you should be familiar with the topics covered in these tutorials: Assembly The H2OhNo! Before you dive in and begin soldering, please review the Remote Water Sensor and Remote LED sections below! (A)Tiny battery monitor - KlaasDC. A few months ago I was looking for a cheap and simple way to keep check on the lead-acid battery of my motorcycle.

Some indication on whether the electrical system is still charging or draining it, and whether the battery still holds a charge. This is very useful, since if the charging circuit or the battery starts to malfunction, any kind of early warning is better than getting stranded... On ebay, I stumbled upon a popular type of battery monitor LEDs, from a company called Gammatronix:This got me interested. How does it work? It is small enough to fit partly into a 10mm LED holder. So, here we see a pushbutton, regulator, capacitor on the bottom and probably some ATtiny microcontroller.
The first version I had in mind would use a switching regulator for the power supply, but SMD components would be required and it would still be a lot bigger due to the necessary inductance.