
DONNA & HOUDINI. The best part about modeling in Houdini is having all the tools at your finger tips.

Hit of a tab key, type what you want and you got it. If you're a destructive modeler (usually character modeling) you'll probably just live in the viewport and sculpt away. However, if you're a procedural modeler (usually environment/prop) you'll find yourself working more closely with the nodes. Optimizing your Shaders.
Eetu's lab. Andy Nicholas » Blog Archive » Houdini Cheat Sheet. Home » 3D, Featured, Houdini 28 August 201122,881 views12 Comments Here’s a quick cheat sheet for Houdini that I wrote ages ago.
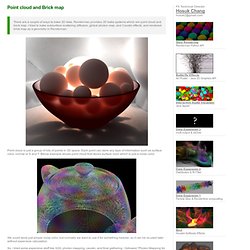
Job 1297 - HQueue. How To Seperate Shadow. The Cornell Box Diaries - od[forum] - Page 2. Day 4: And so we begin day 4 with an interesting turn of events.
![The Cornell Box Diaries - od[forum] - Page 2](http://cdn.pearltrees.com/s/pic/th/cornell-diaries-rendering-74412121)
For some esoteric reason, no matter how hard I tried, I could not get rid of the noise in the render regardless of how high I turned up my irradiance sampling quality. In fact, I could not detect a noticable difference in the prettiness of the render at all... all it did was take longer (8, 64, 128, 256 settings). Surface Baking. Index of /docs/houdini. Www.pixar.com/companyinfo/research/per/egsr04.pdf. Michael rice misc» Blog Archive » COP2_tonemap. COP2_tonemap A compositing operator for Side Effects Houdini Based on the method described by Jiang Duan, Guoping Qiu and Min Chen in “Comprehensive Fast Tone Mapping for High Dynamic Range Image Visualization” and several other papers.
The idea is that first hdr luminance is compressed to display luminance using a logarithmic mapping weighted by a user control (brightness). Www.janwalter.com/ShaderWriting/filmakademie.pdf. Peter Claes Vfx. Hi, Welcome to my blog.

This will be a blog about houdini, visual effects and some of my other effects related interests. I would like to keep the tone of this blog light and fun, but with in-depth information about how to achieve certain effects. I hope you will find some of the information (technical or otherwise) interesting! Animated Pixels - Filed under 'houdini' Christian Schnellhammer . TD Blog. Houdini Ocean Toolkit for H12 Training Video For Houdini Flocking Systems on cmiVFX cmiVFX just releases my flocking tutorial:store.cmivfx.com/tutorials/view/330/Houdini+Flocking+Systems Check it out.
I hope you’ll enjoy it! This training focuses on a basic concept of flocking simulations: steering behaviors. The digmCollective. Too many lights? I've been playing with lighting up the large scale spacecraft of mine, and one thing I've noticed is the large number of lights I now have.

For example, on the top and bottom sides of the main hull I have a series of ten navigation lights (point lights), so 20 total (top and bottom) for the port, and another 20 for the starboard sides. Another 6 spots on the top hull illuminating various bits, another 12 lights illuminating various internal docking bays (area lights).
All told about 60 or more potential light sources. This seems like a lot, but it does give the effect I'm looking for. My concern is that this is too much and is making the render slower than it needs to be. PQ Houdini Tutorial. Understanding mantra rendering. Approach to Lighting and Managing big Scenes. Bubbles in Houdini with Flip solver. Rendered simulation: I am interested in fluids and in the interaction between different types of fluids so I started looking into a way to create the interaction between air and water.
Specifically how to create bubbles. As of right now (Houdini 11) I found the only way to do it with FLIP fluids is by using a single fluid object and processing the bubble particles differently from the liquid particles. Even though the distinction is made by the user rather than by a density parameter. The FLIP solver only takes in velocity adjustments, so it does not matter if you add a density attribute to the initial points as that will be ignored by FLIP.
After defining an initial volume of “water” particles, “air” particles are emitted from groups of points at the bottom of the container. Once the particles have been simulated and cached to disk, it was time to create a mesh out of them. Rendering was done using PBR, which gives good results fairly quickly. PhotonMapping. From Odwiki Photon mapping is one method of performing BackwardsRayTracing . Rather than sending rays from a camera into the scene and then sampling the direct illumination, Photons are sent from the light sources into the scene. The photons bounce off surfaces and eventually get stored in a PhotonMap . The PhotonMap can be used to estimate Caustics. So, in essence, Photon Mapping is a two pass process, the first pass generates the photon map and the second pass uses the photon map to compute illumination. Typically, photon maps are stored in a k-d tree data structure.
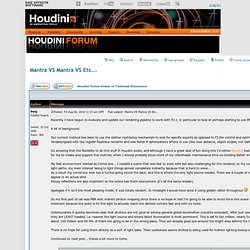
Hosuk's personal website. Point cloud and Brick map There are a couple of ways to bake 3D data.
Renderman provides 3D bake systems which are point cloud and brick map. I tried to bake subsurface scattering diffusion, global photon map, and Caustic effects, and rendered brick map as a geometry in Renderman. Point cloud is just a group of lots of points in 3D space. Each point can store any type of information such as surface color, normal or S and T. We could store just simple noise color, but normally we want to use it for something heavier, so it can be re-used later without expensive calculation.
So, I tried some expensive stuff like SSS, photon mapping, caustic, and final gathering. First I tried SSS and found point cloud is not only used to store data but also used to calculate SSS or photon mapping using stand-alone software called ptfilter. Direct illumination point cloud ptfilter -ssdiffusion -material marble direct_rad_t.ptc ssdiffusion.ptc. Mantra VS Mantra VS Etc... Recently I have begun to evaluate and update our rendering pipeline to work with H11, in particular to look at perhaps starting to use PBR and Photon maps for indirect lighting.
A bit of background. Our current method has been to use the Gather raytracing mechanism to look for specific exports as opposed to Cf (for control and optimization purposes), this has been successful so far in matching (H10) PBR renders/speed with the regular Raytrace renderer and was faster if optimizations where in use (like max distance, object scopes, not Gathering expensive stuff, etc). GI troubleshooting. A few things, All of the lights (environment, etc.) do work with pbr, so, yes, you're doing something wrong.
If I drop down an environment light, a grid (ground), a sphere, and do a pbr render, I get the expected result. Make sure that you turn the diffuse bounces up to something like 5 in the mantra ROP (under the pbr tab) or you won't get much inter-surface light energy distribution. You shouldn't be using the GI_light shader in a pbr render - I couldn't quite tell if that's what you were getting at in your post, but I thought that I'd put it out there anyway. Radiance vs. YouNameIt. 1 Introduction Q: What is Radiance? A: Instead of describing in my own words what Radiance is, let me provide the information, where to find it, and which documents or which book you should read. Q: Why Radiance vs. YouNameIt ? A: It's basically a comparison of Radiance with other renderers which are able to render a scene with global illumination (GI).
Junkyard Thesis. So apparently I can't figure out how to link my ambient occlusion test render, so I figure I'll explain what I did to be able to render this piece. My artistic aspirations to create this piece was for 100% control over how each piece was placed, all 1468 plus pieces. A greeble would let me cover the stuff pretty well, which a guy at Pixar already developed pretty well for trash, but even they had to place there objects close up to camera which accounted for a majority of my scenes. I could have also easily created a matte painting for my mid ground and background, but I am not trying to be a matte painter.
Z distance from cam to any point. Www.profwiz.com/wp-content/uploads/2008/05/rb_h9_attributes.pdf. Exchange: VEX Pathcache info. Secondary GI cache in mantra rop in Houdini 11. Why mantra renderer is so so so slow? Its a circus out there. Its a circus out there. April 2011. I, Houdini. Home. Houdini. Lesson 1: Introduction to Shaders in Houdini « Houdini Render Passes. Houdini tutorial database. Art of Destruction (or Art of Blowing Crap Up)
Www.peterclaes.be/tutorials/PeterClaesThesis/thesis/PeterClaesThesis.pdf.