
WordPress Drag & Drop Content Builder. Ajouter TinyMCE éditeur de texte enrichi pour WordPress Plugin. Default WordPress comment form is pretty basic.
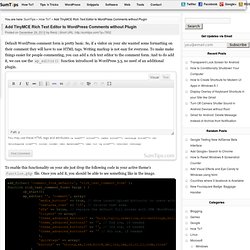
So, if a visitor on your site wanted some formatting on their comment they will have to use HTML tags. Writing markup is not easy for everyone. To make make things easier for people commenting, you can add a rich text editor to the comment form. And to do add it, we can use the wp_editor() function introduced in WordPress 3.3, no need of an additional plugin. To enable this functionality on your site just drop the following code in your active theme’s function.php file. I’ve commented most parts of the code that you can customize. You can customize the TinyMCE text editor. If you want to add many buttons and your comment form isn’t wide enough, those buttons can be moved to another row. Theme_advanced_buttons2: '', theme_advanced_buttons3: '', theme_advanced_buttons4: '', Similarly to the visual editor you can also customize quicktags buttons in the HTML editor by adding and removing them. 'quicktags' => false.
Customize WordPress TinyMCE Editor With Custom Buttons. WordPress comes with an awesome rich text editor-TinyMCE.
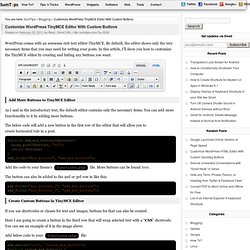
By default, the editor shows only the very necessary items that you may need for writing your posts. In this article, I’ll show you how to customize the TinyMCE editor by creating and hiding any buttons you want. Add More Buttons to TinyMCE Editor As I said in the introductory text, the default editor contains only the necessary items. You can add more functionality to it by adding more buttons.
The below code will add a new button in the first row of the editor that will allow you to create horizontal rule in a post. function add_mce_buttons($buttons){ array_push($buttons, "hr"); return $buttons;} add_filter("mce_buttons", "add_mce_buttons"); Add the code to your theme’s functions.php file. Comment utiliser le plugin Edit Flow pour WordPress. Cliquez sur les miniatures pour afficher les images complètes.
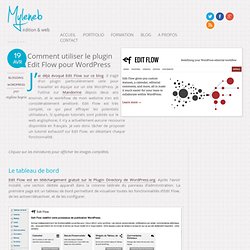
Le tableau de bord Edit Flow est en téléchargement gratuit sur le Plugin Directory de WordPress.org. Après l’avoir installé, une section dédiée apparaît dans la colonne latérale du panneau d’administration. La première page est un tableau de bord permettant de visualiser toutes les fonctionnalités d’Edit Flow, de les activer/désactiver, et de les configurer. Widgets du tableau de bord Par défaut, Edit Flow installe des widgets sur votre tableau de bord : les articles suivis par l’utilisateur & le contenu non-publié (cf. image 1).
Statuts personnalisés Cette fonctionnalité manquait cruellement aux créateurs d’un WordPress multi-utilisateurs. Groupes d’utilisateurs Cette fonctionnalité vous permet de créer des groupes d’utilisateurs selon vos besoins. Notifications En dessous du contenu de l’article, la zone Notifications permet, en un simple clic, de sélectionner les personnes concernées. Calendrier éditorial Commentaires éditoriaux. Video Music Box – Floating Player – CodeCanyonBuzz Theme. WordPress Plugins Archives. 80+ WordPress Add-ons.