
Un boîtier pliable pour votre Raspberry Pi 2 ou B+ Suite à la publication d’un article sur les boîtiers à réaliser soi-même (DIY=FéZiToiMême!)
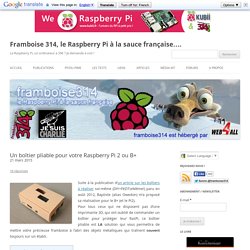
Paru en août 2012, Baptiste (alias Owedon) m’a proposé sa réalisation pour le B+ (et le Pi2). Pour tous ceux qui ne disposent pas d’une imprimante 3D, qui ont oublié de commander un boîtier pour protéger leur RasPi, ce boîtier pliable est LA solution qui vous permettra de mettre votre précieuse framboise à l’abri des objets métalliques qui traînent souvent toujours sur un établi. Présentation Sur les photos ci-dessus vous pouvez voir que le boîtier de Baptiste est parfaitement adapté au RasPi B+ et au P2. Baptiste vous offre le modèle à imprimer (ci-dessous) que vous pouvez télécharger en PDF en cliquant simplement sur l’image.
Télécharger le fichier à imprimer Après avoir imprimé le modèle, il vous suffira de découper en respectant les instructions. Baptiste a également réalisé un PDF sur lequel figurent deux repères de 50 mm de long, en horizontal et en vertical. RPI INTEGRE DANS UN CLAVIER. Step 1: Stumble upon mechanical keyboards.
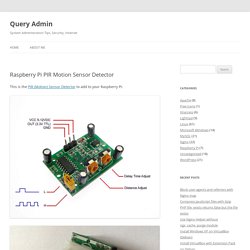
Fall in love with them. Find out that Raspberry Pi 2 is released. Get an idea. Build a computer inside a keyboard. Step 2: Google around the Internet, someone has done something quite similar. Raspberry Pi PIR Motion Sensor Detector - Query Admin. This is the PIR (Motion) Sensor Detector to add to your Raspberry Pi: Create a script named sensor.bash in /root/ directory: Set the right permissions: Run the script: Now walk in front of the sensor and then check the /root/ directory.
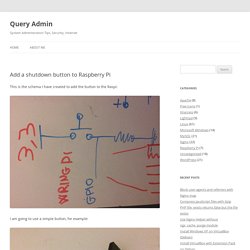
You should see an image file named image1.jpg Stay Updated Other Posts Random Posts. Shut down your Raspberry Pi on button press and add reset function. Add a shutdown button to Raspberry Pi - Query Admin. This is the schema I have created to add the button to the Raspi: I am going to use a simple button, for example: I have created a hole on the top part of the Raspi’s box, where I inserted the button: This is an image of the button, with the Raspi’s box closed:
DIY WiFi Raspberry Pi Touchscreen Camera. This project explores the Adafruit PiTFT touchscreen and the Raspberry Pi camera board to create a simple point-and-shoot digital camera.
One can optionally use WiFi and Dropbox (a cloud file storage and synchronization service) to automatically transfer photos to another computer for editing. This isn’t likely to replace your digital camera (or even phone-cam) anytime soon…it’s a simplistic learning exercise and not a polished consumer item…but as the code is open source, you or others might customize it into something your regular camera can’t do.
Raspberry Pi computer, either the Model B or Model AWith Ethernet and two USB ports, the Model B is usually easier to set up. Voyant pour indication de la température. Hello, aujourd'hui j'ai décide de me pencher sur un des avantage de notre petit raspberry pi qui est la possibilité d'utilisé des broches GPIO, pour contrôler de l’électronique et faire de la domotique.
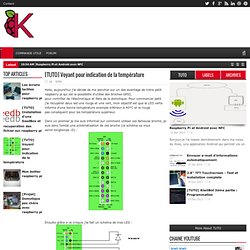
Pour commencer petit j'ai récupérer deux led une rouge et une vert, mon objectif est que la LED verte informe d'une bonne température exemple inférieur à 40°C et la rouge pas conséquent pour les température supérieur. Dans un premier je me suis informer sur comment utiliser ces fameuse broche, je suis donc tombé une schématisation de ces broche (ce schéma va vous servir longtemps :D) : Top 10 Things to Connect to Your Raspberry Pi. During my time with the Pi I’ve experimented with various devices and sensors.
Here is my Top 10 list of devices to connect to the Raspberry Pi. In most cases they are very cheap and easy to interface and are great building blocks for more complicated future projects. I’ve included links to more detailed posts where I can and many of these include example Python scripts to help you get going. From robot cars to security systems there are plenty of ways of combining these mini-projects into some amazing creations! RPI - HDMI config.txt. As the Raspberry Pi doesn't have a conventional BIOS, the various system configuration parameters that would normally be kept and set using the BIOS are now stored in a text file named "config.txt".
The Raspberry Pi config.txt file is read by the GPU before the ARM core is initialized. This file is an optional file on the boot partition. It would normally be accessible as /boot/config.txt from Linux, but from Windows (or OS X) it would be seen as a file in the accessible part of the card. To edit the configuration file, see the instructions at R-Pi_ConfigurationFile.
You can get your current active settings with the following commands: Electronique Innovante » RaspberryPi à tout faire… Fabriquer une caméra HD de surveillance RaspiCam avec votre RaspBerry Pi. Raspberry Pi : fabriquons des trucs! - Topics perso et Community Management. Description des composants utiles pour commencerNous avons vu dans le post précédent ce qu'est précisément le Raspberry Pi, ainsi que le materiel requis pour s'en servir.
Cependant, il s'agissait du minimum syndical requis pour faire fonctionner le Pi. Notre but n'étant pas de simplement faire un serveur, je vais vous présenter ici quelques équipements intéressants, et nous ferons des "packs" de démarrage. Test du mini clavier sans-fil RT-MWK0 iclever Rii 2.4GHz. RPI - TEMP SENSOR. In this tutorial, we will be building a circuit to connect a temperature sensor to our Raspberry Pi, and writing a program to read the sensor data.
The circuit we will build is going to connect to the Raspberry Pi using the GPIO pins. GPIO stands for General Purpose Input/Output. General purpose because all they are is simple connections that can be either high or low, a binary choice. This means we can easily do things that involves binary choices, and it will still be nice and simple to understand what is going on.
In this tutorial, we are going to be turning LEDs off and on, and checking whether buttons are being pressed—all very binary actions, which makes them ideally suited for GPIO pins. Déclencher un ventilateur avec seuil de temperature sur raspberry pi via python et gpio. A Raspberry Pi controlled mini CNC Laser engraver [keep updating] I recently made a mini CNC laser engraver using two DVD drives salvaged from old computers and <$10 extra parts bought on eBay. The controller of the CNC machine is a Raspberry Pi, a $35 credit card size computer. The engraver turns out to be pretty successful. So I am sharing it with everyone. There have been a lot of examples people using Arduino to control CNCs. You can probably find tons of C programs available that run directly on Arduino to process G code. RPi Adding USB Drives. USB Flash and Hard Drives Sooner or later, you're going to run out of room on the SD card used to boot and run your Pi.
One solution is to move to a larger SD card, but, the largest low-cost high-speed cards are 32 GBs for about US$20 ~ $45 (May 2012). However, there may be compatibility issues between these higher-capacity SD cards and the Pi, at least, temporarily. USB flash drives (aka "thumb" drives) can provide additional storage for about the same, or less, cost as an SD card of the same capacity. USB flash drives generally also have faster data transfer speeds than SD cards. Powered USB Hubs. RPi VerifiedPeripherals. Back to the Hub. Hardware & Peripherals: Hardware and Hardware History. Low-level Peripherals and Expansion Boards.
Screens, Cases and Other Peripherals. Parce que si on ne se compliquait pas la vie, ce serait beaucoup moins drôle ! AdvaBoard RPi1. Details The AdvaBoard RPi1 is an extension-board for the Raspberry Pi, incl. a real-time-clock, various (5V-tolerant) interfaces on dedicated connectors, digital- and analog-I/Os, an integrated power-management incl. battery power and an optional TFT-display (2.4" - 7.0") with touchscreen. So, the AdvaBoard widely extends the possible field of application of the Raspberry Pi and upgrades it to an universal small embedded industrial PC. It's easy to connect different sensors, additional I/Os, CPLD- and microcontroller-boards, control components (e.g. motors) and even further TFT-displays on the interfaces (I2C, E-SPI, RS-485, RS-232). The provided software includes a complete program library for C and Python and some open example programs, which allow a very fast startup, and may serve as base for own programs.
Additionally, the Raspberry Pi and the AdvaBoard can be controlled via JSON-RPC over a network connection. A Raspberry Pi dashcam with two cameras and a GPS. RPI-PARKING SENSOR. RPI EN VRAC. Raspberry Pi Tracker. Top 10 Things to Connect to Your Raspberry Pi. 25 fun things to do with a Raspberry Pi. Outil de diagnostic automobile à base de Raspberry Pi. Raspberry Pi email/SMS doorbell notifier + picture of the person ringing it. I have been receiving requests to build a SMS doorbell from all around the world ever since my SMS doorbel project got featured on hackaday, damnGeeky, hackedgadgets and few other places . My approach is relatively difficult to follow, so I decided to put up some simple steps for you folks to follow and get even better results than my original project. You will need the following components.
SMS Gateway : une passerelle SMS à la maison. Si vous avez votre serveur domotique en place et qu’une alerte doit vous être remontée il existe plusieurs manières de le faire : SMS, Pushme.to, push via l’application Smartphone de votre serveur domotique… Ces solutions marchent très bien mais ont un point faible: elles nécessitent une connexion internet. Les SMS par exemple sont générés par votre box domotique puis sont envoyés en HTTP sur internet au serveur central de votre solution domotique.
Là ils sont envoyés au format SMS sur le réseau GSM via une passerelle. Si votre box Internet qui vous relie au web n’est plus opérationnelle… l’alerte ne pourra jamais vous parvenir. C’est là qu’une plateforme SMS à la maison peut vous être utile. Voyons comment en construire une. Envoyer des SMS avec un Raspberry PI. How to Install A Wireless USB Network Card on Raspberry Pi. Today I’m going to show you how to install a wireless networking card on your Raspberry Pi.
I’m using the ultra cheap Ralink wireless card, but the instructions are similar for any Wireless Device. Update Your System For this tutorial I’m using Raspian. This is a great beginner OS for the Pi and quite easy to use. Dangardner/pylcdsysinfo. Coldtearselectronics.wikispaces. LCD Sys info can be used with other software for custom application development. The device accept simple USB control packets. Once driver for your OS is installed, you can control the LCD using libusb library under VB, VC, VC#, python (Raspberry Pi or Linux) to send USB control packet command to control what the LCD display. Development samples are included for C# and python. » Add a Reset Button to a Raspberry Pi Raspberry π Labs. 07 : Allumer/éteindre une vraie lampe OU comment faire de la domotique low cost.