
Lampade palloncino e colla. Jessica of Wednesday Inc shows us how to make those gorgeous twine chandeliers from the inspiration shoot she shared with us this morning.

Using balloons, glue and twine, you can also make these lanterns for your wedding – and then bring it home and use it as your very own mid century lampshade. What you will need are: balloons, glue, yarn, tray for glue, corn starch 1/2 cup of Corn starch, 1/4 cup of Warm water, clear fast drying spray paint, hanging lamp cord or fishing line (depending on your desired final product), and a lighting kit if you’re looking for a fully functional lantern. Jessica recommends using a sharpie to mark on the inflated balloon how much room you need to leave for the lighting cord. She also recommends coating the balloon with vaseline prior to wrapping the yarn coated with glue so it doesn’t stick on the balloon once it’s dry.
You can see all the details on Jessica’s blog. Are you getting excited to try to do this at home as much I am? Instructions: Cuscinone rotondo. When a certain big Swedish apparel retailer decided to offer a home collection including a hand drawn looking button pillow, it started my wheels turning.
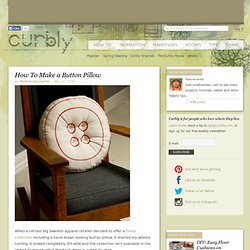
It looked completely DIY-able and the collection isn't available in the United States so, what the heck. Here is a step-by-step tutorial with a slight color shift just to be different. What You Need: 3/4 yard of plain, flat weave fabricscissorssewing machinepinsthreadrulerchalkneedleembroidery floss and needlefabric marker in your color choicea variety of circular shapes to trace What You Do:
Suit Coat Clutch TUTORIAL. This was my project for the $5 and under for sytyc.
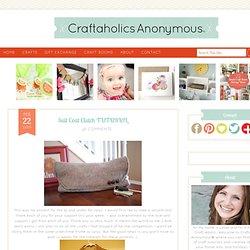
I would first like to take a second and thank each of you for your support this past week. I was overwhelmed by the love and support I got from each of you. Thank you so very much. It meant the world to me :) And don’t worry, I still plan to do all the crafts I had thought of for the competition. I won’t be doing them in the same order/time frame as sytyc. Ok, to make this awesome clutch, you’ll need an old suit jacket. All you’ll need to make a suit coat clutch is a suit jacket (duh), seam ripper, scissors, sewing machine, magnetic snap, and needles and thread.
First I used a seam ripper and separated the sleeve seam. Move the lining out of the way. Cut off the sleeve cuff and save this. Cut a 13″x18″ rectangle from the sleeve. I was not able to get a big enough piece, so I cut a small section to make up the difference…. which I sewed on and ironed open the seam. Next, divide your 13″x18″ piece into thirds. Sew cuff into place. Re-purposing: Tshirts into 5-strand-braided-headbands. I was walking through Target a few weeks ago and noticed this little knit fabric headband that was not just braided together…….but woven.
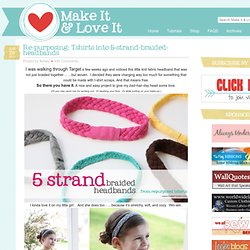
I decided they were charging way too much for something that could be made with t-shirt scraps. And that means free. So there you have it. A nice and easy project to give my bad-hair-day head some love. (Or you may need one for working out. I kinda love it on my little girl . She always has little hair fly-aways that get into her face…….and this helps with that problem. It even works great with her hair down…..and keeps that hair tucked behind her ears. And yep, good for me too. Thanks little t-shirt scraps. Want to make your own? First, find some old t-shirts. Then, cut your fabric into long strips. Blog Archive » Formina di alluminio. Blog Archive » Pianta frigo.