
Tuesday Tutorial - Hanging Jewelry Organizer. Hi – it’s Traci, from amazing mae.
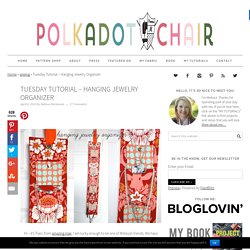
I am lucky enough to be one of Melissa’s friends. We have known each other for over 10 years ever since we both moved to the same area of Kentucky. She is awesome and I love bouncing ideas off of her, copying her ideas and just sitting in her craft room to absorb all the creative juices. I am glad she asked me to do the Tuesday Tutorial because it got my slow juices flowing again. So, here is my version of the Tuesday Tutorial – the hanging jewelry organizer for your necklaces and bracelets. What it takes to make it: 2 pieces of cotton quilter’s fabric 34″long X 6″wide 1 piece of medium weight fusible interfacing 34″long X 6″wide 1 piece of Warm and Natural batting 34″long X 6″wide. Hanging Jewelry Holder – Space Saver.
I have mentioned before that the reason we moved to Colorado 2 months ago, was for my husband to complete several clinical rotations (for PA school) before graduating next spring.
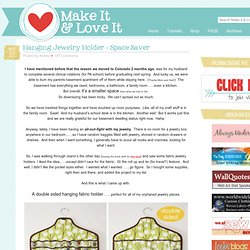
And lucky us, we were able to bum my parents basement apartment off of them while staying here. (Thanks Mom and Dad!) The basement has everything we need; bedrooms, a bathroom, a family room……even a kitchen. But overall, it’s a smaller space than what we had in GA. So downsizing has been tricky. So we have meshed things together and have doubled up room purposes. Anyway, lately, I have been having an all-out-fight with my jewelry.
So, I was walking through Joann’s the other day (buying the duck cloth for this bag) and saw some fabric jewelry holders. And this is what I came up with. A double sided hanging fabric holder…….perfect for all of my orphaned jewelry pieces. Both sides are made with customized pocket sizes. Mail organizer tutorial. To kick off Spice up your Kitchen, I figured I should start things off with a tutorial to help you get organized.
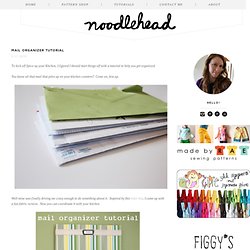
You know all that mail that piles up on your kitchen counters? Come on, fess up. Well mine was finally driving me crazy enough to do something about it. Inspired by this letter bin, I came up with a fun fabric version. Now you can coordinate it with your kitchen. Here's what you'll need: I used Elmer's spray glue and a piece of fabric cut about 4" bigger on all sides. Lay the fabric squarely on top and smooth and wrap around sides.
Make the mail slots: For both mail slots: Use your pattern piece and cut out two pieces of exterior and two pieces of lining, putting the pattern piece on the fold as indicated on the template. Sew the exterior and lining piece RIGHT sides together using a 1/2" seam allowance at the top of what will be the mail slot. Repeat for other mail slot pieces. Align the twill tape about an inch below the top of each mail slot. Planning Organizer. Hi!
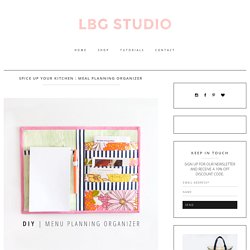
First I want to say many thanks to Anna of Noodlehead for inviting me to participate in her 'Spice Up Your Kitchen' week. It's been a challenge to say the least to try to come up with something worthy of all the fabulous talent going on over there! I am an organization freak. I think that I enjoy the process more than the end result. Which is a good thing since nothing stays organized for long with 2 kids running around the house; my wild and inquisitive 2 year old daughter and my 29 year old man-child/husband, to be specific. The general idea is that there are seven pockets in this organizer that you could use to hold the recipe cards for all the meals (or just dinners if you are like me) you plan to cook for the week.
Terms of use: Personal use only! Let's get started: Supplies: Fabric: {1} 11 x 15" Main Fabric {1} 11 x 15" Backing {7} 6 x 7.5" Recipe/Coupon Pockets (3 of one print and 4 of another if you want alternating prints) {1} 8 x 7.5" Notepad Pocket *not pictured Interfacing: Ruler.