
Raspberry Pi Stepper Motor Tutorial. Expand GPIOs of Raspberry using MCP23017 Port Expander - Projects Made with Cayenne - myDevices Cayenne Community. About This Project The Raspberry Pi comes in the last models with 40 gpio pins and supports many protocols.
For project, maybe in the area of homeautomation or industrial applications, the 40 gpio pins are not enough. An port expander can help in this situation. The most port expanders are connected via I2C or SPI to the Raspberry Pi or microcontroller. The expander provides many input / outputs. What's Connected In my case i use a Raspberry Pi 3 with Cayenne. Setup. Pi My Life Up - DIY Raspberry Pi Projects. Yet more DHT22 sensor code. #!
/usr/bin/env python # 2014-07-11 DHT22.py import timeimport atexit import pigpio class sensor: """ A class to read relative humidity and temperature from the DHT22 sensor. The sensor can be powered from the Pi 3V3 or the Pi 5V rail. Powering from the 3V3 rail is simpler and safer. For 3V3 operation connect pin 1 to 3V3 and pin 4 to ground. Connect pin 2 to a gpio. For 5V operation connect pin 1 to 5V and pin 4 to ground. The following pin 2 connection works for me. 5V--5K_resistor--+--10K_resistor--Ground | DHT22 pin 2 -----+ | gpio ------------+ """ def __init__(self, pi, gpio, LED=None, power=None): """ Instantiate with the Pi and gpio to which the DHT22 output pin is connected. Optionally a LED may be specified. Optionally a gpio used to power the sensor may be specified. Taking readings more often than about once every two seconds will eventually cause the DHT22 to hang. Temperature and Humidity from AM2302/DHT22 Sensor Displayed as Chart.
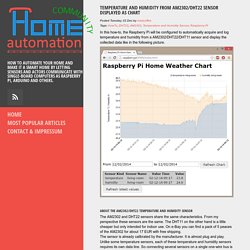
In this how-to, the Raspberry Pi will be configured to automatically acquire and log temperature and humidity from a AM2302/DHT22/DHT11 sensor and display the collected data like in the following picture.
About the AM2302/DHT22 Temperature and Humidity Sensor The AM2302 and DHT22 sensors share the same characteristics. From my perspective these sensors are the same. The DHT11 on the other hand is a little cheaper but only intended for indoor use. On e-Bay you can find a pack of 5 peaces of the AM2302 for about 17 EUR with free shipping. Needed Parts. Yet more DHT22 sensor code. Raspberry Pi - WiFi/Ethernet. Raspberry Pi has become a widely used device, not only for prototyping and educational purposes, but also for production projects within companies.
Besides its small size, low cost and fully operational Linux OS, the greatest difference from your Destkop PC lies in its ability to interact with other peripherals through GPIO pins (General Purpose Input/Ourput Pins). This allows you to code pretty robust hardware applications without having to be an expert in embedded electronics. At the end of this guide you’ll be able to read and send data values from your Pi to Ubidots. Requirements To complete this tutorial, you’ll need: A Raspberry Pi connected to the Internet Setup This guide assumes your Raspberry Pi has been configured and is already connected to the Internet. If you’re using a WiFi dongle, we suggest using Wicd to manage your WiFi connection. Install Ubidots’ Python Library Check your Internet connection $ ping -c 2 8.8.8.8 You should see a response like this: Update apt-get repositories:
Setup WiFi on Raspberry Pi using Wicd. An essential part of the Internet of Things is having objects speak to each other wirelessly.
Raspberry Pi's are a great way to do this because of the low cost of available Wifi dongles and the ease of setting them up. In a previous tutorial we covered how to setup your Raspberry Pi WiFi by manipulating the /etc/network/interfaces file directly. While this approach is pretty straightforward, it has some disadvantages: It doesn’t handle all types of encryptions (WPA, WPK, etc.)If the connection drops, it won't be re-established automaticallyIt doesn’t provide a simple interface to manage the connection, making it hard to troubleshoot Hardware Needed In this tutorial we’ll setup wifi on Raspberry Pi using the TP-Link TL-WN725N usb wifi adapter.
Step 1 First of all, make sure the WiFi dongle is plugged in before booting up your Raspberry Pi. Sudo aptitude install wicd-curses Step 2 Wicd is a well known package to manage wifi networks from any Linux computer. Sudo wicd-curses Step 3 What to do next? Raspberry Pi - Documentation - Documentation.