
Flipped Cream Blouse. Grandmother’s Cream Blouse. Grandma’s Skirt to Blouse. Let me begin with my inspiration.
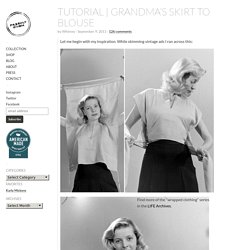
While skimming vintage ads I ran across this: You Will Need: 1. Fabric (Mine measured 56×34 inches. However, you can judge this based on your size and the length you prefer. This was more than enough for the shirt and strap.) 2. Here’s the skirt from my grandmother: And here it is after I took it apart. Fold your fabric in half. {Excuse my feet…hehe} This next part depends on how long you want your shirt AND how big you want your straps. You will then hem all sides on the straps. I have finished hemming at this point. Now sew the ends of the straps together to make one long strap. Sew strap along the base of the BACK flap. Simple Bow Tie Top. I'm so happy about how this turned out.
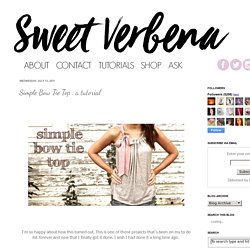
This is one of those projects that's been on my to do list forever and now that I finally got it done, I wish I had done it a long time ago. This is such a simple project. One of the easiest I've ever made. Don't have much sewing experience? Give this a go, I promise it's a piece of cake and any mistakes made are hardly noticeable because of the gather. Materials: 5/6 + yard knit & 1/3 yard silk, cotton, etc. My knit is 60" wide and my dusty pink silk (faux) is 45" wide. Your fabric doesn't have to be exactly as wide as mine, just keep in mind that if you buy a fabric that is less wide you may need to purchase more to compensate.
Cut two large squares to the dimensions of 30" x 30" If you bought 5/6 yd of 60" fabric all you have to do is cut along the fold line. Sharpie Tie Dye Shirt. This is a great project for kids, or adults.
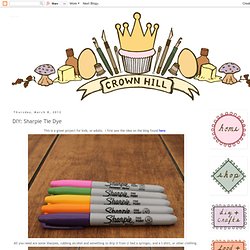
I first saw the idea on the blog found here. All you need are some Sharpies, rubbing alcohol and something to drip it from (I had a syringe), and a t-shirt, or other clothing. I put a piece of cardboard in my tank top to prevent bleeding. Step 1: Use the Sharpies to make marks on your t-shirt. Step 2: Drip some drops of rubbing alcohol. Watch your design expand Step 3: Dry your t-shirt completely before washing. After I washed it the colors faded, but I still like the look: TIP: After drying the shirt with a hair dryer, allow it to set for 24 hours before washing.
Tank Tops from old Tee. Flower Headbands Lets Start Here: You can use any type of fabric.
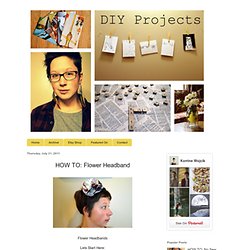
I chose something thicker with a busy pattern. Use a (very) small bowl or medium/small lid to trace your large circles. The bigger the circle the bigger the flower will be in the end. 9: Large (mine are 4 1/2 inches wide, so my flower is pretty big) 1: Medium (1/4 to 1/2 inch smaller than the large circle) 1: Small (1inch wide) I traced the top of a small bowl for my large circles and the bottom for my medium one. (*the next photo should read: Take ONE of the large circles and lay flat) If you chose a fabric that has a pattern you can choose to have the pattern side up or down. (Sew the Bottom Tip of the Bud into the front/center part of flower ) After the bud is sewn in: Embroidered Top. I'm very happy to finally show this tutorial I made for the last issue of Kireei magazine.
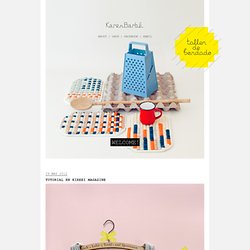
It's about using simple embroidery stitches and some colour for giving new life to a worn garment. Find the rest of the tutorial in number 2 of Kireei mag. Estoy muy feliz de poder al fin mostrarles este tutorial que hice para el último número de la revista Kireei. Se trata de usar puntadas simples de bordado y algo de color para dar nueva vida a una prenda ya desgastada.
Encuentra el resto del tutorial en la revista número 2 de Kireei mag. Knockout Stenciling. Shirt Recon. A shirt 2 short 2 a singlet just right :P So you may have seen my plea for help on the "help" board on co+k.
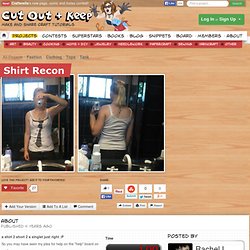
Basically my boobs grew, i used to be quite flat, but not anymore - as a result, all my shirts are now too short! This is what i came up with (sorry theres no before pic, but imagine a t shirt hanging over my boobs like a tent and up to my belly button) so what i did was get a singlet that does actually fit and measure the width for the torso so the singlet will be fitted (or just measure your stomach). then i pinned and sewed the torso part amd trimmed excess. i then took off the sleeves, and unpicked the shoulder part of the shirt so now its jst a big tube. i unpicked all seams on sleeves and ironed them flat, then folded in half and sewed a strap of desired width (1 1/2"), trimmed excess and turned right side out. i put on the "tube" and measure how long i needed the straps to be (this is how i got the length back to my shirt)sew straps on tada!
Xxoxox rach. *No Sew* Cute Halter Shirt/Tunic From A Old Oversized Shirt.