
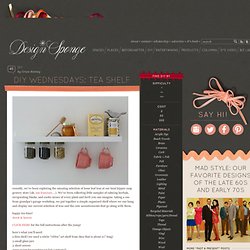
HAIR STUFF IN CHIC ORDER. Photos & post by Kristin Ess If you’re a girl on the go, you’re probably familiar with the magical mystical “bathroom tornado”.

It comes through scattering everything everywhere, leaving no bobbypin unturned. No one knows how it happens, but it’s a huge bummer when you return home from a long day to find this natural disaster has struck your bathroom counter once again. Luckily there’s a way to keep your hair stuff (or makeup brushes) all together in one super chic place. These holders are made from Mason jars which are incredibly cheap and easy to find. You will need: blue painter’s tape, paper towels, gloves, white flat spray paint, gold metallic spray paint, mason jars in various sizes… (and I used a vintage shot glass for the bobbypin holder, but that’s optional.) Remove the lids from your mason jars.Put painter’s tape along the edge of a paper towel or two.Wrap the jar. Related posts: A solution to getting my boxes up. Rustic herb crates knock off. Drawer Magazine Holders.
Accessories Published on March 26th, 2012 | by Jules IKEAHacker Materials: Knuff , Svep (handle), walnut stain, black paint Description: A fast, small, and great makeover for Ikea’s KNUFF magazine holder.

First I stained them with color walnut, then painted the end black with water based paint. Waited half an hour, and scraped off some paint. Tea Shelf. Recently, we’ve been exploring the amazing selection of loose leaf teas at our local hippie coop grocery store (oh, san francisco….).
We’ve been collecting little samples of calming herbals, invigorating blacks, and exotic mixes of every plant and herb you can imagine. taking a cue from grandpa’s garage workshop, we put together a simple organized shelf where we can hang and display our current selection of teas and the cute accoutrements that go along with them. happy tea time! Derek & lauren CLICK HERE for the full instructions after the jump! No-interfacing Storage Basket Tutorial. As promised, a recipe for making washable stand-up storage baskets: You'll need to cut 2 of each of these pieces (click on the pic to enlarge it to a readable size).
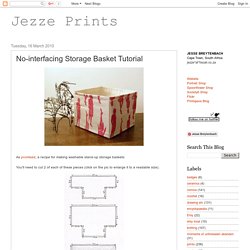
The measurements are in centimetres because that's the way I was brought up (sorry). A seam allowance of 1cm is included in these measurements. This basket's base is 15cm wide, but you could make any size using this slightly haphazard formula, where x is the width of the base and y is the height of the basket. And 2 is cm and seam allowance. Pieces cut, sew right sides together along these seams: Sew the boxed corners of the linings by folding the pieces open, matching the side seams with the bottom seams, and stitching across: Zig-zag the top edge of the smaller lining piece. Hem the bottom edge of the outer sleeve piece, turning up 1cm all round and stitching it down.
Turn the lining pieces so that their right side faces out, and slide the outer sleeve over. Recycled Paper Basket. Thanks to a few recent online purchases, I had an enormous pile of long brown packing paper strips in my studio.
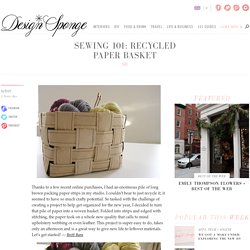
I couldn’t bear to just recycle it; it seemed to have so much crafty potential. So tasked with the challenge of creating a project to help get organized for the new year, I decided to turn that pile of paper into a woven basket. Folded into strips and edged with stitching, the paper took on a whole new quality that calls to mind upholstery webbing or even leather. This project is super easy to do, takes only an afternoon and is a great way to give new life to leftover materials. Let’s get started! Read the full how-to after the jump! Materials long lengths of paper (I used packing paper, but wallpaper scraps or gift wrap would work great, too.)sewing machineglue or hot gluepaperclips Instructions 1.
Starting with a large piece of paper (mine was 30″ wide), begin folding the strips. Visual Boxes. Moppe Card Catalog Jewelry Box. Moppe Published on July 15th, 2012 | by Jules IKEAHacker Materials: Moppe Drawers, Craft paint in black and burnt umber, Crackle medium, Light grey paint (we used Analytical Grey by Sherwin Williams), Paint brush, Metal ruler or scraper, Sandpaper, Adhesive metal bookplate (Martha Stewart), Handles (we used these from Lee Valley), Lint free white cloth/rag, Natural and Dark Finishing Paste Wax, Ink pen Description: 1.
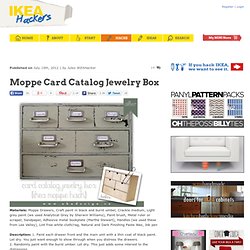
Paint each drawer front and the main unit with a thin coat of black paint. Let dry. 4. See more of the Card Catalog Jewelry Box. The Anthro bookcase. Have you ever seen something in a catalog, gawked at the price tag, and thought ‘I could totally make that?

‘ That was my reaction to this bookcase in the Anthro catalog. Cool vintage books, beautiful bookcase, but why the heck does it cost $1400? So I set off to make my own. The case is custom made to fit certain books.