
Anthro-Inspired Mirror. You all know we love a good Anthropologie knockoff around here – so a couple of days ago when I was browsing online I came across this mirror.
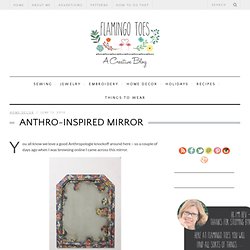
Oh I definitely need that. Hold the presses – did that say $498??? Huh. We can do better than that. :) So after scouring the thrift shops, cutting myself on mirror glass, and overcoming an unreasonable fear of Mod Podge, here is my version! (Bear with me here – taking a picture of a mirror is a bit tricky. Ready for the tutorial? You’ll need: A MirrorEasy Off Oven CleanerFabric (enough to cover the frame and the back of the mirror)Mod PodgeA Staple Gun or other framing tool I went searching for a method to removing silvering and came across a great tutorial at Mitzi’s Collectibles. I started with a frame that I found at the thrift store. Obviously not clean. We actually had to ask on this one – because it just said 1951. $19.51 seemed way to high – and it was. Start by taking your mirror out of the frame. Lay your mirror down on a protected surface.
DIY! 7 new stylish ways to de-clutter your beauty closet. D.i.y. scrap recycle site. Wall decor. Lighting fixtures. - StumbleUpon. Hi friends! I can't tell you how excited I am to be a creative guest on Ucreate today! I've been bubbling with excitement for weeks and have been scheming over what project would be Ucreate-worthy. I hope this one fits the bill...! First of all, I'm Autie and my friend Jen and I blog over at iCandy handmade. I'm a busy mom of 2 cute little kids and during nap time and bed time, I love to work on projects! The project that I thought I'd share with you today started out with these. The drawer does not open, but the cupboard door does...and it leaves about an inch of space to keep something in it...like art masterpieces of a few sheets of homework paper...hmmmm I bounced some ideas off of Jen, and this is what I came up with...I give you the Cupboard Door into Art Desk Tutorial I made one for each of my littles, and so far, they're totally diggin' it!
If you want to know what I did, here's a quick run-down on what I did: I wanted to use the drawer as a supply holder. Here we are so far: -Autie. Money Money Money. Ready to see my mystery office desktop?
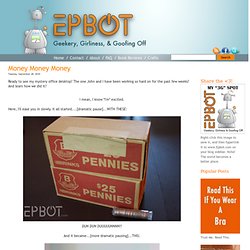
The one John and I have been working so hard on for the past few weeks? And learn how we did it? I mean, I know *I'm* excited. Here, I'll ease you in slowly. It all started.... And it became... Ta-DA! Ok, that's not the best shot. Oooh. Now, on to the photo-intensive tutorial/progress shots! First, if you want your top to have any shine to it, you're going to need to polish up some of the pennies you're using.
Fill your bowl about a quarter of the way with pennies, pour in a little Tarn-X, and then swish and shake the bowl around over the sink (in case of splashes) to evenly expose the coins to the liquid. From there, dump the batch onto an old towel to dry them: I polished roughly half of the pennies I planned to use, so there would still be plenty of color variation. Next you're going to need a surface to adhere the pennies to. This fits in a cubby between two bookshelves, so only the front edge is rounded prettily. Well, we used these: Bottle Cap Table with Poured Resin Surface. Magic Fence with marbles. Hanging Boat Bed.
Lapicero1.jpg from inhabitat.com - StumbleUpon. Search results for vase.