
Flux de création de fichiers GCODE avec des outils libres. Après le petit tutoriel de ce matin, voici un post qui résume le « flux de production » de mes fichiers GCODE.
La base Tout commence par l’objet indipensable à la prise de mesure: le pied à coulisse. Les matériaux Une fois l’objet à créer correctement dimensionné, il faut trouver le matériau dans lequel on va le créer. Petit tutoriel vidéo pour utiliser LibreCAD, HeeksCAD et HeeksCNC. Joging GRBL with a rotary dial (MPG) · Issue #243 · grbl/grbl. Jonathan Keep, Self build Delta 3D printer. Annoyed and frustrated by 3D Systems buying out and then stopping the production of the RapMan 3D printer. This was the first kit printer Belgian design duo Unfold adapted to print with clay and has subsequently been copied and widely used by others, I decided to develop my own replacement 3D printer.
Based on the delta type of 3D printer my aim has been to use parts that can either be made with basic DIY tools and skills, or ordered off the internet. The design is specifically for printing in clay but could be adapted to work with other materials. Headless - ShapeOko. SD Support A few years back, almost immediately after finding grbl, I became obsessed with the idea of creating a truly headless CNC machine.
A couple of reasons: Having a full sized computer next to the machine made it look silly. Having a full sized laptop next to the machine made it look silly. But, mainly because the only reason a computer was needed at all was to push simple text across tx/rx lines and that seemed like a waste to me. The idea of course was to have an SD card loaded with programs (gcode), and send those programs over to grbl without the need for a computer. I never even messed with the idea of putting SD reader functionality into grbl, thinking there wouldn't be enough room and (to be honest) really having no idea how to incorporate such a task into the existing code. Arduino et GRBL - l'incontournable solution pour piloter une petite CNC. Choix de la version Beaucoup d'améliorations sont régulièrement faites sur GRBL.

J'ai donc choisi de documenter comment travailler sur la dernière version extraite de GitHub. What softwares do i need for an adafruit motor shield cnc? (sof) It helps if you provide a link to the motor shield that you have.
Since you say it has the L293D chip, it must be the older Adafruit Motor Shield: There is a library written by Adafruit to control it, at the link above. I don't really like that shield, as it is not a chopper (PWM) driver. That means if they are 5V steppers, you use 5V to drive them, if they are 3V steppers, you must use a resistor of the appropriate value because that L293D chip (please use capital letters where appropriate, as lowercase "L" looks like a one) requires at least 5V for the motor supply. If they are 8V steppers, you must drive them with 8V. And the steppers lose torque rather quickly when you speed them up.
I prefer the Pololu chopper stepper drivers, they use a higher voltage to drive the steppers, and regulate current with PWM automatically. The newer Adafruit motor shield uses different, higher current chopper (PWM) chips. Controlling a Stepper Motor with an Arduino Part 2. This is an update to my first post about connecting a stepper motor to an Arduino or other microcontroller.
Wiring it up This is a basic transistor circuit set up as a switch. It can also be called an open collector configuration since when it’s on it essentially connects what is on the output to ground. This type of circuit is useful for things like motors or lights where you are simply turning something on or off and need to provide more current than the microcontroller can. When it’s “on” it connects the output to ground and can pass a relatively large current through the transistor. RAMPS1.4 and using AccelStepper or Stepper arduino library.
I am starting to dig into these, the below code is what is being used to test all parts of a ramp 1.4 setup. it is slightly diff from a std code being circulated around the web, jus to suit my own testing. iirc max/min pins are physical limit switch logics operationally, i think it is possible to use "enable" pins like a emergency stop switch. dir n step are pretty str8 forward, direction of stepper rotation ... n steps :p.
Topic: Quadrature output (ULN2803 type) - how to? (1/2) Microstepping, Full Step & Half Step. There are three commonly used excitation modes for step motors; these are full step, half step and microstepping.
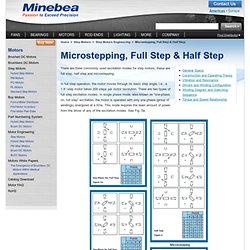
In full step operation, the motor moves through its basic step angle, i.e., a 1.8° step motor takes 200 steps per motor revolution. There are two types of full step excitation modes. In single phase mode, also known as “one-phase on, full step” excitation, the motor is operated with only one phase (group of windings) energized at a time. This mode requires the least amount of power from the driver of any of the excitation modes. See Fig. 5a. In dual phase mode, also known as “two-phase on, full step” excitation, the motor is operated with both phases energized at the same time.
[Tuto] Inkscape/Gcode tools + image = gcode (100% gratuit!) : FAO général. Difficulté : très facile Temps : rapide (5min) hors installation Bonsoir, ______________________________________Introduction :______________________________________Je vais vous présenter une manière simple de transformer un dessin en parcours d'outil GCODE avec "Inkscape" et son extension "Gcode tools" tout 2 des logiciels libre et gatuit.
![[Tuto] Inkscape/Gcode tools + image = gcode (100% gratuit!) : FAO général](http://cdn.pearltrees.com/s/pic/th/inkscape-gratuit-usinages-73647578)
Inkscape est un puissant logiciel de dessin vectoriel à vocation "artistique", le dessin y est enregistré sous forme d'équations de courbes (chemins) et non par des pixels comme les images bitmap. Ce programme est vaste (mais très bien fait), les fonctions qui nous intéresse dans le cadre de ce tutoriel c'est qu'il permet d'ouvrir un nombre très important de type d'image (PS, DXF, PDF, SVG, PNG, JPG, BMP, XCF,...) et qu'il est capable de transformer des images bitmap en image vectorielle.