
Create a Highlighted Text Effect With Adobe InDesign. Sometimes using a highlighted effect text gives a stronger emphasis and style to your design.
In this quick tip we are going to achieve that effect by utilizing Paragraph Rules in Adobe InDesign. Let's begin! Step 1: Insert text Create a new document at any size you want. Then insert the text that you are going to highlight. Top 7 Photoshop Keyboard Shortcuts for Productivity. This is a list of my top 7 (or so) favorite and most used Photoshop keyboard shortcuts.
Some might be obvious to you, some you might already know, and some might be new to you. Feel free to add your own below. There’s nothing more damaging to your productivity than having to wrestle with the program you are using to get it to do what you want. Searching for tools or buttons is a task that can easily be bypassed with some quick memorization of shortcuts. Undo, Multiple Times. Photoshop Secret Shortcuts. It is proven that by using software shortcuts can boost up productivity.
Here are 30 secret Photoshop shortcuts that I’ve learned from years of experience. Well, what I mean by "secret" is that these shortcuts are not documented in the menus. Keep reading and you will find how these shortcuts can speed up your productivity. Tutorials > Scripting Photoshop, Part 1 — An Introduction. Whether it's automating tedious tasks, customizing commands, or adding new features, scripting makes almost anything possible in Adobe Photoshop.
The ability to script Photoshop debuted back in version seven as an optional plugin that could be downloaded from Adobe's website . As of version eight (CS), the scripting plugin is installed by default. Now, in version ten (CS3), scripting the backend of Photoshop is more accessible and powerful than it's ever been. Yet despite how long scripting has been part of Photoshop, it's surprising how few people take advantage of it — and even more surprising, is the number of people who aren't even aware that Photoshop can be scripted. The Scripting Advantage So, what's so great about scripting, and what can scripts do that can't be accomplished by traditional actions? Consider, for example, something as simple as toggling the visibility of the current layer (i.e., turning a layer off if it's on, and vice versa). Adobe Illustrator en Español: Alinear Objetos.
Brown Grunge Vintage Texture HD. TUTORIAL: QUICK SITE PLANS - SITE PLAN TUTORIAL. With this tutorial, I wanted to show the workflow that I use to develop a clean looking architectural site plan.
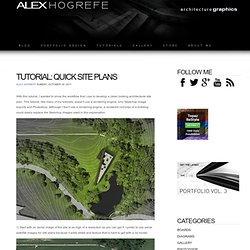
This tutorial, like many of my tutorials, doesn't use a rendering engine, only Sketchup image exports and Photoshop. Although I don't use a rendering engine, a rendered roof plan of a building could easily replace the Sketchup images used in this explanation. 1) Start with an aerial image of the site at as high of a resolution as you can get it. QUICK SECTIONS - quick section - architectural rendering and illustration blog. When I don’t have time to fully render sections in Kerkythea due to time constraints, I fall back on this method to get me out of jams.
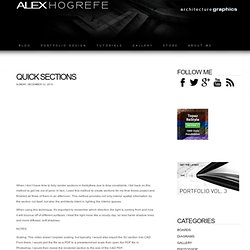
In fact, I used this method to create sections for my final thesis project and finished all three of them in an afternoon. This method provides not only interior spatial information by the section cut itself, but also the architects intent in lighting the interior spaces. When using this technique, it's important to remember which direction the light is coming from and how it will bounce off of different surfaces. I treat the light more like a cloudy day, so less harsh shadow lines and more diffused, soft shadows. Scaling: This video doesn’t explain scaling, but typically, I would also export the SU section into CAD. Landscape Tutorial Continued: Final Post Processing - Final Landscape Post Processing. I posted a landscape video tutorial a few weeks back, however the video did not cover some final post processing steps used for the final look.
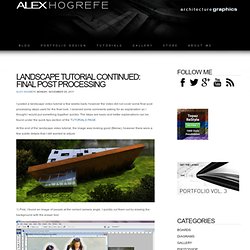
I received some comments asking for an explanation so I thought I would put something together quickly. The steps are basic and better explanations can be found under the quick tips section of the tutorials page. At the end of the landscape video tutorial, the image was looking good (Below), however there were a few subtle details that I still wanted to adjust. QUICK TIPS: GRUNGE - QUICK TIPS: GRUNGE. This tutorial looks at some grunge and sketch overlays to add a little artistic styling to an architecture image and break away from the “fresh from the rendering engine” look that too many architecture presentations have.
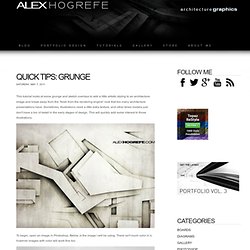
Sometimes, illustrations need a little extra texture, and other times models just don't have a ton of detail in the early stages of design. This will quickly add some interest to those illustrations. To begin, open an image in Photoshop. Below, is the image I will be using. There isn't much color in it, however images with color will work fine too. Grasses & Plants Photoshop. Trees - archiforge.com. Web Design Trend Showcase: Letterpress Text Effect. The trend that has become commonly known as ‘the letterpress effect’ has managed to make its way into a range of website designs.

The effect itself is often added to text headers and buttons, giving an inset or debossed appearance. Take a look at this roundup of great examples of this trend, and follow on to a mini tutorial outlining how to create this effect in your own designs. Deaxon.com SarahLongnecker.com 365DaysOfAstronomy.com AlexBuga.com PowerSet.com ESOrganizers.com LennartBasler.com RyanRoberts.co/uk. Make Photoshop Faster: 2 little tips to help speed up the tool web designers love to hate. Touching up renders with photoshop.
{LaB} » Adobe Photoshop . Perspective Textures. Post-Production Trends in 3D Visualizations. Advertisement Post-production might well be the most underappreciated part of creating 3D visualizations.
It gives you the power to easily make some changes; put in the sky you like, add some dirt, make the colors more vibrant and even correct some little mistakes in your 3D mesh. Most of the traditional 3D artists tried to do as much as possible wihtin their 3D package since these packages were not focusing on post, but rather on the 3D products themselves. Rendering masks for the different color corrections one would like to do was a painstaking job of fixing the lighting and materializing — making artists choose to do most of the work in 3D (such as adding dirt and textures) and so leaving only color correction for post-work. The techniques and styles of correcting images in post-production have changed a lot over the last couple of years. Different Styles of Post-Production This is what a 3D image should look like according to the corporate industry. Same thing here: Techniques. IceflowStudios Design Training - Photoshop: Fake Depth of Field.
Photoshop Depth Of Field Effect Tutorial. Tutorials. 2008-Aug-4 update regarding CS3: Adobe enhanced the lens blur filter in Photoshop CS3 (it now blurs opacity as well as color). So this tutorial only applies to CS2. If you are using Photoshop CS3, please visit the tutorial, "Simulating Depth of Field using Photoshop Lens Blur Filter--2nd Edition" instead. How to Add a Glow Effect to Bright Objects. Here is a short tutorial on how to add a glow effect to self illuminated objects in photoshop. Open the rendering that you want to edit in photoshop and make a copy of the layer. On the upper layer, select the bright areas that you want to apply the glow on, using the magnetic lasso or the polygonal lasso tool.
(Alternatively you could render an alpha channel for that specific part of the object so that you don’t need to select anything afterwards). After having selected all the needed parts, chose a large brush with white color and paint the selected area like in the image below: Now invert the selection by pressing ctr+shit+I (all at once) and paint the new selection black.. 25 beautiful dreamy effect photoshop tutorials - 15 November 2010 - Poetry, Writings, Art, Design. Below . 1. 28 Powerful Photoshop Lighting Effects. There is something about beautiful lights that can mesmerize an audience. Take a fireworks show for example. It’s been around for thousands of years, yet still has the power to put looks of amazement on faces of all ages. That’s why lighting effects make such powerful design elements. How to do good bloom for HDR rendering « Thoughts Serializer.
One thing that makes HDR rendering impressive is the bloom effect. *BB Special* 3 Ways: VECTOR HALFTONES from RASTER Images *BB Special* 3 Ways: VECTOR HALFTONES from RASTER Images. SketchUp and Photoshop. SketchUp and Photoshop based tutorials (sometimes additional software depending on tutorial). Learn how to perfect your modeling with new post-processing skills, techniques and easy to follow step by step instructions provided by highly talented professional contributors.
DAYTIME RENDERING: SKETCHUP TO PHOTOSHOP - Daytime rendering tutorial - architectural rendering and illustration blog.