
DIY Wine Bottle Cups - MAIYA - MY ADVENTURE IS YOUR ADVANTAGE. Blogger pal Tyler of Plastolux posted a sweet DIY project today, one which I thought you'd all appreciate.
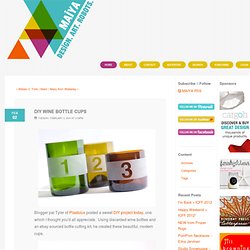
Using discarded wine bottles and an ebay-sourced bottle cutting kit, he created these beautiful, modern cups. The patterns were created by sandblasting over vinyl stickers. If you don't have access to a sandblaster, one of those glass etching creams would probably do the trick. Anyway, check out his post for more details about the project. For instant gratification, stop by his Etsy shop and pick up a finished cup or two. How to Make Cherry Blossom Lights - StumbleUpon. Tiny Polaroid Magnets. Hi there!
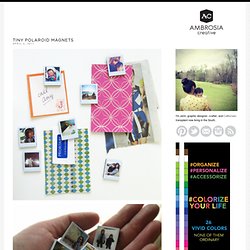
It’s felt like forever since I’ve last blogged, and has felt like an eternity since I’ve done anything crafty and nifty. Since my morning sickness has gone into full speed (yes, we’re expecting our third this fall!) I haven’t felt like myself. But nothing like inspiration to wake one out of a reverie — or nightmare, in my constantly sick state. I came across these DIY Pantone chip magnets on How About Orange and wanted to do something similar. You will need: Cardboard (mine was the backing of a sketchbook — much thicker than the back of a regular spiral bound notebook) or 2-3 sheets of white cardstock or poster board spray-mounted together to use as a sturdy backing to the magnetsOpaque white marker (necessary only if your cardboard is not white) Craft knife Metal straight edge/ruler Clear packing tape or frisk film. Step 1: Download a Photoshop file of the Polaroid frames below. Step 2: Print out photos onto photo paper.
Step 4: Trim out photos with craft knife. 487 Comments. Spring Scrapbook Paper Tree. Hello fellow crafters!
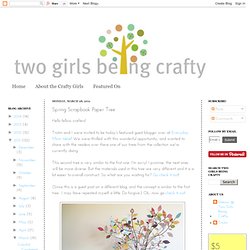
Tristin and I were invited to be today's featured guest blogger over at Everyday Mom Ideas! We were thrilled with this wonderful opportunity, and wanted to share with the readers over there one of our trees from the collection we're currently doing. This second tree is very similar to the first one. I'm sorry! I promise, the next ones will be more diverse. (Since this is a guest post on a different blog, and the concept is similar to the first tree.. Thanks, Julia, for having us on your blog! Paper Flowers – Anyone Can Do That.
Japanese Kusudama, this tutorial is featured on Craftuts Anyone can do that, I assure you.

The proof: I can, just take a quick look at my result below. And, believe me, I am neither meticulous nor particularly patient. You could even say I’m the opposite. Below you can see my very first attempt to create paper flowers. What you will need to make your own Kusudama paper ball? 1. 3. 4. (optionally) I prefer torn paper instead of cut. You have to start with a single petal. Now you have to glue your 5 petals into a flower. Apply the glue to only one side of each petal, except for the last one, in this case cover both sides with glue. Your first flower is done. Don’t glue every petal right after you make it. When all 12 flowers are finished you have to glue them together. When two halves of Kusudama Flower Ball are ready you have to glue them together.
Things we make, bake and photograph: Things I'm loving this week: mason jars. I love mason jars.

I know everyone loves mason jars right now, but that's okay, I love them anyway. I've been using them for years to store buttons and ribbon and dry beans, and we used them at our wedding as flower vases with lace tied around the top. They are just so lovely. Here are some fantastic things on Etsy right now that are mason jar-related: A mason jar stamp! I've seen several tutorials lately on how to make mason jars into soap dispensers.
These are also adorable. These organic, hand-printed towels from madder root would match our kitchen chairs perfectly. Bottle (w)rap. I drink a lot of wine.
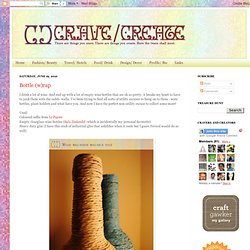
And end up with a lot of empty wine bottles that are oh so pretty, it breaks my heart to have to junk them with the raddi- walla. I've been trying to find all sorts of utility excuses to hang on to them - wate bottles, plant holders and what have you. And now I have the perfect non-utility excuse to collect some more!
Used: Coloured raffia from Le Papier Empty clearglass wine bottles (Sula Zinfandel -which is incidentally my personal favourite) Heavy duty glue (I have this stick of industrial glue that solidifies when it cools but I guess Fevicol would do as well) Starting at the bottom (cos the top's a bit tricky) starting winding the raffia tightly around the bottle, pausing to add a bit of adhesive every now and then. Edited to add: A couple of months later some more string arrived. And about half a dozen wine bottles later, here's what happened: