
DIY: Furniture Makeovers. I'm obsessed with making-over old, worn out furniture.

It's amazing how almost any old piece can be totally transformed with new paint, hardware and a little imagination! Here are three examples from Ladies Home Journal...click here to read the entire article. Out-dated side table with stone top transformed into a bright and cheerful accent piece! *First they removed the hardware and stone top, sanded the table all over, and applied a coat of primer.
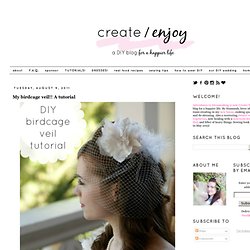
*Then they gave it two coats of semigloss latex paint in a lively citrus hue. *They cut a length of seagrass wallpaper to fit the inset and topped it with a pane of 1/4-inch glass. My birdcage veil!! A tutorial. I have been inspired by a lot of veils in the past few months.
Lots. DIY Halloween: The Carrie Bradshaw Costume. The first winner of my DIY Halloween Costume Guest Blogger Series is… Laura Pifer!
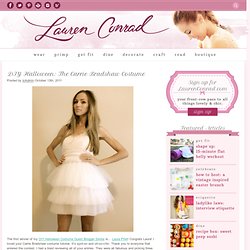
Congrats Laura! I loved your Carrie Bradshaw costume tutorial. It’s spot-on and oh-so-chic. Thank you to everyone that entered the contest. I had a blast reviewing all of your entries. Without further ado, here is Laura’s Carrie Bradshaw costume tutorial on how to make Carrie’s iconic Sex & the City tutu skirt. XO Lauren “People had reservations about the tutu in the opening sequence,” Sarah Jessica Parker told EW in 2003. Turn Paint Chips into a Dry Erase Calendar.
How to build the Best DIY Beauty Dish – www.ishootshows.com. For anyone doing portrait work, the term “beauty dish” is bound to crop up sometime or another, whether it’s reading Strobist, looking at the technical notes from shoots, or simply surfing for more gear you don’t need.

Over the last year, there’s been a lot of interest in DIY (do it yourself) beauty dishes, made of everything from plastic salad bowls to aluminum turkey roasting pans. With the annual slowdown of concert season this winter, I decided to undertake my own DIY project and set out to see what this beauty dish business was all about. About $20, one Nikon SB-900 speedlight, and a bit of work later, and here are the results. The Anatomy of a Beauty Dish The principle of a beauty dish is relatively simple: flash is fired through the back of a large concave dish into a smaller reflector, which returns the flash into the bowl for an outward projection of indirect light. Make This - DIY Shoes - Part 7 - Ballet Flat Upper - Luxe DIY - How Did You Make This? After six parts of this project that explained how to make a pattern and every basic part of shoe construction we’ve finally gotten to the part where you can make a real, wearable shoe.
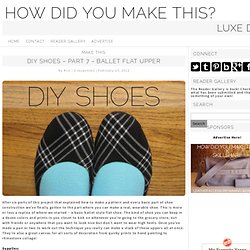
This is more or less a replica of where we started – a basic ballet style flat shoe. The kind of shoe you can keep in a dozen colors and prints in you closet to kick on whenever you’re going to the grocery store, out with friends or anywhere that you want to look nice but don’t want to wear high heels. Once you’ve made a pair or two to work out the technique you really can make a stack of these uppers all at once. They’re also a great canvas for all sorts of decoration from quirky prints to hand painting to rhinestone collage!
Use your basic pattern, including any modifications you’ve made for an improved fit. 1. 2. 3. 4. 5. 6. 7. 8. 9. 10. 11. 12. Make This - Lace Trimmed Envelopes - Luxe DIY - How Did You Make This? Add a special touch to an invitation, a thank you note or any other correspondence with a bit of flat lace.
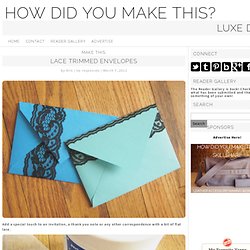
Supplies: - cut and folded (but preferably not glued) envelope(s) - YES paste or other paper friendly glue - glue brush - flat lace - waxed paper Cut out and pre-fold your envelopes. Use your favorite envelope template or download ours here! Cut lace a bit longer than what will fit where you’re sticking it. Place the lace face down (if it has a front and back) on the waxed paper. Press the lace onto the envelope, then allow to dry. Make This - Feature Stone Bracelet - Luxe DIY - How Did You Make This? One current fashion trend that I have been enjoying recently is bringing bits of nature into what you wear.
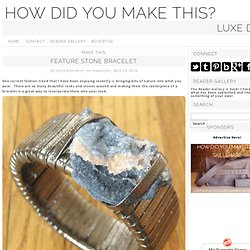
There are so many beautiful rocks and stones around and making them the centerpiece of a bracelet is a great way to incorporate them into your look. Supplies: - A stone or rock that you want to feature - A basic bracelet – the one I used came from our sponsor DIY Bangles - Craft Lace (typically located with leatherworking supplies or trimmings) - E6000 glue - Small clamps - A toothpick or similar object to spread the glue - An old toothbrush (to remove glue that comes up between the lacing) Directions are located below the image collage.
This project is actually very simple and easy. Spread some glue along approximately 1″ of the inside and outside of the bracelet. Work your way around the bracelet spreading glue as you go. Wrap the original lacing around the bracelet (leaving the new end you just added free) approximately the width of the stone. Technique - Classic Chevron Friendship Bracelet - Luxe DIY - How Did You Make This? Friendship bracelets are one of those accessories that have stayed popular through time and around the world.
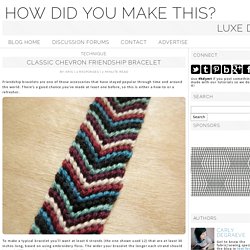
There’s a good chance you’ve made at least one before, so this is either a how-to or a refresher. To make a typical bracelet you’ll want at least 6 strands (the one shown used 12) that are at least 30 inches long, based on using embroidery floss. The wider your bracelet the longer each strand should be, and different kinds of thread/yarn will affect your yardage needs. I remember from my drama filled late elementary/junior high days that there were two very different ways to handle the closure. One camp insisted on a loop at the top that the braided tail looped through to tie. Friendship bracelets are really made up of lots of half hitch knots. Pin or tape your strings down to something sturdy. Technique - Mounting Embroidery on Art Canvas - Luxe DIY - How Did You Make This? I have seen a lot of stitchwork mounted in frames or in embroidery hoops, but I live in an apartment that is lofty and a little industrial, so I wanted a simpler and more modern way to display my work.
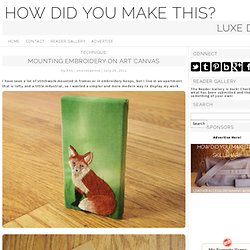
Supplies and Equipment: - embroidered fabric - artist’s stretched canvas (I used something similar to Blick Studio Mini 3/8″ Profile Cotton Canvas) - thread - needle - scissors - mat board (optional) - sawtooth hanger or other art hanging hook (optional) - archival/acid free glue (optional) Artist’s Canvas: Canvas is usually either side stapled or back stapled. Either is fine for this application. The tiny canvases I used are actually glued, that’s okay, too. You could choose to just use stretcher bars and mount your embroidery on that, but it is higher risk and the white canvas seemed to brighten up what I mounted on it.
Planning Ahead Before you start your stitchwork you need to do some planning. I added a basting line around the edge of what would be visible before I started. Make This - Stab Bound Journal - Luxe DIY - How Did You Make This? Make a hand bound journal with elaborate side stitching for yourself or as a gift.
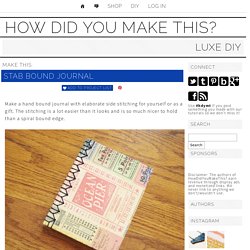
The stitching is a lot easier than it looks and is so much nicer to hold than a spiral bound edge. Supplies and Equipment – sharp utility knife and cutting surface BE VERY CAREFUL WITH THE SHARP BLADE – rulers – drill with 1/16th inch bit OR a small paper punch BE VERY CAREFUL WITH POWER TOOLS – fancy cover paper – I used Cavallini Vintage Tickets Wrapping Paper – 20″ x 28″ – 1 sheet of 8.5×11 for endpapers (this can be fancy or the same paper as your pages) – 10 sheets of 8.5×11 paper for pages – 3 yards of embroidery floss – mat board – I used Crescent No. 33 White & Cream Smooth Mat Board – Yes Stikflat Glue or other archival glue that leaves paper flat – heavy object to use as a weight – waxed paper – cutting/hole punch template – click here to download – thin cotton or linen fabric (optional) – needle with an eye large enough to fit embroidery floss – brush for glue Stitch down through the next hole. How to Make an Ocarina Out of Glass. How to Make an Ocarina.
How To.