
Anthropologie Inspired Necklace Tutorial. Anthropologie is one of my favorite placer to turn into for inspiration, they don’t just have the most creative awesome and eco-friendly displays, they always have super cute clothes and accessories!

So today I will show you how easy is to make one of this little necklace: And in case you wondered my inspiration were this wonderful necklaces: [ is & is ] [Click Images to Enlarge] Note: Try to find the thinest fabric you can to make this because if the knots are just as big as the pearls you loose the effect. I love how simple and how cute it is! * This tutorial is provided for personal, non-commercial use only. Tags: accessories, anthro, Anthropologie, flower, handmade, necklace, tutorial. ▒ 아트비즈 - 비즈공예전문점 ▒ 비즈공예재료,비즈공예도안,DIY,악세사리,핫픽스모티브. Best Bet: Totem Pole Earrings. Simply Vintagegirl Blog » Blog Archive » Tutorial: How to Make Lovely Fabric Flowers. 29 May 2010 These elegant fabric flowers are very simple to make . . . and only take a few basic supplies.
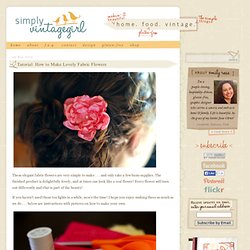
The finished product is delightfully lovely, and at times can look like a real flower! Every flower will turn out differently and that is part of the beauty! If you haven’t used those tea lights in a while, now’s the time! I hope you enjoy making these as much as we do . . . below are instructions with pictures on how to make your own.
Supplies: · Synthetic Silky Fabric · Scissors · Candle (preferably a tea light) Additional supplies: · Needle and Thread, Glue Dots or Glue Gun · Buttons and/or Beads Directions: 1. Make the largest one’s diameter about half an inch larger than you want the diameter of the flower, as the petals will end up shrinking a bit. 2. You can also cut around the pattern and skip the drawing part, it just might not be as uniform . . . but with these, uniform isn’t necessary. 3. Cut just inside the drawn lines to make a circle out of the fabric. Braided Headband Tutorial. It's chilly outside here today and I'm loving it!
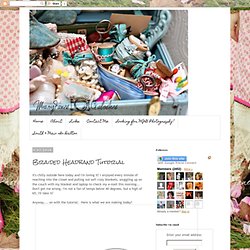
I enjoyed every minute of reaching into the closet and pulling out soft cozy blankets, snuggling up on the couch with my blanket and laptop to check my e-mail this morning... Don't get me wrong, I'm not a fan of temps below 40 degrees, but a high of 65, I'll take it! Anyway.... on with the tutorial. Here is what we are making today! What you need- Thick hair tie Six 1" strips of fabric Bulldog clip or safety pin Sewing machine (or needle and thread) Fabric tac I ripped my fabric strips so they were a bit frayed on the edges, personal choice. Tack each end of the braid just enough that it doesn't come undone . Then tack both braids together on each end, be careful not to twist the braids.
Cut your hair tie so it's one strip of elastic. Sandwich your elastic ends between the ends of your braids on each end, again, careful not to twist the braids. DIY Wrap Bracelet. You should all know by now that we are all about stacking bracelets on our wrists.

The more, the better. In fact . . . the most, the best! With that being said, we’ll show you how to master a version of the ever so popular wrap bracelet. It’s so simple and addicting, you’ll soon be churning out these wristlets with your eyes closed. Clearly this arm party train isn’t stopping and it’s about time you get on board!
You’ll need (for a double wrapped bracelet) :* Lengths will vary depending on the size of your wrist (see comments for suggestions). Fold the length of leather cording in half to form a loop. Place the ball chain along the leather cording with the end of the chain meeting the end of the wrap. Continue wrapping while checking it for fit around the wrist. When you have reached the end of the ball chain wrap the linen cording around the leather strands 2-3 more times. Thread the hex nut through the strands and tie a second knot. Trim with scissors and your wrap bracelet is finished!! DIY : Sailor's Knot Bracelet.
The Adventures of an Urban Socialite™ Top two images from Honestly… WTF (total cost about $5)/ Bottom image from Oak– retail $372.00 Love this clever project from Erica and Lauren of Honestly… WTF… so much so I might even attempt it– I love these bracelets!

The best part is, there are tons of options in terms of hex nuts (they have bronze, steel, etc.) and twine color, size, etc. and the project is super straight-forward. Have fun! Via MCSpice.