
How to Cast-On. Also known as Double Cast-On or Continental Cast-On view video This is my favorite cast on method, I use it almost exclusively.
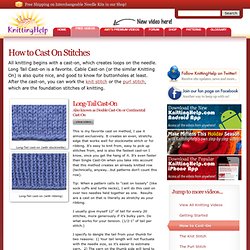
It creates an even, stretchy edge that works well for stockinette stitch or for ribbing. It's easy to knit from, easy to pick up stitches from, and is also the fastest cast-on I know, once you get the hang of it. It's even faster than Single Cast-On when you take into account that this method creates an already knitted row (technically, anyway...but patterns don't count this row). Tip: When a pattern calls to "cast on loosely" (like sock cuffs and turtle necks), I will do this cast on over two needles held together as one. I usually give myself 12" of tail for every 20 stitches, more generously if it's bulky yarn. Alternative Method There is another method of working longtail cast-on, which is a slower to work, called the thumb method. Working Joined Rounds with Single Crochet.
There are a couple of ways (known to me) of crocheting in rounds without turning your work.
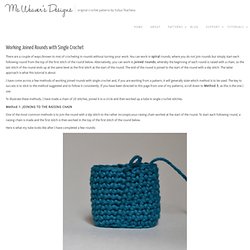
You can work in spiral rounds, where you do not join rounds but simply start each following round from the top of the first stitch of the round below. Alternatively, you can work in joined rounds, whereby the beginning of each round is raised with a chain, so the last stitch of the round ends up at the same level as the first stitch at the start of the round. The end of the round is joined to the start of the round with a slip stitch. The latter approach is what this tutorial is about. I have come across a few methods of working joined rounds with single crochet and, if you are working from a pattern, it will generally state which method is to be used.
To illustrate these methods, I have made a chain of 20 stitches, joined it in a circle and then worked up a tube in single crochet stitches. Method 1: JOINING TO THE RAISING CHAIN. Tutorial: Crocheted Jogless Stripes. A common problem in amigurumi: you want to crochet something striped, but there's this funky looking stairstep "seam" running diagonally where you change colors.
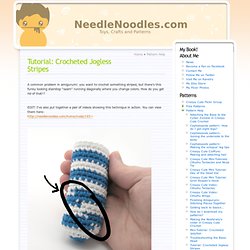
How do you get rid of that!? EDIT: I've also put together a pair of videos showing this technique in action. You can view them here: The easy answer would be to just hide the seam in the back or somewhere else out of notice, but let's say that this option won't work for you, or that you're making a long, spindly striped piece where the seam can't really be hidden. Luckily, I have another solution for you: the crocheted jogless stripe! Click the photo above to read more. Method #1: Jogless Stripes when working in a single crochet spiral Normally, making stripes when working in a spiral leaves a rather messy line where the color changes happen:
How To Make A Crochet Magic Ring. There is definitely a benefit to using a magic ring, or magic circle, over the traditional beginning chain that you slip stitch into a ring.
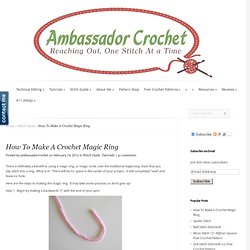
What is it? There will be no space in the center of your project. It will completely “seal” and leave no hole. Here are the steps to making the magic ring. It may take some practice, so don’t give up! Step 1: Begin by making a backwards “J” with the end of your yarn. Step 2: Cross end of yarn behind your yarn coming from the skein. Step 3: At this point you will need to pinch/hold the yarn together where they cross. Step 4: Let yarn from skein fall behind loop.
Step 5: Pull loop all the way through, and up to top of ring. Step 6: Using your middle finger (or any finger that is comfortable) continue to hold the loop you just made, to the top of the ring. Step 7: Chain 1 for sc & hdc patterns. Step 8: Crochet as many stitches in the ring as your pattern calls for. Step 9: Pull yarn end to seal circle. Happy Crocheting! Seamless + symmetrical. November :: mystery crochet project Hooks at the ready!
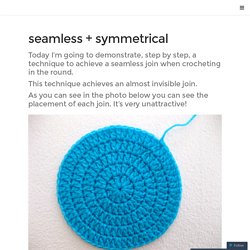
Let's get started with this month's mystery crochet project. To make this project all you need to know how to do is to make a basic granny square. Don't worry if you're just starting out and you are more of a beginner, this post has been… With 43 comments Wool-Eater CAL 2012 Effective, textured, an absolute show-stopper the Wool-Eater has become a favourite among many! With 225 comments Wool-Eater Motif CAL 2013 In 2012 we hooked a square or oblong Wool-Eater . . . 2013, and I thought it would be nice to hook a Wool-Eater Motif Blanket! With 78 comments.